The output layout can be controlled by the OutputLayoutManager object. A default global instance of the OutputLayoutManager exists in every Mission Plan. FreeFlyer allows users to manage the output layout by setting the size and location of output windows through the following ways:
•FreeForm Script •Workspace Tab Drop-Down •Output Window Tab Drop-Down |
You can also use the OutputLayoutManager object to take a screenshot of the whole FreeFlyer output workspace.
The following are a few of the Sample Mission Plans (included with your FreeFlyer installation) that demonstrate the use of OutputLayoutManager:
|
Configuring the OutputLayout through FreeFlyer Script
FreeFlyer allows users to manipulate the workspace output layout using the OutputLayoutManager Object. The default global object OutputLayout provides methods to manage the output windows at any time during the Mission Plan's execution. The OutputLayoutManager can not manage docked windows.
Apply Updates
Once the user has defined the desired output layout using the OutputLayoutManager Object, the user will call OutputLayout.ApplyUpdates() to apply the specified actions.
OutputLayout.ApplyUpdates(); |
Show New Window Behavior
The OutputLayout.ShowNewWindowBehavior() method allows the user to defined how new Windows will appear in the current Workspace.
OutputLayout.ShowNewWindowBehavior = 0; // 0 = Tiles all windows horizontally. OutputLayout.ShowNewWindowBehavior = 1; // 1 = Tiles all windows vertically. OutputLayout.ShowNewWindowBehavior = 2; // 2 = Cascades all windows. OutputLayout.ShowNewWindowBehavior = 3; // 3 = Shows windows without any arrangement. |
Arrange Windows
The OutputLayout.ArrangeWindows() method allows the user to automatically arrange the windows with the syntax:
OutputLayout.ArrangeWindows(0); // Cascade OutputLayout.ArrangeWindows(1); // Tile Horizontal OutputLayout.ArrangeWindows(2); // Tile Vertical |
The OutputLayout.ArrangeWindows() method can also be used to specify a tiling layout in rows or columns. Please note that the ConsoleWindow must be undocked to be arranged with the OuputLayoutManager.
// Row1 - PlotWindow1, PlotWindow2 // Row2 - Console, ViewWindow1, ViewWindow2
OutputLayout.ArrangeWindows(0, // rows {PlotWindow1.ID, PlotWindow2.ID, -1, // indicates new row Console.ID, ViewWindow1.ID, ViewWindow2.ID});
OutputLayout.ApplyUpdates(); |
Hide Window Frames
The user can hide window frames using the syntax:
// Hide the window frame of ViewWindow1 OutputLayout.SetWindowFrameVisibility(ViewWindow1.ID, 0); OutputLayout.ApplyUpdates();
// Hide the window frame of multiple windows OutputLayout.SetWindowFrameVisibility({ViewWindow1.ID, ViewWindow2.ID}, 0); OutputLayout.ApplyUpdates(); |
Hide Output Properties Tab
The user can hide and show the Output Properties Tab using the syntax:
// Hide the Output Properties tab page OutputLayout.ConfigureOutputPropertiesTab(0, 1);
// Show the Output Properties tab page OutputLayout.ConfigureOutputPropertiesTab(0, 2); |
Set Window State
The OutputLayoutManager allows users to minimize, maximize, and return windows to their original size by setting the window state. The user can set the window state using the syntax:
// SetWindowState for PlotWindow1, PlotWindow2, and PlotWindow3
OutputLayout.SetWindowState(PlotWindow1.ID,0); // Normal OutputLayout.SetWindowState(PlotWindow2.ID,1); // Minimized OutputLayout.SetWindowState(PlotWindow3.ID,2); // Maximized
OutputLayout.ApplyUpdates(); |
Set Window Size and Position
The OutputLayout.SetWindowSize() and OutputLayout.SetWindowPosition() allows the user to set the size and location of output windows through FreeFlyer script. The OutputLayout.SetWindowPosition() method sets the position of the top-left corner of a window. The origin (0, 0) is located at the top-left corner of the Workspace. The position can be defined by absolute positioning or proportional positioning. Call OutputLayout.ApplyUpdates() to perform the action.
// SetWindowPosition and SetWindowSize for ViewWindow1
OutputLayout.SetWindowPosition(ViewWindow1.ID, 1, 0, 1, .3); // Proportional positioning (as a percentage of workspace between 0 and 1) // 0% of width, 30% of height
OutputLayout.SetWindowSize(ViewWindow1.ID, 1, .3, 1, .7); // Proportional sizing (as a percentage of workspace between 0 and 1) // 30% of width, 70% of height
OutputLayout.SetWindowPosition(ViewWindow2.ID,0,500,0,0); // Absolute positioning (in pixels) // X-position = 500 pixels, Y-position = 0 pixels
OutputLayout.SetWindowSize(ViewWindow2.ID,0,500,0,500); // Absolute positioning (in pixels) // width = 500 pixels, height = 500 pixels
OutputLayout.ApplyUpdates(); |
For multiple-screen configurations with identical pixel counts and ratios, it's possible to force windows to appear on the second screen or to extend from one screen to the other. To do this with a two-monitor setup, for instance, the position values would range from 0-2 instead of from 0-1 like would be done for a single monitor. This approach can be extended to any monitor configuration, including vertical and horizontal setups, with the same range extension kept in mind for any of the appropriate dimensions.
Note: When the output workspace is resized, all windows inside the workspace will be proportionally rescaled to maintain the same relative layout. This behavior can be disabled in user preferences.
Query the Window Size and Position
You can use the OutputLayout.GetWindowSize() and OutputLayout.GetWindowPosition() methods to query the size and location of output windows through FreeFlyer script. You can also use the OutputLayout.GetScreenSize() method to query the size of the screen in pixels.
Variable width; Variable height;
OutputLayout.GetWindowSize(ViewWindow1.ID, 0, width, 0, height); Report "Window 1 size in pixels", width, height;
OutputLayout.GetScreenSize(width, height); Report "screen size in pixels", width, height; |
Set Workspace to FullScreenMode
The OutputLayout.SetWorkspaceFullScreenMode() method allows the user to make the current workspace go to full screen mode. To exit full screen mode, hit the ESC key.
OutputLayout.SetWorkspaceFullScreenMode(1); |
Unconstrain Output Windows
You can unconstrain output windows from the FreeFlyer Workspace using the OutputLayout.ConstrainToWorkspace() method. Note that you also have access to the output window ID numbers using the OutputLayout.GetWindowsIDs() method.
// GetWindowIDs returns the WindowIDs array of ID numbers for all objects of the specified type WindowIDs = OutputLayout.GetWindowIDs(0); // 0 = All, 1 = Console, 2 = View, 3 = Plot, 4 = Report, 5 = Watch
// Unconstrain all window IDs specified by an array of ID numbers OutputLayout.ConstrainToWorkspace(WindowIDs,0); // All windows within the WindowIDs array returned from the GetWindowIDs method, // 0 = Set window as unconstrained // Unconstrain a single window ID OutputLayout.ConstrainToWorkspace(ViewWindow1.ID,0);
// Apply the Updates OutputLayout.ApplyUpdates(); |
Note: When getting "All" window IDs, the WindowIDs array will by default have one entry, which is the ID of the Global Console. If multiple window objects exist, the global Console ID will be last element of the array.
Set FreeFlyer Main Window Size and Position
The OutputLayout.MainWindowX, OutputLayout.MainWindowY, OutputLayout.MainWindowWidth, OutputLayout.MainWindowHeight properties allow the user to set the size and location of the FreeFlyer main window through FreeFlyer script.
// Set the X coordinate of the top left corner of the FreeFlyer main window OutputLayout.MainWindowX = 0;
// Set the Y coordinate of the top left corner of the FreeFlyer main window OutputLayout.MainWindowY = 0;
// Set the Width of the main FreeFlyer window OutputLayout.MainWindowWidth = 800;
// Set the Height of the main FreeFlyer window OutputLayout.MainWindowHeight = 600;
OutputLayout.ApplyUpdates(); |
Save Workspace Image
You can use the method below to save an image of the whole FreeFlyer output workspace. You can also use the output window SaveImage() methods to take screenshots of individual windows.
// Specify the image type and filename and save a screenshot of the whole output workspace OutputLayout.SaveWorkspaceImage("PNG", "WorkspaceImage.png"); |
Configuring the OutputLayout through the Workspace Tab Drop-Down
By default, each workspace contains the output of a single run of your Mission Plan. You can easily compare output from different runs by switching between workspaces. The maximum number of workspaces is set in the User Preferences on the Display page. The Workspace Tab Drop-Down list allows the user to manipulate the Workspace in the following ways:
•Rename •Move All Output To •Close All Workspaces •Cascade Workspace •Tile Workspace Vertical or Horizontal •Show/Hide Output Properties •Show/Hide Output Window Tabs •Show/Hide Window oShows a list of windows that can be shown/hidden. This menu will also have a Show All or Hide All button if there are multiple windows. •Lock Window Order •Display Workspace in Full Screen Mode •Save Workspace Image |
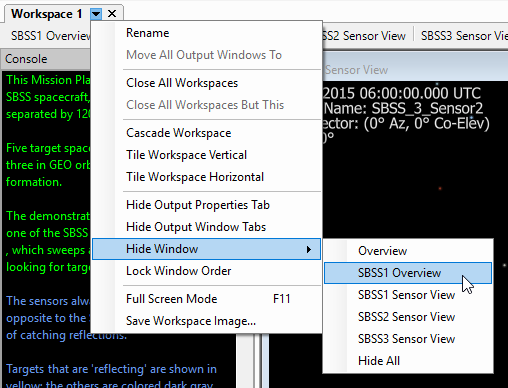
Note: The menu items will say “Show” or “Hide” based on the current visibility.
Configuring the OutputLayout through the Window Tab Drop-Downs
An Output Window on a Workspace can be a DataTableWindow, PlotWindow, ViewWindow, or WatchWindow, or any of the corresponding output commands. Use the drop-down tab on the Window to do the following:
•Print or Export •Move to another Workspace •Constrain/Unconstrain Window from FreeFlyer •Close All Output Windows •Close All But This Window •Display the Window in Full Screen Mode •Show/Hide Window Frame •Re-enable script automation of viewpoint properties •Open the View Properties Editor for more options |
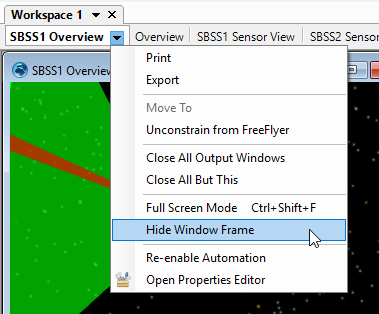
Note: The menu items will say "Show" or "Hide" based on the current visibility.
In addition to the drop-down menu shown above, an Output Window can also be constrained or unconstrained from FreeFlyer using the drop-down menu on the window frame itself, as shown in the images below. This allows any window to be moved to a separate external display. This can be done while the Mission Plan is running, or after completion. The ability to unconstrain output windows is also available through FreeFlyer scripting via the OutputLayoutManager Object, as shown above.
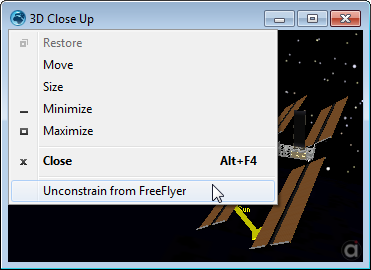
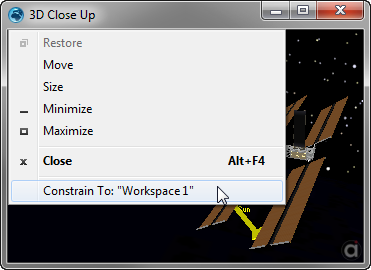
Note: When you click the "Constrain To: Workspace X" option, the window will return to its previous location in the Workspace.
Example: Using the OutputLayoutManager
The OutputLayout Object allows the user to set the size and location of output windows through FreeFlyer script. In this example, three ViewWindows are displayed along with a ConsoleWindow. The script below defines the three ViewWindows and the image displays the output from this script.
// Setup the OutputLayoutManager OutputLayout OutputLayout.ShowNewWindowBehavior = 3; // 3 = Shows windows without any arrangement.
// Hide the Output Properties tab page OutputLayout.ConfigureOutputPropertiesTab(0, 1);
// Hide all Window Frames OutputLayout.SetWindowFrameVisibility({MapView.ID, AbovePlane.ID, Spin.ID}, 0);
// SetWindowPosition and SetWindowSize for MapView ViewWindow OutputLayout.SetWindowPosition(MapView.ID, 1, 0, 1, 0); OutputLayout.SetWindowSize(MapView.ID, 1, 1, 1, 1);
// SetWindowPosition and SetWindowSize for Spin ViewWindow OutputLayout.SetWindowPosition(Spin.ID, 1, .05, 1, .50); OutputLayout.SetWindowSize(Spin.ID, 1, .30, 1, .30);
// SetWindowPosition and SetWindowSize for AbovePlane ViewWindow OutputLayout.SetWindowPosition(AbovePlane.ID, 1, .05, 1, .10); OutputLayout.SetWindowSize(AbovePlane.ID, 1, .30, 1, .30);
// Order Windows OutputLayout.BringWindowToFront(Spin.ID); OutputLayout.BringWindowToFront(AbovePlane.ID); OutputLayout.SendWindowToBack(MapView.ID);
OutputLayout.LockWindowOrder(1);
// Call ApplyUpdates to execute all OutputLayout actions OutputLayout.ApplyUpdates(); |

Output Layout Design for the GPS Operations Demo Sample Mission Plan
See Also