The User Preferences Editor allows you to customize various properties of the FreeFlyer application. To access these options, go to FreeFlyer's Options Menu à Preferences à User Preferences. From this window, you will have access to System-level options, including Home Screen and output display configuration, Mission Plan Default options, and Profile options.

User Preferences in the FreeFlyer Options Menu
System
The system preferences are divided into separate pages as follows.
Startup
From this page, you can choose FreeFlyer's behavior on launch. The options are as follows.
•Create New Mission Plan •Load Default Mission Plan (the Default Mission Plan can be specified on this page as well) •Load Last Opened Mission Plan •Show Empty Environment •Show Home Screen (default) •Show Open Mission Plan Dialog |
Automatic Backups
From this page, you can choose whether to enable or disable Automatic Backups of FreeFlyer Mission Plans. The default save interval is 5 minutes, and this can be set to any integer number of minutes between 1 and 120.
Deprecation Behavior (millisecond or nanosecond)
From this page, you can choose which deprecated items will be shown in the GUI and FreeForm script. You can also determine the deprecated warning behavior. For more information, see the Deprecated Objects, Properties, Methods, and Functions description in the Appendix.
Object Presets (millisecond or nanosecond)
On this page, you can set locations to search for object preset files, select one location to which new presets are exported. Use the Add Path button to add additional search locations, and use the Export Path radio button to select the export location. Several Object Preset files are included in FreeFlyer.
Home Screen
The home screen preferences are divided into separate pages as follows.
General
From this screen, you can Import and Export the Home Screen settings. This feature enables you to easily share your Home Screen with other users. You can also revert to the Home Screen default settings. You can configure the number of recent Mission Plans to be displayed on the Recent Files section of your Home Screen. You can also set the Root Directory to use for relative paths defined within a Widget entry.
Widgets
From this screen, you can configure the Widgets available for use on your Home Screen. The process by which this screen is used is defined and ordered below based on the numbers in the following image.
1)Create a Widget. 2)Define the Widget properties. You can set the Widget title and create sections for the Widget by selecting the Create Section button. 3)Define the section properties by setting the Section Title and adding entries for the section using the Add Entry button. 4)For each entry, the Entry Properties are defined. There are four types of entries available: Mission Plan, HTML Link, Executable, and File. From here, you can configure the Display Text and the properties for each type of entry which are listed below.
|
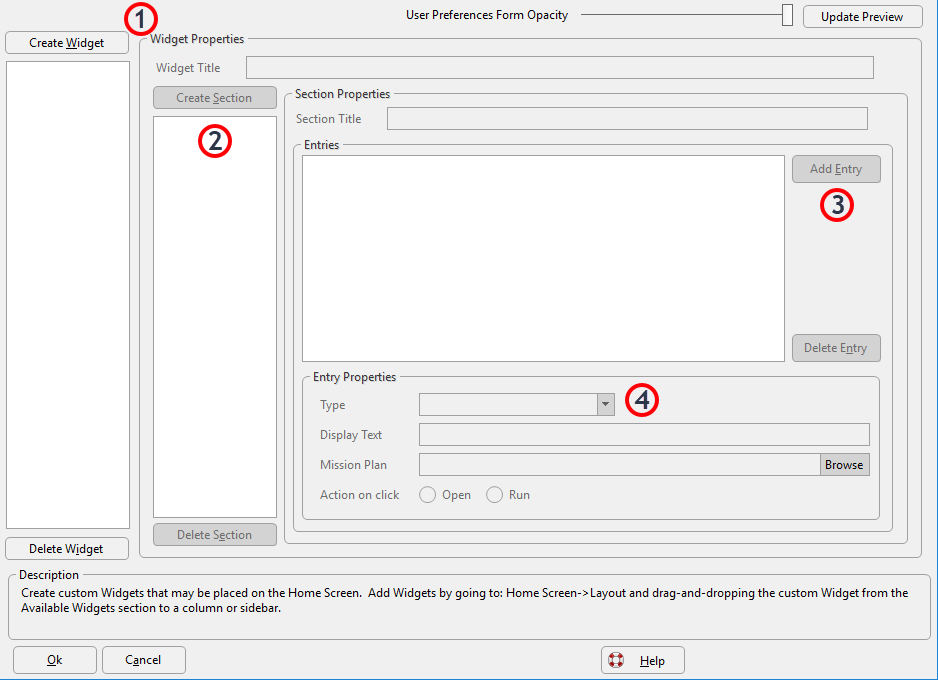
The Widgets page of User Preferences
Layout
From this configuration page, you have control over various settings for the Home Screen.
•Set the Column Count •Update the Preview to see any changes. •Show or Hide the Banner •Show or Hide the Sidebar •Set the Width of each Column, please note that the far right column before the sidebar will expand or shrink depending on the window size. •Move Available Widgets to various Columns including the Sidebar. |
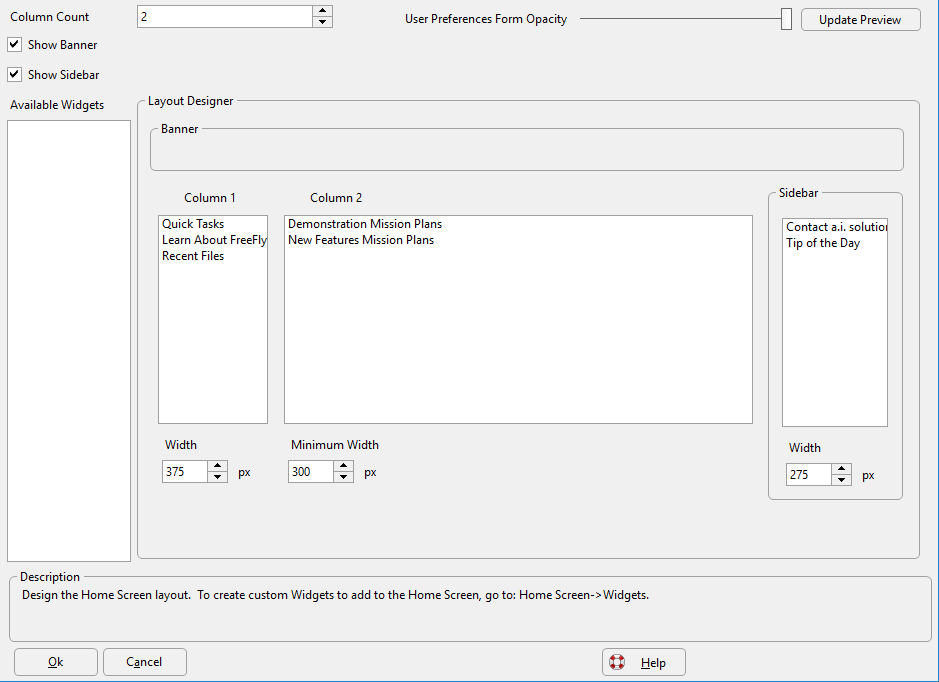
The Layout page of User Preferences
An example of a custom-defined Home Screen Layout is shown below.
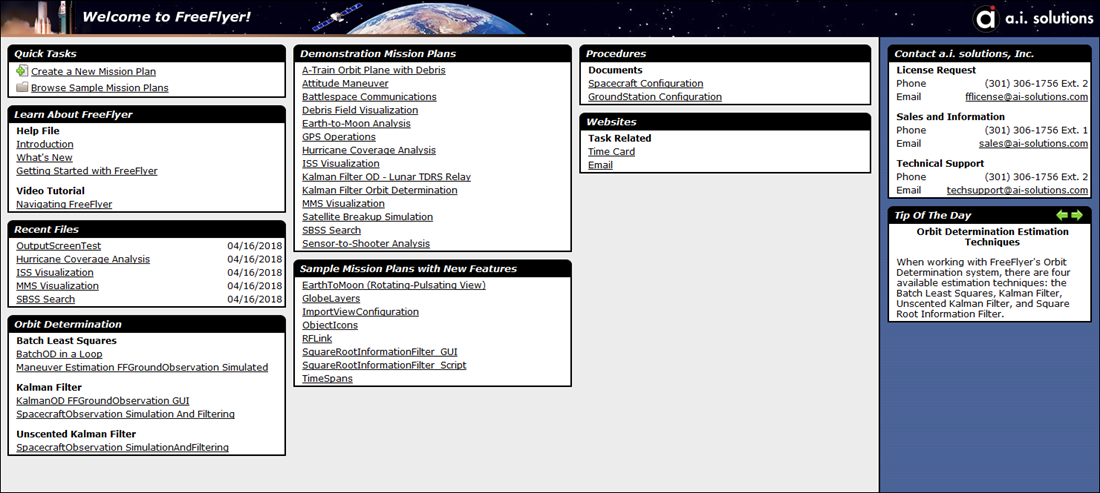
An example of a custom Home Screen
Display
The display preferences are divided into separate pages as follows.
Editors
From this page you can change the settings of the FreeForm Script Editors. There are five sections:
1)Display: Set options on how text is displayed in FreeForm Editors including bracket highlighting, displaying line numbers, wrapping words and others. 2)Area Colors: Configure the background colors for the line numbers, margins, and text area. 3)Line Modification Colors: Choose to turn on modification coloring, and highlight unsaved text in a different color. 4)Autocomplete Logic: Choose whether to enable Autocomplete when typing in FreeForm Script Editors. You can also choose whether pressing the spacebar will commit to a selection in the Autocomplete menu. See the Syntax and the FreeForm Script Editor article for a discussion of Autocomplete Logic. 5)Syntax Colors / Formatting: Configure various formatting options for each type of script syntax: Blocks, Commands, Comments, Functions, Keywords, Line Numbers, Numbers, Object Methods, Object Instances, Object Properties, Object Types, Operators, Plain Text, and String Values. For each item, a font, size, style, color, and background color can be set. A preview window is shown in the lower right section of the screen. |
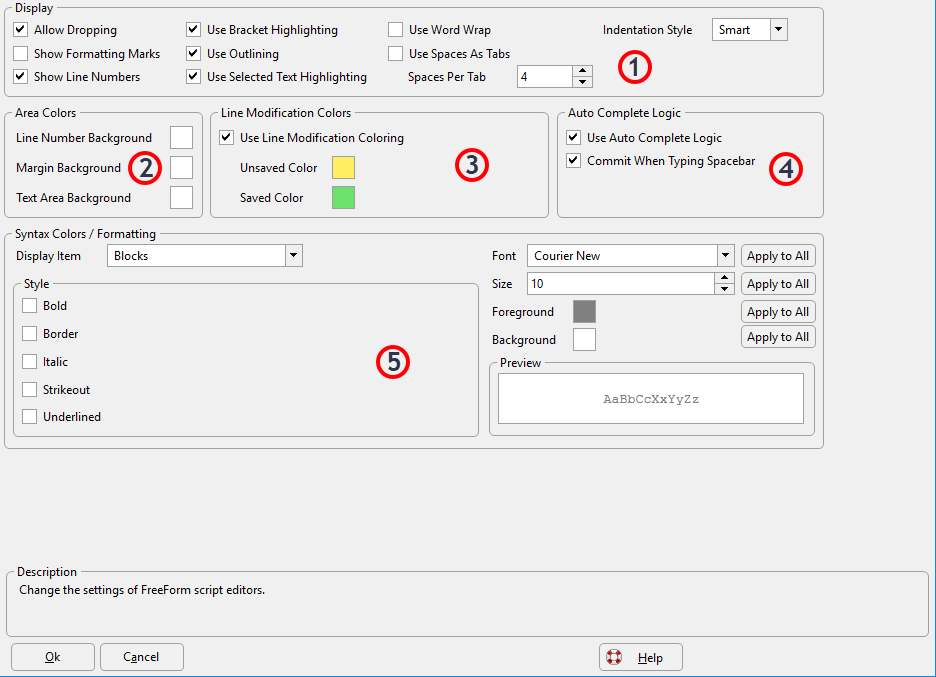
The Editors page of User Preferences
Mission View
On this configuration page, you have control over various display options for FreeFlyer's 2D and 3D output windows. See the Generating Output Guide for information on creating Mission Views.
•Rendering Options: Set preferences for Rendering Mode, Anti Aliasing, Anisotropic Filtering, and Lock to Refresh Rate oRendering Mode: Select whether to use the system's Default Renderer or to Force Software Rendering ▪Use Default Renderer: Output Window graphics will be rendered using the system default graphics rendering device (Intel GPU, NVIDIA GPU, etc...) ▪Force Software Rendering: Output Window graphics will be rendered entirely in the CPU. Software rendering will typically result in slower performance for output visualizations oAntiAliasing: Smooths over jagged distortions to improve visualization quality. FreeFlyer employs Multisample AntiAliasing (MSAA). The AntiAliasing multiplier refers to how many samples are taken around alias artifacts to assist in smoothing. Higher multiplier indicates higher visual quality at the expense of performance. oAnisotropic Filtering: Improves the clarity and crispness of textured objects. The multiplier levels reflect the viewing angles at which anisotropic filtering is applied, where higher multipliers will filter more textures at slight expense of performance. oLock to Refresh Rate: Selecting this option will increase the smoothness of graphical updates by locking the rendering rate to the screen refresh rate at the expense of performance speed. •Celestial Bodies: Set preferences for each Celestial Body oSpecify image files for textures oFor the Earth: Specify image files for day and night, specular map, clouds, and bump map. Set render quality using the slider. A message will show whether or not the Earth will be rendered in a very high, high, or low quality based on the combination of texture files and render quality selected. |
Note: MSAA is a technique where you take more than one color sample per pixel to get a better approximation of what color the pixel should be on the edges. The more samples, the better quality the approximation. While the drop down list of available Anti-Aliasing options varies by graphics driver and includes multipliers and letters (indicating techniques), the drop down list is ordered by increasing quality (and decreasing performance) in all cases.
Note: The bump map in FreeFlyer represents the surface normal in tangent space, not the actual height. A bump (or normal) map contains the surface normal encoded into the RGB channels for XYZ respectively. A height map contains a single value per pixel representing the relative height above sea level. There are several online tools available that can help you convert a height map into a bump map, or you can generate your own by finding the gradient in the height for each pixel and turning that into a normal.
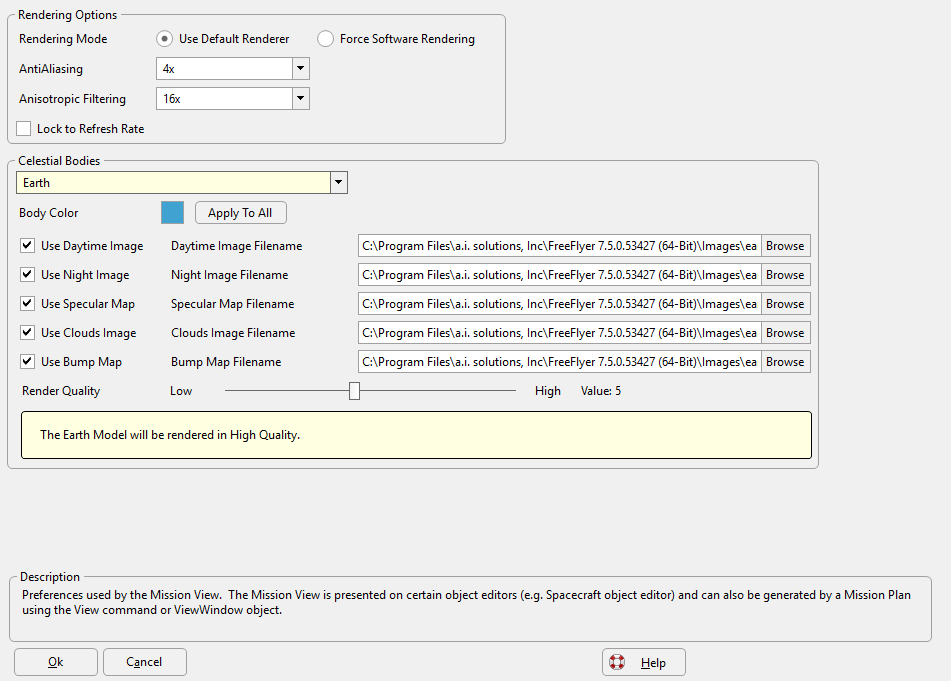
The Mission View page of User Preferences
Plot
On this page, you can configure maximum number of points to plot before data is culled, the number of points that are accumulated before the plot is updated, and whether or not to show the "Display data is culled!" message on Plots.

The Plot page of User Preferences
Output Workspaces
With these options, you can define the behavior of output workspaces when running a Mission Plan multiple times. The "Multiple" workspace mode creates a new workspace for each run, and the "Selected" mode generates new output in the selected workspace. You can also configure the maximum number of workspaces allowed, and whether to close all workspaces when a Mission Plan is run.
Controls
With these options, you can select whether to show the throttle bar (unselected by default); if shown, the throttle bar can be used to control the speed at which a Mission Plan runs. You can also select whether replay and movie generation capabilities are enabled (selected by default) and configure slider behavior for the replay toolbar. The "Max. Storage Per Instance" field sets the maximum amount of disk space available to the replay/movie generation functionality; if the maximum disk space is reached, then older frames will be dropped as necessary from the replay-able output or generated movie.

The Controls page of User Preferences
Note: If 20% of the maximum storage space is not available, then replay and movie generation will automatically be disabled.
Mission Plan Defaults
The Mission Plan Defaults section controls the options used by default for all Mission Plans. These defaults can be overridden for individual Mission Plans through the Active Mission Plan Preferences editor.
Timing Precision
This page specifies the default timing precision mode for FreeFlyer Mission Plans when you use the Ctrl+N shortcut on the home screen or when you press the New Mission Plan icon on the menu at the top of the screen.
Data Files
On this page, you can choose the data files used for new Mission Plans. By default, files included with the FreeFlyer installation will be used, but these can be overridden with custom files by unchecking the "Use System Default" button and browsing to the desired file. See the Data Files reference for more information on the various files and their formats.
Description
Here, you can configure descriptive information for the Author, Source, and Revision Number for your Mission Plans, as well as a Title, Subject, and Category, and any Keywords, Comments, or Notes.
On Open
The choices for the default "On Open Show" action are: Mission Sequence, Empty Environment, Home Screen, Notes Screen, and Output Screen. This page also allows you to choose whether or not to back up the Mission Plan when opened.
On Run
The "On Run" page allows you to choose whether the Mission Plan is saved when run and whether to hide warning messages when run.
Profile
Your user profile contains information on all the preferences described in all of the sections of the User Preferences and Active Mission Plan Preferences. For a more detailed look at user profiles, see the User Profiles reference page.
General
On this page, you can import and export your profile, or revert to the system defaults.