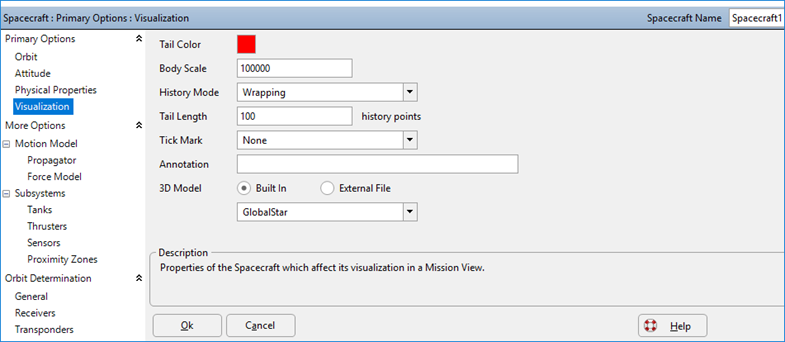
There are many options available for Spacecraft visualization. The user can set the tail color, tail length and body scale of the Spacecraft. The user can also define tick marks and include annotations. Please see the Generating Output Guide for more information.
There are a variety of Sample Mission Plans (included with your FreeFlyer installation) that demonstrate various applications of these topics. Continue to the Generating Output Samples page to view descriptions and images of these examples. |
Visualization Options
The image below shows how some of the FreeFlyer's visualization options look in a View Window. This shows a GlobalStar 3D model, with plus tick marks, an annotation, and a yellow tail.

Example Visualization
The following aspects of the Spacecraft visualization can be specified via FreeFlyer Script or the Spacecraft Object Editor:
Tail Color
The tail shows the past positions of the Spacecraft, and can be any color. See the Color Reference guide for more information.
Spacecraft1.Color = ColorTools.Green; |
Body Scale
The BodyScale property defines how large the Spacecraft looks compared to other objects.
Spacecraft1.BodyScale = 10000; |
History Mode
The HistoryMode property of the Spacecraft allows the user to specify whether the tail of the Spacecraft will be unlimited or wrapped. If the history mode is set to wrap, the Tail Length option specifies how long (in number of steps) the tail will persist in the view. Use caution in setting unlimited tail lengths, or in using tail lengths longer than 10,000 - 30,000 points. Tail lengths exceeding this range can cause memory problems due to the large amount of relative position data that must be maintained. The maximum tail length that can be used safely depends on the amount of memory in the system and the number of objects managed by the Mission View.
Spacecraft1.HistoryMode = 0; // 0 - wrapping, 1 - unlimited Spacecraft1.TailLength = 100; |
Tick Marks
If desired, FreeFlyer will place a marker at the end of each spacecraft step. The following choices are available for tick marks.
•None •Plus •Cross •Circle (Open or Solid) •Square (Open or Solid) •Diamond (Open or Solid) •Up Triangle (Open or Solid) •Down Triangle (Open or Solid) |
The tick type can also be assigned via script in the following way:
Spacecraft1.TickType = "Cross"; |
Annotations
You may annotate the Spacecraft with a description of some sort. The annotations will appear with every tick mark.
Spacecraft1.Annotation = "Spacecraft"; |
3D Model
You can use any one of the following built in 3D models to represent the Spacecraft in the 3D view, or use a custom model from an external file. A flattened 2D representation of the 3D model will appear in 2D map views.
•GlobalStar •SBSS •ICE •ISS •GPS •TDRS |
This can also be assigned via script in the following way.
Spacecraft1.ThreeDModelFile = "myModelFile.3ds"; |
Icon
You can also choose not to display a 3D model for your Spacecraft, and instead display only its name and/or an icon (an image file). This can be useful when you don't have an accurate 3D model, or when you want to distinguish between different orbiting objects at a glance even when zoomed out. Icons are also useful when you don't have access to information about the attitude (orientation) of an orbiting object, and you don't want to misrepresent the attitude of the object by displaying a 3D model.
ViewWindow1.SetObjectIcon(Spacecraft1.ObjectId, "orion.png"); ViewWindow1.SetShowIcon(Spacecraft1.ObjectId, 1); |
Defaults
The default settings create a Spacecraft with a GlobalStar model at a scale of 100000, a red tail that lasts for 100 steps, with no tick marks or annotations.

Spacecraft Visualization Editor
See Also
•Generating Output Guide