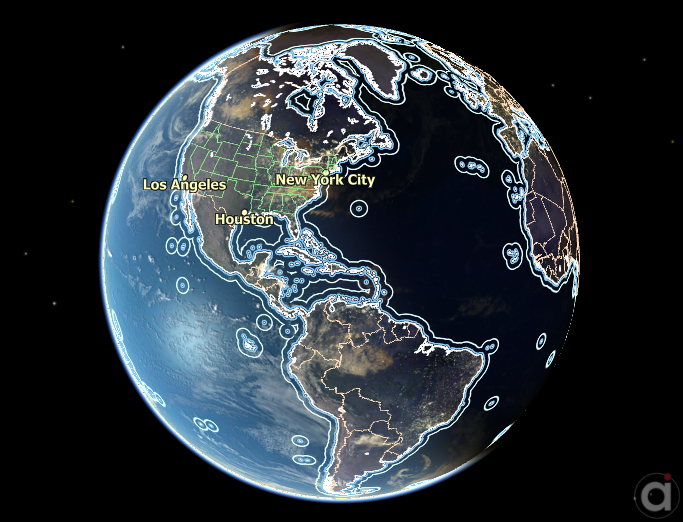
You can customize the display of any CelestialObject (such as the Earth or Moon) in FreeFlyer through the CelestialObject.Globe child object. The globe options let you control the display of the surface textures, planetary atmosphere, coastlines, political boundaries, and custom user-specified lines or location markers. The globe options are organized into the SurfaceLayer, AtmosphereLayer, BoundaryLayers, LineLayers, and LocationLayers as described below.

Earth configured with coastlines, coastline offsets, and political boundary globe layers
The following Sample Mission Plans (included with your FreeFlyer installation) demonstrate customized globe layers:
|
Working with Globe Layers
You can access the globe options of any built-in or user-created CelestialObject as shown below:
Earth.Globe.Quality = 10; |
You can also create a new GlobeOptions object, customize it, and assign it to a CelestialObject.Globe:
GlobeOptions customizedEarthGlobe;
// Start by getting the values of the default Earth globe customizedEarthGlobe = Earth.Globe;
// Change any properties of the globe customizedEarthGlobe.AtmosphereLayer.UseCloudMap = 0;
// Assign it back to be used by the Earth Earth.Globe = customizedEarthGlobe; |
If you want to display the globe for a CelestialObject differently in different windows (such as a 2D map vs. a 3D view), you can change how the globe is displayed in a single ViewWindow, as shown below. This will override the CelestialObject.Globe settings for that window only.
ViewWindow vw();
vw.SetCelestialObjectGlobeOptions(Earth.ObjectId, customizedEarthGlobe); |
Surface Layer
The CelestialObject.Globe.SurfaceLayer lets you control the day and night textures as well as the specular reflections and bump texture. The default textures for the built-in CelestialObjects can be changed through your User Preferences.
// Use high-resolution textures Earth.Globe.SurfaceLayer.DaytimeImageFilename = FF_Preferences.FreeFlyerEXEPath + "Images\earth_base_very_high.jpg"; Earth.Globe.SurfaceLayer.NighttimeImageFilename = FF_Preferences.FreeFlyerEXEPath + "Images\earth_night_very_high.jpg"; |
Atmosphere Layer
The CelestialObject.Globe.AtmosphereLayer lets you control the cloud texture and the rendering of atmosphere effects.
// Use high-resolution texture Earth.Globe.AtmosphereLayer.CloudMapImageFilename = FF_Preferences.FreeFlyerEXEPath + "Images\earth_clouds_very_high.jpg"; |
Globe Layers can be configured using .jpg and .png format image files.
Boundary Layers and Coastlines
BoundaryLayers are used to render coastlines and coastline offsets in FreeFlyer. Use the following script to turn on coastlines:
Earth.Globe.NumberOfBoundaryLayers = 1; Earth.Globe.BoundaryLayers[0].Label = "Coastlines"; Earth.Globe.BoundaryLayers[0].ImageFilename = FF_Preferences.FreeFlyerEXEPath + "Images\earth_coastlines_very_high.png";
// All coastline files included with FreeFlyer must be used with a distance bias of 0.9 Earth.Globe.BoundaryLayers[0].DistanceBias = 0.9; |
You can customize the display of the coastline border color, opacity, and line width. You can also fill the land areas with a solid color, and customize the color and opacity.
You can draw up to 10 coastline offsets on a BoundaryLayer. The following script demonstrates how to draw 2 coastline offset borders at distances of 50 and 200 km. Note that the coastline offset data files delivered with FreeFlyer allow coastline offsets to be drawn at distances of up to 500 km.
// All coastline files included with FreeFlyer must be used with a maximum offset border distance of 500 km Earth.Globe.BoundaryLayers[0].MaximumOffsetBorderDistance = 500; Earth.Globe.BoundaryLayers[0].NumberOfOffsetBorders = 2; Earth.Globe.BoundaryLayers[0].OffsetBorderDistances = {50, 200}; Earth.Globe.BoundaryLayers[0].OffsetBorderColors = {ColorTools.LightSkyBlue, ColorTools.LightCyan}; |
The file format for BoundaryLayer image files is described on the Political Border and Coastline Files page in the Appendix.
LineLayers can be used to render political boundaries such as state and country borders. They can also be used to render any user-specified latitude/longitude datasets on the surface of any CelestialObject. For example, they can be used to render landing zones, reentry footprints, safety corridors, destruct lines, regions of scientific interest, etc. Note that LineLayers are used for visualization only. For visibility analysis, see the Coverage and Contact Analysis guide.
The latitude/longitude points that make up a LineLayer can be read in from a binary file format, or specified through script.
To turn on the display of state and country boundaries, use the following script:
Earth.Globe.NumberOfLineLayers = 2; Earth.Globe.LineLayers[0].Label = "Country Borders"; Earth.Globe.LineLayers[0].LineDataFilename = FF_Preferences.FreeFlyerEXEPath + "data\borders_global_countries.dat"; Earth.Globe.LineLayers[1].Label = "US State Borders"; Earth.Globe.LineLayers[1].LineDataFilename = FF_Preferences.FreeFlyerEXEPath + "data\borders_US_states.dat"; |
You can customize the lines' color and line width:
Earth.Globe.LineLayers[0].LineWidth = 2; Earth.Globe.LineLayers[0].Color = ColorTools.PeachPuff; Earth.Globe.LineLayers[1].LineWidth = 2; Earth.Globe.LineLayers[1].Color = ColorTools.LightGreen; |
To specify the latitude/longitude points of the line layers through FreeFlyer script, use the following syntax:
Earth.Globe.NumberOfLineLayers = 3; Earth.Globe.LineLayers[2].Label = "Colorado"; Earth.Globe.LineLayers[2].NumberOfDataPoints = 5; Earth.Globe.LineLayers[2].Latitude = {37, 37, 41, 41, 37}; Earth.Globe.LineLayers[2].Longitude = {-102.03, -109.03, -109.03, -102.03, -102.03};
// Segments are used to indicate any line breaks in the data Earth.Globe.LineLayers[2].NumberOfLineSegments = 1; Earth.Globe.LineLayers[2].SegmentLengths = 5; |
The file format for binary LineLayer data files is described on the Political Border and Coastline Files page in the Appendix.
LocationLayers can be used to render location markers and names, such as for cities, state or country names, landing sites, imaging targets, etc. Note that LocationLayers are used for visualization only. For visibility analysis, see the Coverage and Contact Analysis guide.
To create a LocationLayer displaying three cities, use the following syntax:
Earth.Globe.NumberOfLocationLayers = 1; Earth.Globe.LocationLayers[0].Label = "Cities of Interest"; Earth.Globe.LocationLayers[0].NumberOfLocations = 3; Earth.Globe.LocationLayers[0].LocationName = {"New York City", "Houston", "Los Angeles"}; Earth.Globe.LocationLayers[0].LocationLatitude = {40.7128, 29.7604, 34.0522}; Earth.Globe.LocationLayers[0].LocationLongitude = {-74.0059, -95.3698, -118.2437}; |
You can customize the color and size of the location markers, as well as the font used to display the location name. You can also turn on/off the location markers or names separately.
Earth.Globe.LocationLayers[0].Color = ColorTools.Yellow; Earth.Globe.LocationLayers[0].Font.Bold = 1; Earth.Globe.LocationLayers[0].Font.Size = 14; Earth.Globe.LocationLayers[0].MarkerSize = 8; |
Globe Layers in the View Output Properties Interface
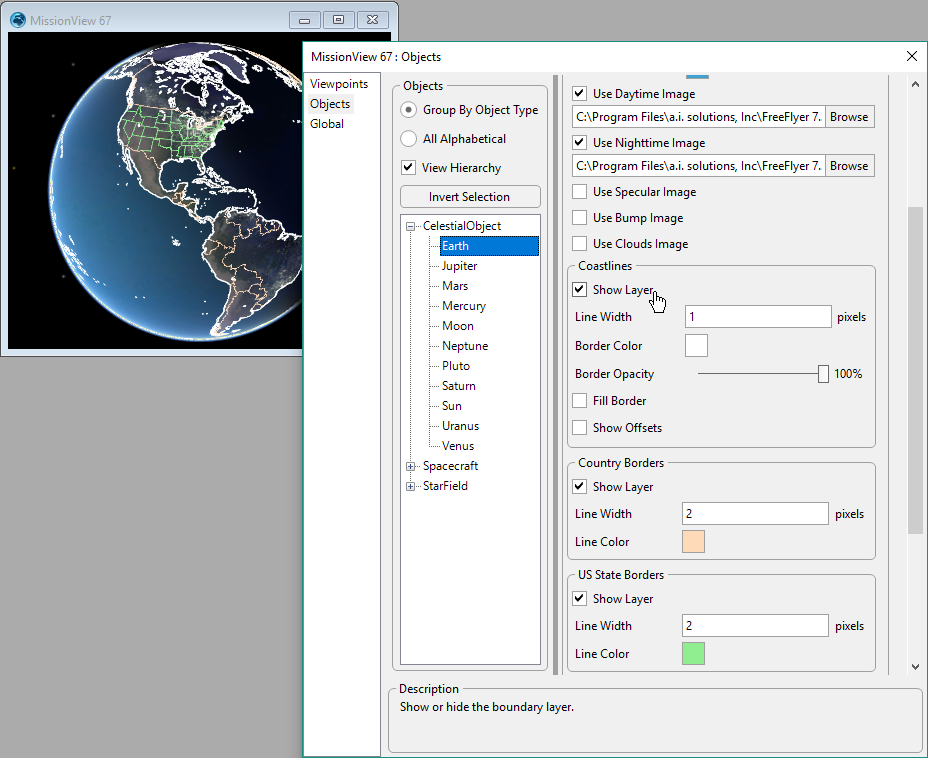
The View Output Properties menu lets you configure the display of objects in any view in FreeFlyer's output screen. Simply right-click in any view and select "Open Properties Editor." You can configure the display settings for any CelestialObject's globe layers through the View Output Properties menu by selecting the CelestialObject (e.g. Earth) under the list of Objects, as shown below.

View Output Properties editor showing adjustments that can be made to Globe Layers
See Also
•Political Border and Coastline Files page in the Appendix
•GlobeOptions Properties and Methods