There are two ways to create an object in the Object Browser:
1.Right-click in the white space of the Object Browser and select the desired object from the "Add" menu (shown below) 2.Select the Add menu at the top of the Object Browser |

Creating Objects
There are three ways to edit an object:
1.Double-click on the object 2.Right-click on the object and select "Edit" 3.Select the Edit menu at the top of the Object Browser |
Other options:
1.Clone - creates an exact copy of the selected object 2.Global - makes the object available in all Procedures that are called by the Mission Plan |
Object Editor Navigation
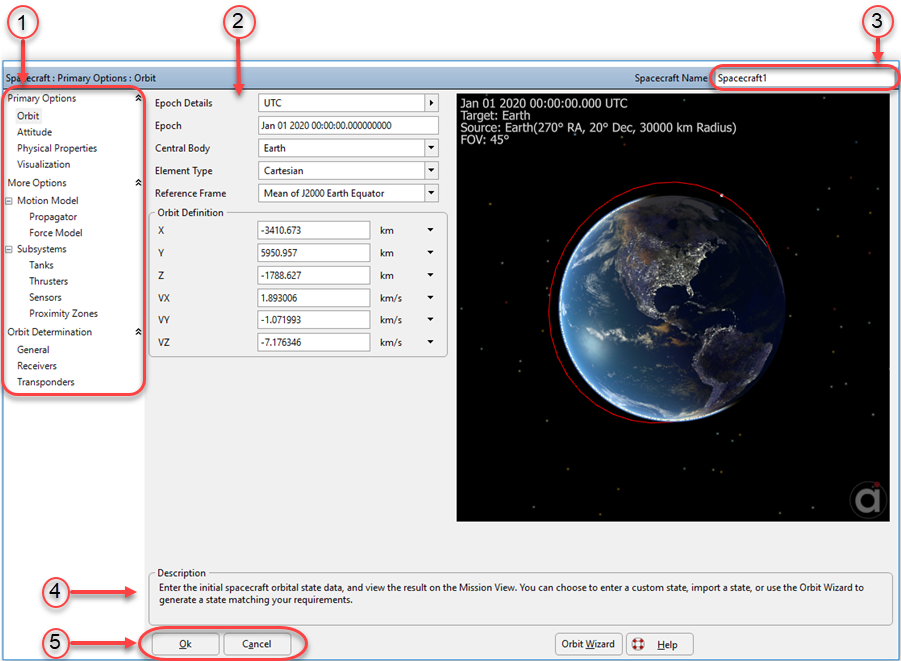
1.Page Tree:
•Items in bold are Categories, such as Primary Options or Orbit Determination •Items not in bold represent categorized pages of properties associated with the object being edited |
2.Editor Page:
•The page shown corresponds to the page selected in the page tree |
3.Object Name
•View and edit the name of the object currently being edited |
4.Description
•Provides a brief description of the field that the mouse pointer is currently over |
5.Ok/Cancel
•Ok closes the window and commits any changes made to the object within the editor •Cancel closes the window and discards any changes made to the object within the editor |
Object Presets
FreeFlyer's Object Presets allow you to share any customized object (Spacecraft, GroundStation, Variable, etc.) across multiple Mission Plans. The Object Presets included with FreeFlyer are:
![]() Object Presets included with FreeFlyer
Object Presets included with FreeFlyer
•CelestialObjects oAmalthea oCalisto oCharon oDeimos oDione oEnceladus oEuropa oGanymede oIo oMimas oPhobos oRhea oThethys oTriton •GroundStations oCanberra oDiegoGarcia oGoldstone oMadrid oSvalbard oWallops •Regions oSAA_High oSAA_Low oSAA_Med •Spacecraft oAQUA oAURA oDSCOVR oGOES 13, 14, 15 oGPS 07, 12, 15, 17, 29, 31 oHST oISS oSIRIUS 1, 2, 3 oTDRS 3, 5, 6, 7, 8, 9, 10, 11, 12 oTERRA |
Importing Presets
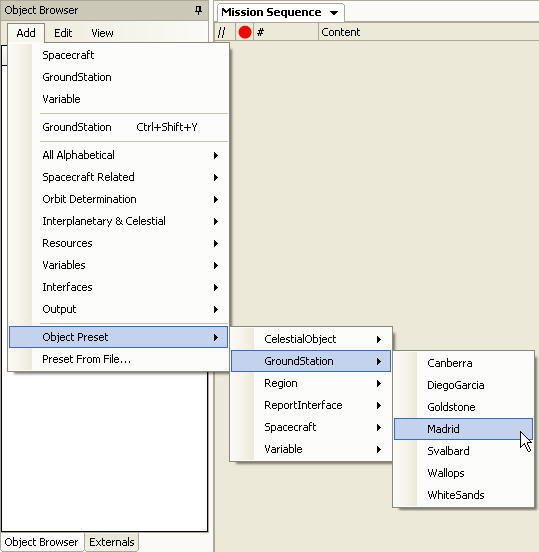
You can import presets that are saved in your system's Object Preset Paths either of two ways.
•Use the Add menu to add a new object based on a preset. This menu shows all the presets saved in the Object Preset Path(s).
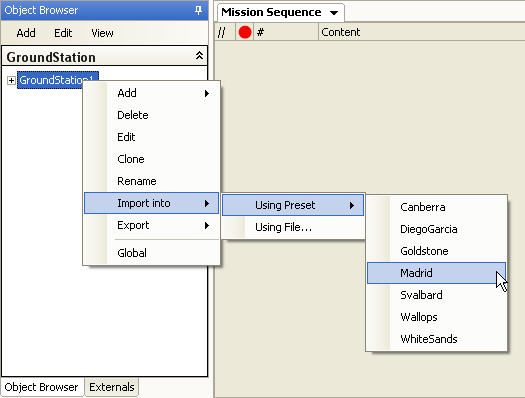
•Right-click on any object and select "Import into" à "Using Preset" and select the desired preset.
|
You can also import presets from a file saved in any arbitrary location, again in either of these two ways:
•Use the Add menu to add a new object based on a "Preset From File..." •Right-click on any object and select "Import into" à "Using File..." |
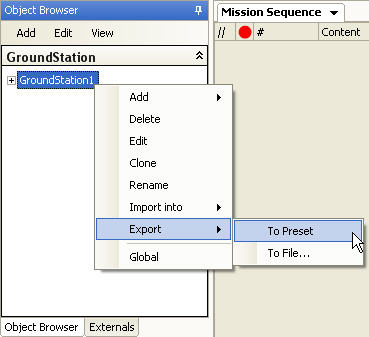
Exporting Presets
You can create new presets by configuring any object in the Object Browser, right-clicking it, and selecting "Export". From here, you have two options:
•Export To Preset - This will save the preset in your export path and make the preset available in the "Add" menu. •Export To File - This allows you to save the preset to any arbitrary location. The preset will not be available via the "Add" menu unless it is saved in one of the Object Preset Paths. |
See Also
•Object Editor Shortcuts in the Appendix
•Put Command
•Get Command
•FreeFlyer Configuration Guide