To make a FreeFlyer Mission Plan interactive, you can create and customize a UserInterface object through either the Object Editor or through FreeFlyer script. The UserInterface object is a powerful tool for both data input and data inspection. By adding and configuring a custom UserInterface object, you can define the fields and default values that will be displayed on the input dialog. FreeFlyer waits for the user to accept the inputs to the dialog using the "Continue" button before resuming execution of the Mission Plan.
There are a variety of Sample Mission Plans (included with your FreeFlyer installation) that demonstrate various applications of these topics. Continue to one of the Mission Plans listed below to view descriptions and images of these examples.
|
Uses
Data Input
When used as a data input mechanism, A UserInterface lets a user vary input to a simulation without actually having to modify the Mission Sequence. This facilitates manual parametric scans by removing the time it takes to open the Mission Sequence, modify it, and re-run. It also eliminates the risk of introducing syntax problems when modifying FreeFlyer script.
Data Display/Inspection
The UserInterface object can also be used to display data. This makes it easy to copy data from the panel into another application. As an output mechanism, the UserInterface object can also be used as a QA tool. If the user wants to check an intermediate calculation, displaying the results of that calculation in a UserInterface panel prompts the user to confirm whether that calculation is correct before proceeding with the analysis.
Command Line FreeFlyer
The command line version of FreeFlyer (FF.exe) supports the UserInterface object in two different modes. By default, if a UserInterface is encountered in a Mission Plan being run by FF.exe, the user is prompted for data from the command line. Using the methods described below in the section on using namelists, the user can generate input files that can be redirected into ff.exe. By generating multiple input files with different input data, the user can test a single script with a range of input data automatically. You can also choose to generate a namelist output file or use a namelist input file when the Mission Plan is called from the command line.
For the different ways in which you can set up a UserInterface as well as further information on special functionality associated with the UserInterface object, see the sections below:
UserInterface Object Setup via the Object Editor
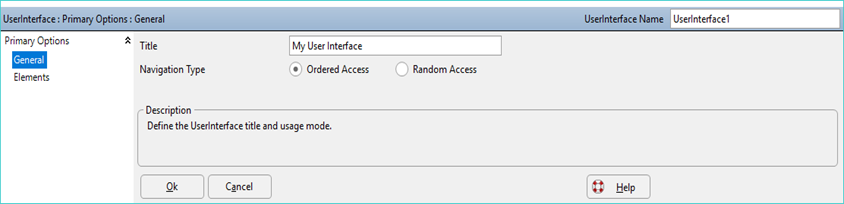
To create a UserInterface through the Object Editor, first select "Add" on the Object Browser, and select UserInterface under "Interfaces". Double-click the new object "UserInterface1" to edit it. The editor has two pages, "General" and "Elements". Select a Title for the UserInterface, and select Random or Ordered access.
On the elements page, you choose which input elements will be displayed when the UserInterface is called using the Show command. To see a preview of what the form will look like, click the "Preview Layout" button on the bottom of the form.
Create Page
Each page is a "container" for entry fields, or "data elements". If a page break is desired, the user can create many pages in the form. This will cause the input dialog that is generated to have multiple pages.
Example:
Name: Title: |
Page1 Choose Orbital Elements |
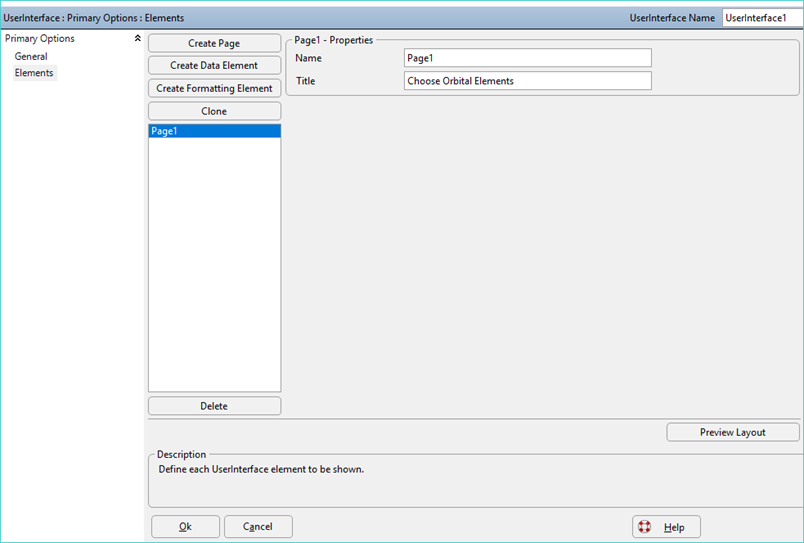
Create Data Element
Elements will be shown on the page listed before them. To reorder the list, click-and-drag the pages and data elements. Data Elements have three basic types, each with their own options: Numeric Text Entry, Multi-Choice, and Boolean Choice.
In the "Element Type" field, select how the user will be able to enter data on the input prompt panel. For "Numeric Text Entry", the user will be able to type an entry into the field provided by the input prompt. For "Multi-Choice", the user will be able to select from a drop-down or radio button list. For "Boolean Choice", the "Yes/No" and "True/False" types present the user with radio buttons that are labeled Yes and No or True and False, respectively.
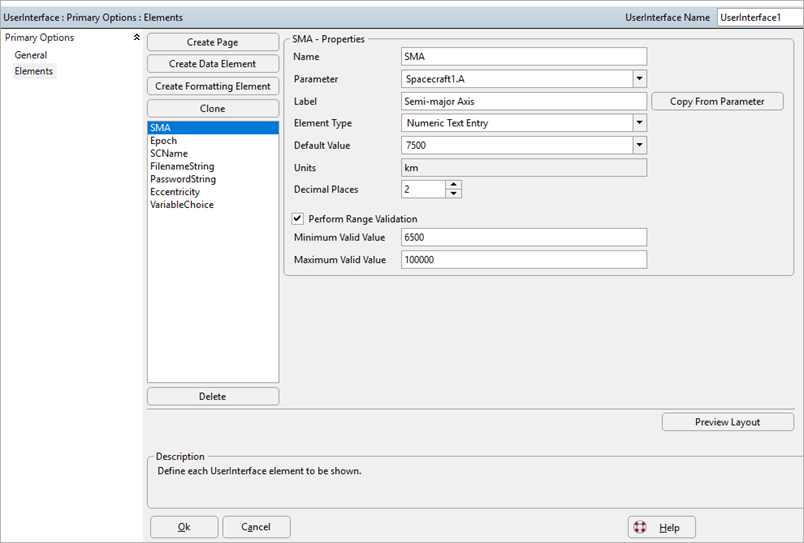
Numeric Text Entry Example
To perform data validation with a UserInterface, select an object or property such as "Spacecraft1.A" for the default value of a data element. When the UserInterface is Shown, the current value of that property will be displayed, allowing the user to confirm whether the value is as expected.
To validate that the user has entered a value that is within a specified range, click the "Check Range" check box, and enter the minimum and maximum range for the property. If no range checking is necessary, then click off the "Check Range" box.
Name: Parameter: Label: Element Type: Default Value: Units: Decimal Places:
Perform Range Validation: Minimum Valid Value: Maximum Valid Value: |
SMA Spacecraft1.A Semi-major Axis Numeric Text Entry 7500 km 2
Yes 6500 100000 |
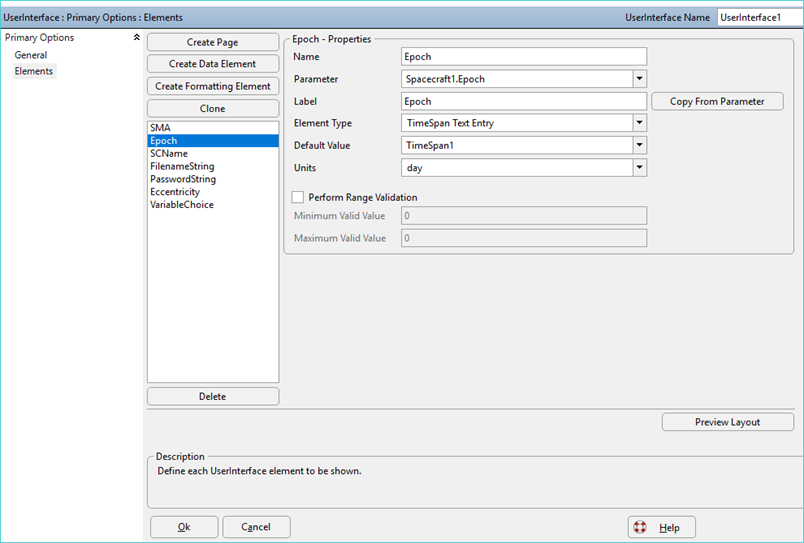
TimeSpan Text Entry Example
To perform data validation with a UserInterface, select a TimeSpan object or property such as "Spacecraft1.Epoch" for the default value of a timespan element. When the UserInterface is Shown, the current value of that property will be displayed, allowing the user to confirm whether the value is as expected.
To validate that the user has entered a value that is within a specified range, click the "Check Range" check box, and enter the minimum and maximum range for the property. If no range checking is necessary, then click off the "Check Range" box.
Name: Parameter: Label: Element Type: Default Value: Units:
Perform Range Validation: Minimum Valid Value: Maximum Valid Value: |
Epoch Spacecraft1.Epoch Epoch TimeSpan Text Entry TimeSpan1 day
No
|
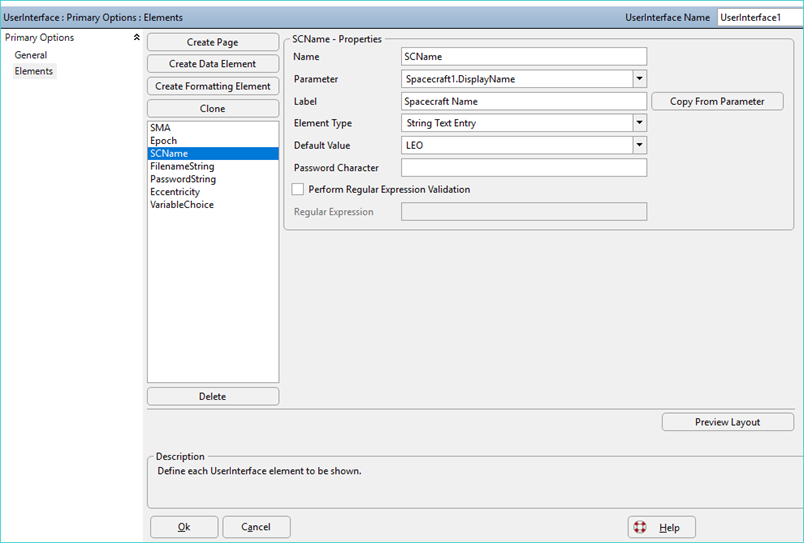
String Text Entry Example
To input or validate string data with a UserInterface, select a string object or property such as "Spacecraft1.Name" as an interface parameter. When the UserInterface is Shown, the current value of that property will be displayed, allowing the user to confirm the current value or enter a new one.
Name: Parameter: Label: Element Type: Default Value: Password Character:
Perform Regular Expression Validation: Regular Expression: |
SCName Spacecraft1.DisplayName Spacecraft Name String Text Entry LEO
No
|
The Password Character allows the user to specify a character that will obscure any text written into the string input textbox, as shown in the image below.
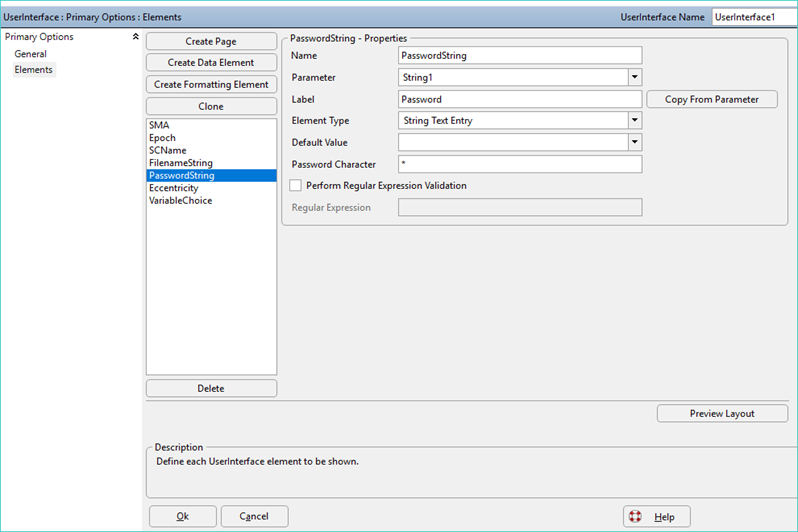

The Regular Expression validation options can be used to define a regular expression to be used to validate the user's string inputs.
Multi-Choice Example
Name: Parameter: Label: Element Type: Selection Type:
Create Choice Choice1 Label: Choice1 Value:
Create Choice Choice2 Label: Choice2 Value:
Create Choice Choice3 Label: Choice3 Value:
Default Choice: |
Eccentricity Spacecraft1.E Eccentricity Multi-Choice Use Radio Buttons
Small 0.01
Medium 0.1
Large 0.5
Choice1 |

UserInterface Object Editor
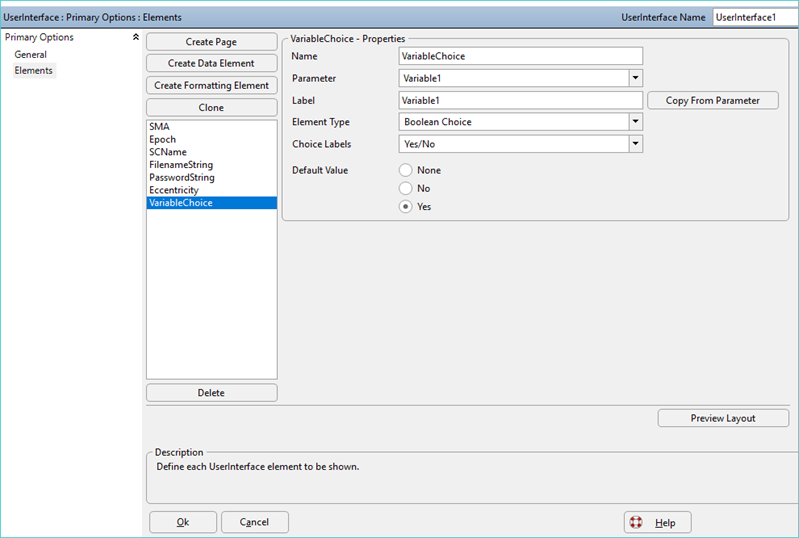
Boolean Choice Example
Name: Parameter: Label: Element Type: Choice Labels: Default Value: |
VariableChoice Variable1 Variable1 Boolean Choice Yes/No Yes |
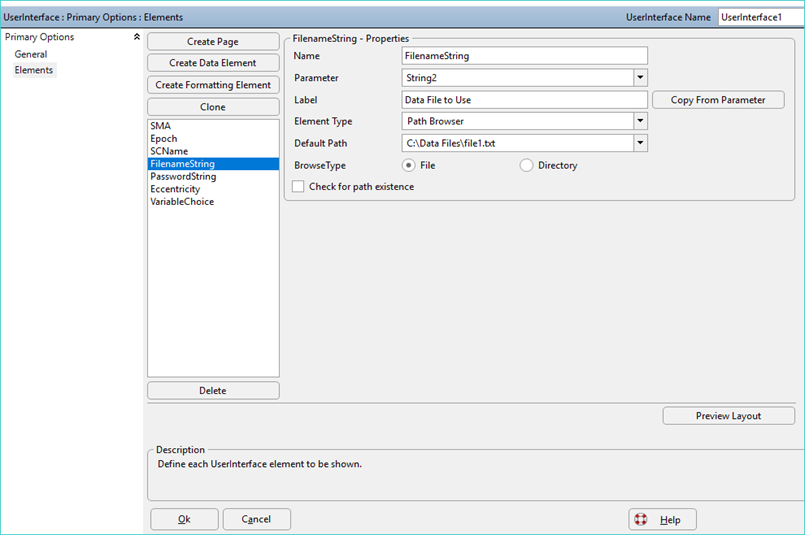
Path Browser Example
Name: Parameter: Label: Element Type: Default Path: Browse Type: Check Existence: |
FilenameString String2 Data File to Use Path Browser C:\Data Files\file1.txt File No |
Create Formatting Element Example
Example:
Name: Element Type: Separator Text: Show Line: |
FormattingElement1 Separator Formatting Separator with Label Yes |

Sample UserInterface Output
UserInterface Object Setup via Script
Create and edit your UserInterface object through a FreeForm script editor if you wish to assign values to objects that were also created in script. Objects, such as Variables, that have been created in script will not be available when editing a UserInterface through its Object Editor. You can also specify a namelist to use as input or output with a UserInterface.
Create a new UserInterface Object:
UserInterface myUI; myUI.DisplayName = "myUI"; myUI.Title = "User Interface Through FreeFlyer Script"; |
Create space for the entry fields:
myUI.AddPage("Five Entry Types"); |
Create a new Drop Down Field:
Variable DropDownValue; Variable id; Variable Variable1 = 1; Variable Variable2 = 3; Variable Variable3 = 5;
id = myUI.AddMultiChoice("DropDownValue","Enter a value","Variable1",0); myUI.AddMultiChoiceItem(id,"Variable1","Small"); myUI.AddMultiChoiceItem(id,"Variable2","Medium"); myUI.AddMultiChoiceItem(id,"Variable3","Large"); |
Create a new Value Entry Field:
Variable EnterValue; myUI.AddTextEntry("EnterValue","Set value for EnterValue","10",1,0,100,"","km"); |
Create a new TimeSpan Entry Field:
TimeSpan TimeSpanValue; TimeSpan MinTime = TIMESPAN(0 days); TimeSpan MaxTime = TIMESPAN(1 days); myUI.AddTextEntry("TimeSpanValue","Set value for TimeSpanValue","TimeSpanValue",1,MinTime,MaxTime,"day"); |
Create a new True/False Field:
Variable TFValue; myUI.AddBooleanChoice("TFValue","Set value for TFValue","True","False","True"); |
Create a new Yes/No Field:
Variable BooleanValue; myUI.AddBooleanChoice("BooleanValue","Set value for Boolean Value","Yes","No","Yes"); |
Create a new Filename Field:
String FileNameValue; myUI.AddPathBrowser("FileNameValue","Set value for Filename","myfile.txt",0,0); |
Set up Random Access to Pages:
myUI.AddPage("Radio Button Example"); myUI.NavigationType = "Random Access"; // The other option is "Ordered Access" |
Create a new Radio Button Field:
Variable RadioValue; Variable id2; id2 = myUI.AddMultiChoice("RadioValue","Set value for RadioValue","Variable1",1); myUI.AddMultiChoiceItem(id2,"1","1"); myUI.AddMultiChoiceItem(id2,"15","15"); myUI.AddMultiChoiceItem(id2,"40","40"); |
Other Options
You can set the shortcut to continue to the next page by putting an ampersand in front of the letter you want the shortcut to operate on. For the example below, the shortcut to continue is ALT+G.
myUI.ContinueButtonLabel = "&Go!"; |
Set UI column widths:
myUI.LabelColumnWidth = 200; myUI.DataColumnWidth = 400; |
Separate fields with a horizontal line:
myUI.AddSeparator("Separator",1); |
Default Values
The "default value" expressions you specify when adding elements to a UserInterface are evaluated when the Show command is called. For example, if you use an indexed expression such as Array1[i] when adding a Multi-Choice item, Text Entry, Boolean Choice, or Path Browser, when the Show command is called, the current value of "i" will be used.
For example, in the following script, the user creates a UserInterface and wants the initial value for each Array element to be shown as the default choice in the UserInterface, so that an end-user can decide whether or not to override the initial value. However, the AddTextEntry command will not be evaluated until the Show command is called - at the end of the For loop. If you run this script, you will see that the UserInterface defaults to "9" for all Array elements.
UserInterface UI; Variable i; Array Array1[10]; Array1 = {0, 1, 2, 3, 4, 5, 6, 7, 8, 9};
For i = 0 to 9;
UI.AddTextEntry("Array1[i]","Set value for each Array element","Array1[i]",0,0,100,"","");
End;
Show UI; |
In order to work around this behavior, you can convert the indexing Variable to a string before adding the text entry to the UserInterface. If you run this script, you will see that the UserInterface defaults to the expected 0-9 sequence for the Array elements.
UserInterface UI; Variable i; Array Array1[10]; Array1 = {0, 1, 2, 3, 4, 5, 6, 7, 8, 9};
For i = 0 to 9;
UI.AddTextEntry("Array1["+i.ToString+"]","Set value for each Array element","Array1["+i.ToString+"]",0,0,100,"","");
End;
Show UI; |
Displaying the UserInterface
Show the UserInterface:
Show myUI; |

Example User Interface screen, Page 1

Example User Interface screen, Page 2
Display the results of the UI to the screen:
Report DropDownValue, EnterValue, TFValue, BooleanValue, FileNameValue, RadioValue; |
Using Namelists
FreeFlyer provides the capability to record UserInterface panel responses to an output file. This file can be edited and used as an input file on future runs of the Mission Plan. You can also choose to generate a namelist output file or use a namelist input file when the Mission Plan is called from the command line.
Record User Choices to an Output File:
FF_Preferences.RecordUIResponses = 1; // Boolean flag indicating whether or not to record the user inputs into a log file FF_Preferences.UIOutputResponsesFilename = "UIResponses.txt"; |
Output File: "UIResponses.txt"
DropDownValue = "3"; // myUI::Enter a value EnterValue = "20.030000"; // myUI::Set value for EnterValue TFValue = "0"; // myUI::Set value for TFValue BooleanValue = "1"; // myUI::Set value for Boolean Value FileNameValue = "myfile.txt"; // myUI::Set value for Filename RadioValue = "15"; // myUI::Set value for RadioValue |
Retrieve Inputs from a File:
FF_Preferences.UIInputResponsesFilename = "UIInput.txt"; FF_Preferences.UseUIResponses = 1; //1 = Use input file //0 = Ignore input file (Show UI) |
Input File: "UIInput.txt"
DropDownValue = "3"; // myUI::Enter a value EnterValue = "20.030000"; // myUI::Set value for EnterValue TFValue = "0"; // myUI::Set value for TFValue BooleanValue = "1"; // myUI::Set value for Boolean Value FileNameValue = "myfile.txt"; // myUI::Set value for Filename RadioValue = "40"; // myUI::Set value for RadioValue |
Note: The input file must end with a blank line. When using an input file with the UserInterface it is required that the UserInterface variables are arranged in the same order as the input file variables to retrieve the proper input values for each entry. Otherwise, when the Mission Plan is run the default UserInterface value will be used instead of the input file value.
See Also
•UserInterface Properties and Methods
•Show Command