This page includes descriptions of licensing functionality present in FreeFlyer 7.9.1 and earlier that are not applicable to the current release. These 'Legacy' licensing features will be supported again starting in FreeFlyer 7.10.1. Please refer to Node-Locked Licensing for licensing instructions compatible with the current version. |
If you are a license system administrator responsible for setting up licensing on your network, please review the following sections of this page:
|
•Configuring a License Server in Windows •Configuring a License Server in Linux •Configuring License Servers for Three-Server Redundancy •How to Connect to a Network License in Windows |
If you are an end user of FreeFlyer and you are not involved in installing the license server software on the server, then proceed to How to Connect to a Network License in Windows, How to Connect to a Network License in Linux, or How To Connect to a Network License inside a Docker Container. Instructions on Borrowing a Network License are also available at the bottom of the page.
Obtaining your License File
1.Select the machine that is to serve as the FreeFlyer license server and determine the computer name and composite or disk serial number for that machine. For Windows systems there are two ways to obtain the computer information. The first way is to launch FreeFlyer on the machine and copy the information shown in the Register a New FreeFlyer License screen or returned from the report host information command line switch (composite, version, disk serial number, computer name, etc.). The second way is to install and launch the FreeFlyerLicenseInformation utility available on the Downloads page of the FreeFlyer website. For Linux systems there are also two ways to obtain the computer information. The first way the computer information can be retrieved is by using the report host information command line switch. The second way is to install the FreeFlyerLicenseInformation utility available on the Downloads page of the FreeFlyer website, enable the file for execution, and execute the program.
2.Send this machine name and computer information to fflicense@ai-solutions.com.
3.A network license file is created based on the server’s machine name and corresponding computer information and is emailed to the License Server Administrator.
4.Save this license file onto the server
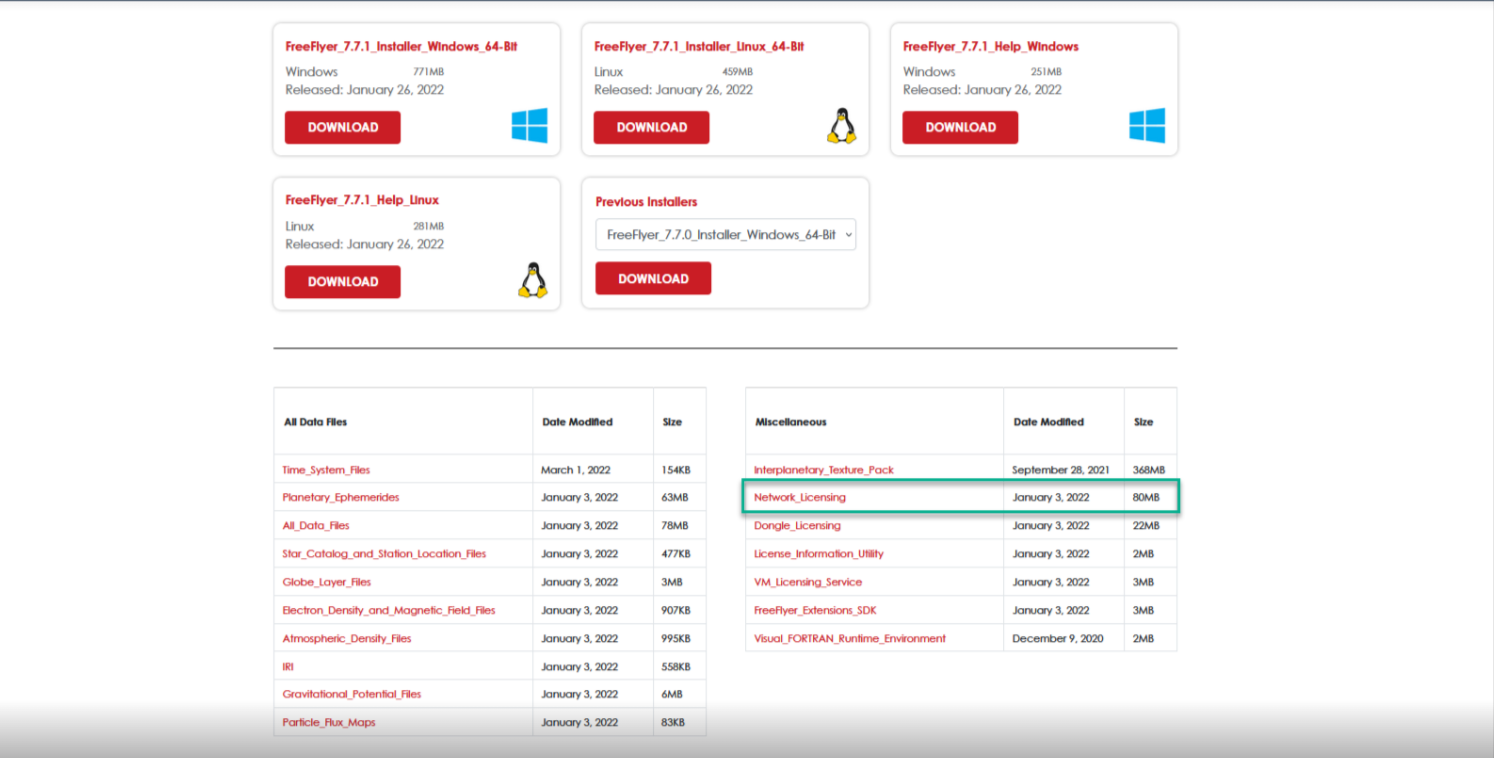
Note: When upgrading FreeFlyer to a newer version, be sure to use the newest version of lmgrd.exe or lmadmin.exe (License Server Manager) and freeflyr.exe (vendor daemon). Older versions of these files may not work with newer versions of FreeFlyer. These files are available on the Downloads page of the FreeFlyer website within the Miscellaneous Network_Licensing folder.
Virtual Machines
If a virtual machine is hosting the license, the license may need to use the VDH_UUID host ID. If this is the case, the VM Licensing Service must be installed. Without the Licensing Service installed, the license information displayed by FreeFlyer's report host information command line switch or the license information utility will say "Licensing Service Not Installed" in the VM_UUID and VDH_UUID fields, and a license based off one of these identifiers will not be valid. To use a license keyed off the machine's VDH_UUID on a virtual machine, follow the instructions below for your Operating System to install the VM Licensing Service:
•Windows oDownload the VM_Licensing_Service.zip from "Section 3 - Miscellaneous" under the Downloads tab on the corporate website (See screenshot below) oUnzip the VM_Licensing_Service folder and navigate to the "Windows" folder oRun "install_licensing_service.bat" ▪If desired, you can check that the installation was successful by opening the Task Manager and confirming that a new background process called "Activation Licensing Service" is running, or by checking that the FreeFlyer license information is displaying values in the VM_UUID and/or VDH_UUID fields
•Linux oIf it is not already installed, you will need to install the LSB package: ▪sudo yum -y install lsb oDownload the VM_Licensing_Service.zip from "Section 3 - Miscellaneous" under the Downloads tab on the corporate website (See screenshot below) oUnzip the VM_Licensing_Service folder oIn the terminal, navigate to the directory where you have saved the installer ("VM_Licensing_Service/Linux") ▪cd path_to_installer_directory oEnable the file for execution by running the following command: ▪chmod +x ./install_fnp.sh oInstall the program by running: ▪sudo ./install_fnp.sh
|
Dynamic License Allocation
As of FreeFlyer 6.10, customers with network licenses may choose whether to enable a feature called Dynamic License Allocation (DLA).
Recall that each copy (or "seat") of FreeFlyer comes with a 6-instance limit by default. This means that a user can have at most six concurrent instances of FreeFlyer running at any given time.
•Enabling DLA means that a single machine can check out multiple seats from the network license if it attempts to launch more instances than the instance limit for each seat on the license. •Disabling DLA means that a single machine will only be able to use a single seat from the network license and can only launch as many instances of FreeFlyer that the single seat allows. |
As an example, consider a network license server with three FreeFlyer seats on the network license, each with the standard 6-instance limit. A user is using FreeFlyer on their local workstation and attempts to launch seven concurrent instances of the program. With DLA enabled, the user will automatically pull a second seat from the license server and the new FreeFlyer instance will open successfully (assuming, of course, that there is at least one free seat on the license). Once the user reduces the number of running instances to six or below, the second seat will be returned to the license server. With DLA disabled, the user will get an error message informing them that they have reached the maximum instance limit.
Note: When DLA is enabled, each version of FreeFlyer will use its own DLA pool. This means that if a user opens multiple versions of FreeFlyer on a single machine connected to a network license with DLA enabled, each version of FreeFlyer will pull its own seat from the network license. Taking the example considered above (3 seats, each with a 6-instance limit), this would mean that if a user opened one instance each of two different versions of FreeFlyer, that user would be holding 2 seats (12 instances total), leaving only 1 seat (6 instances) available for other users.
Overview
There are two possible ways of setting up network licensing using FreeFlyer: lmgrd.exe and lmadmin. The following will give a high-level overview of each and how to configure them for operations. Any information not covered in this guide can be found in the LicenseAdministration.pdf file included with the FreeFlyer installation files on the a.i. solutions FTP server or the a.i. solutions website.
Platforms supported to date by the license servers are listed below:
Operating System |
Platform |
Microsoft® Windows® 64-bit |
x64 |
Red Hat Enterprise Linux (Version 8 or 9) 64-Bit |
x64 |
Note: The FreeFlyer network licensing scheme utilizes two ports, one for the license manager application (lmadmin or lmgrd.exe) and one for the vendor daemon (freeflyr). These ports can either be allowed to be chosen dynamically by the license manager (the typical setting) or be specified by the license server administrator. If specified ports are desired, make sure to include this information when requesting a network license from a FreeFlyer account manager. Finally, make sure to keep both ports open when configuring a FreeFlyer license server in secure environments.
Configuring a Network License Server in Windows
lmadmin
The lmadmin GUI-based License Server Manager includes all the functionality of the lmgrd.exe License Server Manager together with a web-based, administrative GUI. lmadmin supports a GUI client connection over either HTTP or HTTPS.
The lmadmin License Server Manager is designed to:
•Support multiple vendor daemons with one lmadmin process (lmgrd.exe only supports one vendor daemon per instance). •Launch without requiring any configuration options (lmgrd.exe requires a restart). •Perform all server configuration and administration functions from the GUI (LMTOOLS provides additional functions to lmgrd.exe). •Keep configuration options persistent (lmgrd.exe uses an option file specified on the command line). |
To Install:
1.Download and execute the lmadmin installer included with the FreeFlyer installation files on the a.i. solutions FTP server or the a.i. solutions website.
a.FlexNet's lmadmin installer is an InstallAnywhere installer that requires that that JRE 11 or later (for OS X: JRE 11 or later) be installed. If the JRE is not already present on the machine, it must be installed separately, because it is not bundled with the lmadmin installer. The JDK 17.0.8, JDK 11.0.20, and OpenJDK 20.0.2 are tested Java Standard Edition systems for installing the lmadmin.
2. Note that administrative privileges are required to complete the installation.
•Network Licensing\Windows\lmadmin\lmadmin-x64_n6-11_19_6_0.exe |
Note: While it is possible to manually start and stop the lmadmin license server manager, it is recommended that lmadmin be installed as an operating system service so that it will automatically start and stop whenever the operating system restarts. To install lmadmin as a service, make sure to check the "Run as a service" option on the Service Configuration installer page.
3.The lmadmin.exe file is installed by default to the following directory:
•C:\Program Files\FlexNet Publisher 64-bit License Server Manager |
4.Log files are stored by default in the following directory:
•C:\ProgramData\FLEXlm\lmadmin\logs |
5.Copy the freeflyr.exe file from the "Network Licensing\Windows\lmadmin" folder into the lmadmin installation directory.
6.Start up the lmadmin service through the Windows "Computer Management" window
•Right-click My Computer, click "Manage," then navigate to "Services" •Right-click on the lmadmin64 service (the service name was input during the install process) and stop it (if it is up) and then right-click and start it |
7.Launch the License Server Manager by entering the following URL into a web browser: http://<server>:8090 (where <server> is the computer name where the license server is running).
•http://localhost:8090 can be used as an alternative to the server name when the license manager is running on your local machine. |
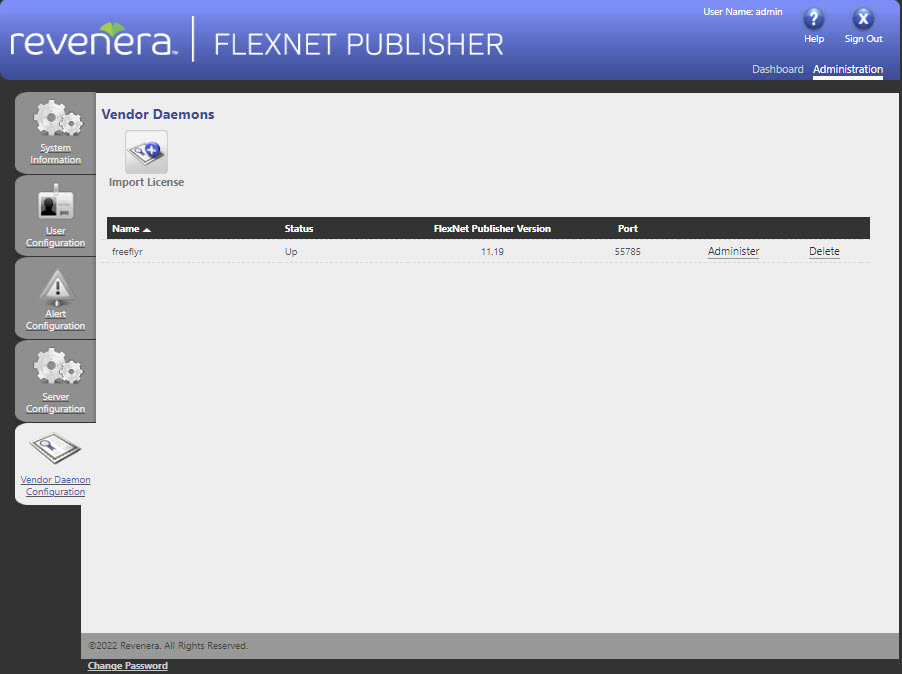
8.Proceed to Administration » Vendor Daemon Configuration » Import License and browse to your license file.
Note: When logging in to the Administration area for the first time, "admin" is used for both the username and password. After logging in, you will be prompted to change the password. We strongly encourage you to change the password before you complete setting up the license server.
9.Once you select "Import License," your License Server will be running and ready for a client machine to connect!
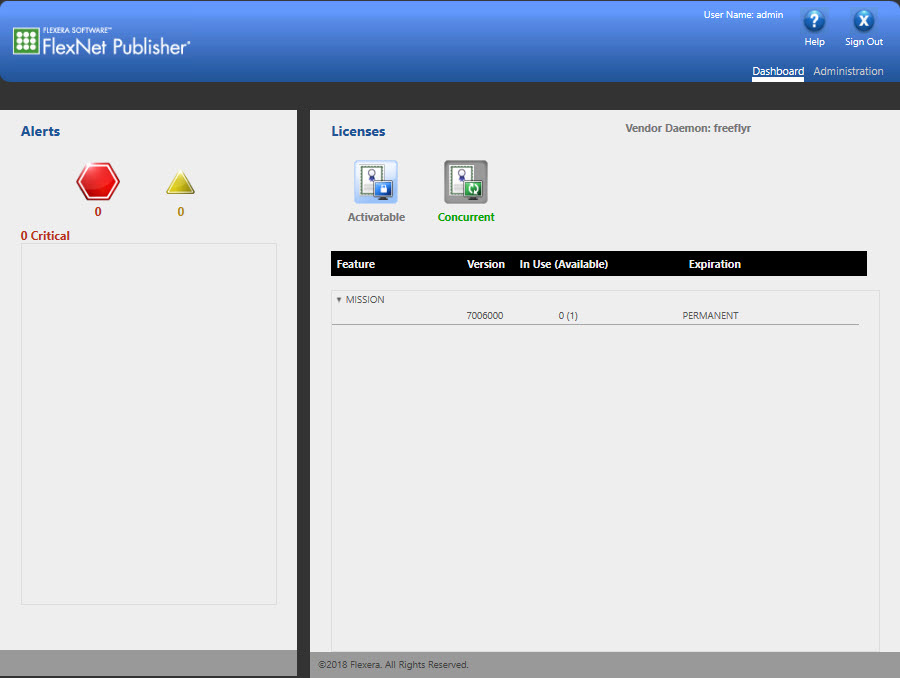
10.Navigate to the “Dashboard” tab to monitor the network license seats.
Additional Documentation:
•Network_Licensing\Windows\LicenseAdministration.pdf |
lmgrd.exe
The License Server Manager (lmgrd.exe) is one of the components that make up a license server (the other being the vendor daemon, freeflyr.exe). In some architectures the License Server Manager is controlled from the command line. On Microsoft® Windows® there is a GUI tool, LMTOOLS, which can be used to interface with the license server manager. It is also possible to set up the license server as a Microsoft® Windows® service.
Although the lmgrd and lmadmin managers are similar, the lmadmin option is much more user friendly and easier to configure. We recommend that you use this option over lmgrd.exe.
Note: A newer lmgrd can be used with an older vendor daemon, but a newer vendor daemon might not work properly with an older lmgrd. If upgrading FreeFlyer to a newer version, be sure to use the newest version of lmgrd and freeflyr.
Previously, the executable "FreeFlyer License Server.exe" was packaged in the "Network Licensing" folder. This executable is no longer available, although you can achieve the same level of functionality with the setup instructions below.
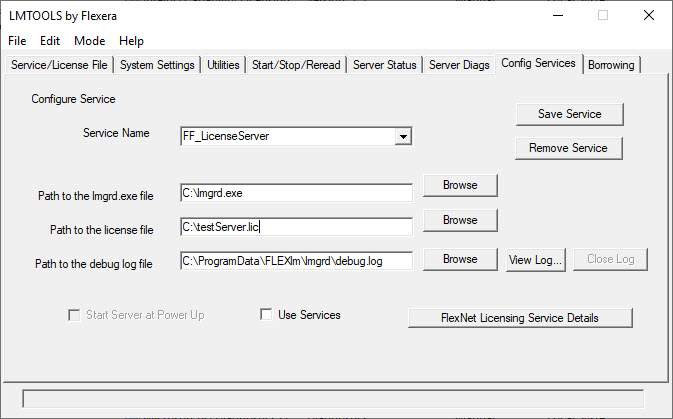
1.Move the "Network_Licensing\Windows\lmgrd" folder included with the FreeFlyer installation files on the a.i. solutions FTP server or the a.i. solutions website to the main drive on the server machine. 2.To configure the License Server, launch lmtools.exe included in the folder. 3.Navigate to the “Config Services” tab and fill in the Service Name (e.g. FF_LicenseServer), and the paths to the lmgrd.exe and license files. 4.In the "Path to the debug log file" text box, enter or browse to the debug log file that this license server writes. Prepending the debug log file name with the + character appends logging entries. The default location for the debug log file is the C:\ProgramData\FLEXlm\lmgrd folder. To specify a different location, make sure you specify a fully qualified path. 5.Once you have set up these paths, select “Save Service”.
6.Navigate to the “Start/Stop/Reread” tab, and select “Start Server”. 7.The FreeFlyer License Server is now running and ready for a client machine to connect! 8.Navigate to the “Server Status” tab and select “Perform Status Enquiry” to monitor the network license seats and the users of these seats |
Additional Documentation:
•Network_Licensing\Windows\LicenseAdministration.pdf |
Note: It is possible for the Windows firewall to prevent lmadmin and freeflyr from receiving incoming connections, which would prevent the licensing server from working properly. If the license server appears to be correctly configured, but FreeFlyer is unable to use a network license, try adding lmadmin and freeflyr to your firewall and allowing them to receive incoming connections.
Configuring a Network License Server in Linux
The lmadmin GUI-based License Server Manager can also be configured on servers running Red Hat Enterprise Linux 8 or Red Hat Enterprise Linux 9. As on Windows servers, lmadmin on Linux provides full license management capabilities together with a web-based, administrative GUI. Linux lmadmin also supports a GUI client connection over either HTTP or HTTPS.
The lmadmin License Server Manager is designed to:
•Support multiple vendor daemons with one lmadmin process. •Launch without requiring any configuration options. •Perform all server configuration and administration functions from the GUI. •Keep configuration options persistent. |
Root privileges are required in order to complete the installation process.
To Install:
1. Obtain the required network licensing files from a.i. solutions one of two ways:
•From the a.i. solutions website: Download the Network_Licensing.zip archive and extract it to a directory to which your account has full write access using Archive Manager •From the a.i. solutions FTP server: Copy the contents of the "Network_Licensing\" directory to a directory to which your account has full write access. |
2. Navigate to the "lmadmin" folder and locate the lmadmin installer (lmadmin-x64_lsb-11_19_6_0.bin).
3. Add write permissions to the lmadmin installer using
$ chmod u+x ./lmadmin-x64_lsb-11_19_6_0.bin |
4. Execute the installer and install lmadmin in a directory to which your account has full write access.
a.FlexNet's lmadmin installer is an InstallAnywhere installer that requires that that JRE 11 or later (for OS X: JRE 11 or later) be installed. If the JRE is not already present on the machine, it must be installed separately, because it is not bundled with the lmadmin installer. The JDK 17.0.8, JDK 11.0.20, and OpenJDK 20.0.2 are tested Java Standard Edition systems for installing the lmadmin.
Note: If lmadmin is being installed and run from a user account other than root, make sure to change the installation directory ownership from root to your user account using chown.
5. Copy the freeflyr vendor daemon file from the "lmadmin" folder into the lmadmin installation directory.
6. While in the lmadmin installation directory, add execute permission to freeflyr using
$ chmod u+x ./freeflyr |
7. Launch the License Server Manager by executing the lmadmin command from the lmadmin installation directory.
$ ./lmadmin |
Note: If when attempting to launch the License Server Manager a "bad ELF interpreter" error message is returned, you need to install the LSB package as indicated by the note above.
Note: If when attempting to launch the License Server Manager a "libssl.so.1.0.0: cannot open shared object file: No such file or directory" error message is returned, you may need to add the lmadmin directory to the LD_LIBRARY_PATH environment variable. This can be accomplished by running "export LD_LIBRARY_PATH=$LD_LIBRARY_PATH:./" while in the lmadmin install directory. You can then check whether all the required libraries for the application can be located by running "ldd ./lmadmin".
8. Navigate to the web-based GUI interface by entering the following URL into a web browser: http://<server>:8090 (where <server> is the computer name where the license server is running).
•http://localhost:8090 can be used as an alternative to the server name when the license manager is running on your local machine. |
9. Proceed to Administration » Vendor Daemon Configuration » Import License and browse to your license file.
Note: When logging in to the Administration area for the first time, "admin" is used for both the username and password. After logging in, you will be prompted to change the password. We strongly encourage you to change the password before you complete setting up the license server.
10. Once you select "Import License," your License Server will be running and ready for a client machine to connect!
11. Navigate to the “Dashboard” tab to monitor the network license seats.
To configure lmadmin to run as an operating system service on Linux systems, consult the instructions contained in the bash script located in the following directory:
<lmadmin_install_directory>/examples/service |
This directory contains an example startup script for the license administration daemon. You can adapt this example script to fit your particular lmadmin installation by updating the installDir and lmadminUser variables.
Additional Documentation:
•Network_Licensing/Linux/RHEL8/LicenseAdministration.pdf •Network_Licensing/Linux/RHEL9/LicenseAdministration.pdf |
Configuring License Servers for Three-Server Redundancy
To help ensure license availability, an alternative to hosting your FreeFlyer license server on a single server is to configure a set of three servers in a three-server redundant setup. In this configuration, the license server manager is installed on each of the three servers and the servers are issued a combined license file. Each of the license servers is identified as either primary, secondary, or tertiary. Once a license server is designated as the master, it is responsible for serving licenses to client systems running FreeFlyer. The servers operate as a triad, and the hosted FreeFlyer seat(s) are available whenever a quorum exists. A quorum is formed when at least two of the three license servers are running and able to communicate with each other. This means that so long as two of the three license servers are up and running the hosted FreeFlyer seat(s) will be available to client systems.
In normal operations, the primary license server is the master. When FreeFlyer sends a checkout request for a license, the master responds and then serves the license to the client system. If the master server fails, whether due to hardware failure, loss of network connection, or something else, the secondary license server becomes the master and will then serve licenses to client systems. If both the primary and secondary license servers go down, licenses will no longer be served to FreeFlyer users until at least two of the three license servers are up and running again. More information about the mechanics of three-server redundant systems can be found in the FlexNet License Administration guide referenced at the end of this section.
When requesting a three-server redundant network license file, information for each of the three servers must be delivered to a.i. solutions support. The process is the same for both Windows and Linux systems. First, determine the three servers that will be used and gather the hostname and hostid (either composites or disk serial numbers) values for each machine. When selecting servers, be sure to use systems that are stable and are not frequently rebooted or shut down. For Windows systems there are two ways to obtain the computer information. The first way is to launch FreeFlyer on the machine and copy the information shown in the Register a New FreeFlyer License screen or returned from the report host information command line switch. The second way is to install and launch the FreeFlyerLicenseInformation available on the Downloads page of FreeFlyer website. For Linux systems there are also two ways to obtain the computer information. The first way the computer information can be retrieved is by using the report host information command line switch. The second way is to install the FreeFlyerLicenseInformation utility available on the Downloads page of FreeFlyer website, enable the file for execution, and execute the program. Next, determine the TCP/IP port that the license servers will use to communicate with one another and client systems. This information is also included in the license file in an editable field (see the sample three-server redundant license below). Finally, once the hostname and hostid values and the TCP/IP port number for each system have been gathered, send this information to fflicense@ai-solutions.com.
A network license file is then created using the hardware information for the three servers and returned to the License Server Administrator. A sample three-server redundant license file can be found below.
SERVER Server1 COMPOSITE=915F01AFC94F 27000 SERVER Server2 COMPOSITE=E64E02010B2E 27000 SERVER Server3 COMPOSITE=LV739F1D52C3 27000 VENDOR freeflyr FEATURE MISSION freeflyr 7006000 permanent 1 VENDOR_STRING=1,6,-1 \ ISSUED=17-Sep-2019 BORROW=336 TS_OK SIGN="00C7 738C 8EBC 6470 \ 2744 A063 75EB BD00 3D3D 9153 B51E E5D0 186A 4A62 EC64" |
This license file has been generated for three servers (hostnames: Server1, Server2, Server3) using the composite hostids. The servers communicate on TCP/IP port 27000. Certain portions of the SERVER lines are editable by the License Server Administrator to enable flexibility in the three-server redundant system. First, the port number can be changed after the license file has been generated. Note that if you are using lmadmin, you do not need to edit the license file directly; instead the port number can be configured using the GUI interface. Next, there is an optional PRIMARY_IS_MASTER keyword that can be added to the end of the first SERVER line to ensure that the primary server is the master whenever it is running and communicating with one of the other license servers. If this is set and the primary server goes down the primary server will always become the master when it comes back up again. If this is not set and the primary server goes down the secondary server becomes the master and will remain the master even when the primary server comes back up. In this case the primary can only become the master again when the secondary license server fails. Finally, there is an optional HEARTBEAT_INTERVAL keyword that can be used to set how long the license servers wait to receive a heartbeat from another license server before shutting down the vendor daemon. More information about the use of this keyword can be found in the FlexNet License Administration guide referenced at the end of this section.
Once the license has been received, save the license file onto each server and follow the directions below corresponding to the server operating system for each machine.
On Windows
1.Download and execute the lmadmin installer included with the FreeFlyer installation files on the a.i. solutions FTP server or the a.i. solutions website.
•Network Licensing\lmadmin\lmadmin-x64_n6-11_19_6_0.exe |
Note: While it is possible to manually start and stop the lmadmin license server manager, it is recommended that lmadmin be installed as an operating system service so that it will automatically start and stop whenever the operating system restarts. To install lmadmin as a service, make sure to check the "Run as a service" option on the Service Configuration installer page.
2.The lmadmin.exe file is installed by default to the following directory:
•C:\Program Files\FlexNet Publisher 64-bit License Server Manager |
3.Copy the freeflyr.exe file from the "lmadmin" folder into the lmadmin installation directory.
4.Ensure that no freeflyr.exe vendor daemon is running by executing the following in a command prompt window:
TASKKILL /F /IM freeflyr.exe |
5.Import the license file and configure the vendor daemon by executing the following in a command prompt window:
cd <LMADMIN INSTALL DIRECTORY> lmadmin -force -import <PATH TO LICENSE FILE>\<LICENSE FILENAME> |
6.Start up the lmadmin service through the Windows "Computer Management" window
•Right-click My Computer, click "Manage," then navigate to "Services" •Right-click on the lmadmin service (the service name was input during the install process) and stop it (if it is up) and then right-click and start it |
Note: Make sure to start the server that you intend to be the master first, as the servers will be declared as primary/secondary/tertiary based on the order in which they are started.
7.Navigate to the web-based GUI interface by entering the following URL into a web browser: http://<server>:8090 (where <server> is the computer name where the license server is running).
•http://localhost:8090 can be used as an alternative to the server name when the license manager is running on your local machine. |
8.Proceed to the Administration area. The "System Information" tab will give you the status of your three-server redundant system. If the system is configured fully the quorum state will be "Up" and all three servers should be displayed as "Active."
Once these steps are complete the license server will be up and running, and users can obtain licenses for use via the steps outlined in the Windows and Linux guides below.
On Linux
1. Obtain the required network licensing files from a.i. solutions one of two ways:
•From the a.i. solutions website: Download the Network_Licensing.zip archive and extract it to a directory to which your account has full write access using Archive Manager •From the a.i. solutions FTP server: Copy the contents of the "Network Licensing\" directory to a directory to which your account has full write access. |
2. Navigate to the "lmadmin" folder and locate the lmadmin installer (lmadmin-x64_lsb-11_19_6_0.bin).
3. Add write permissions to the lmadmin installer using
$ chmod u+x ./lmadmin-x64_lsb-11_19_6_0.bin |
4. Execute the installer and install lmadmin in a directory to which your account has full write access.
Note: If lmadmin is being installed and run from a user account other than root, make sure to change the installation directory ownership from root to your user account using chown.
5. Copy the freeflyr vendor daemon file from the "lmadmin" folder into the lmadmin installation directory.
6. While in the lmadmin installation directory, add execute permission to freeflyr using
$ chmod u+x ./freeflyr |
7. If FlexNet has previously been installed, there may be existing lmadmin processes running. Kill any running lmadmin processes by running:
$ pidof lmadmin |
Note: This will return the lmadmin process ID if the process is running. If nothing is running, there will be no process ID returned.
8. If a process ID is returned, kill the lmadmin process (where <pid> is the process ID number we just received) by running:
$ kill -9 <pid> |
9. Import the license file and configure the vendor daemon by executing the following:
$ cd <LMADMIN INSTALL DIRECTORY> |
$ lmadmin -force -import <PATH TO THE LICENSE FILE>/<LICENSE FILENAME> |
10. Launch the License Server Manager by executing the lmadmin command from the lmadmin installation directory.
$ ./lmadmin |
Note: Make sure to start the server that you intend to be the master first, as the servers will be declared as primary/secondary/tertiary based on the order in which they are started.
8. Navigate to the web-based GUI interface by entering the following URL into a web browser: http://<server>:8090 (where <server> is the computer name where the license server is running).
•http://localhost:8090 can be used as an alternative to the server name when the license manager is running on your local machine. |
9. Proceed to the Administration area. Navigate to the "Vendor Daemon Configuration" tab, select "Import License," and browse to your license file.
10. After importing the license file the license server will attempt to connect to the other members of the triad. The "System Information" tab will give you the status of your three-server redundant system. If the system is configured fully the quorum state will be "Up" and all three servers should be displayed as "Active."
Once these steps are complete the license server will be up and running, and users can obtain licenses for use via the steps outlined in the Windows and Linux connection guides below.
Additional Documentation:
•Network_Licensing/Linux/RHEL8/LicenseAdministration.pdf •Network_Licensing/Linux/RHEL9/LicenseAdministration.pdf |
How To Connect to a Network License in Windows
Connecting with FreeFlyer.exe
1.Verify that the License Server is running:
•Contact your System Administrator to verify that the Network License Server software is installed on the server and is running. •See Setting up a Network License Server above. |
2.Launch FreeFlyer on the client machine.
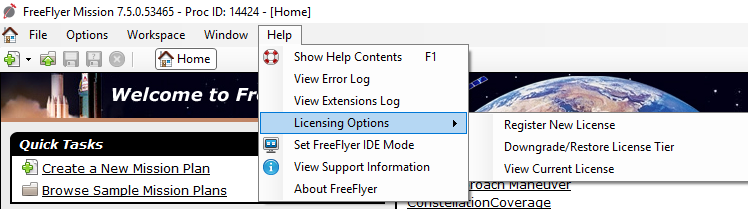
3.Navigate to Help » Licensing Options » Register New License and complete Step 2 by selecting "Connect to Network License Server" under Registration Method.
4.Type the license server computer name into the “Primary Network Server” – “Host Name” field, and select the port to connect to in the “Primary Network Server” – “Port” field.
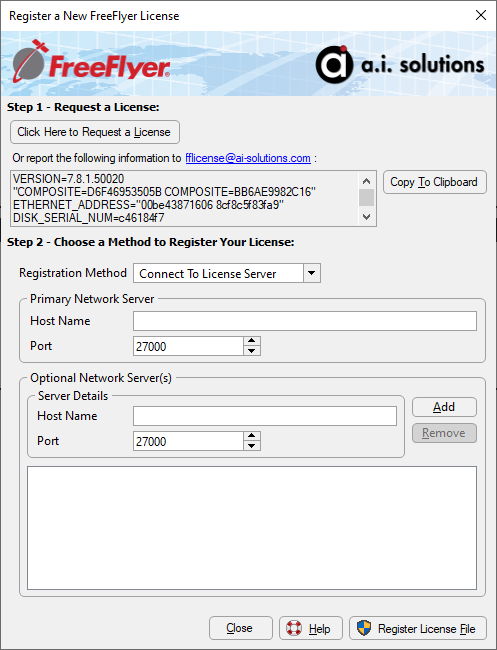
Note: When connecting to a three-server redundant license server, input the primary server host name and port into the "Primary Network Server" fields and input the secondary and tertiary server host names and ports into the "Optional Network Server(s)" fields.
5.Select "Register License File". Windows users will see a shield symbol on this button and may be prompted to enter credentials for an administrator account on the machine.
6.This will complete the installation and registration process. You can modify your license settings at any time using the Help à Licensing Options menu.
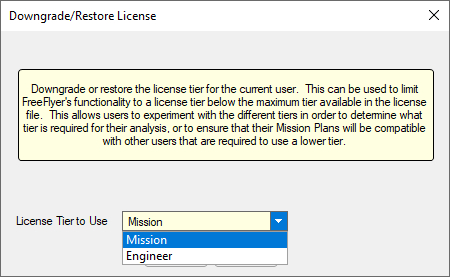
7.The Downgrade/Restore License Tier option allows you to select which tier of FreeFlyer functionality (Engineer or Mission) you would like to use, up to the maximum tier allowed by your license file. This allows users to experiment with the different tiers in order to determine what tier is required for their analysis, or to ensure that their Mission Plans will be compatible with other users that are required to use a lower tier. If your license file includes any Packs, you can enable or disable them here.
8.If you have any problems, please contact us at fflicense@ai-solutions.com or 301-306-1756 x2.
Connecting with FF.exe
1.Verify that the License Server is running:
•Contact your System Administrator to verify that the Network License Server software is installed on the server and is running. •See Setting up a Network License Server above. |
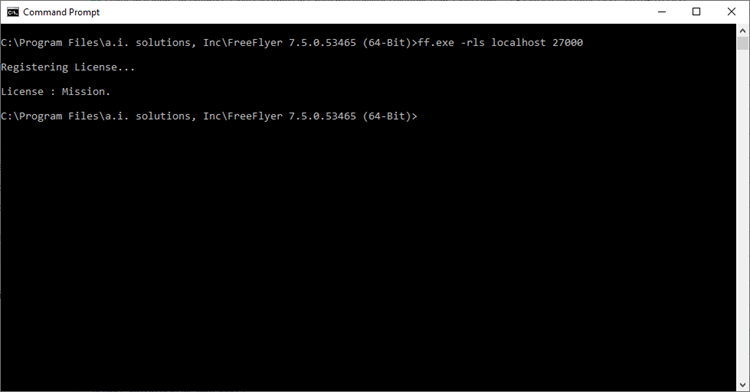
2.In a Command Prompt window, navigate to the FreeFlyer install directory (e.g. C:\Program Files\a.i. solutions, Inc\<FREEFLYER VERSION>).
3.Using the server name and port specified by your System Administrator, use the register license server switch (-rls) to register the license server.
Note: When connecting to a three-server redundant license server, use the register license server switch (-rls) in conjunction with the server name and port for each license server. For example, for a three-server redundant setup with servers "Server1," "Server2," and "Server3" on port 27000 the command line syntax would be as follows:
FF.exe -rls Server1 27000 -rls Server2 27000 -rls Server3 27000 |
Note: If the license server has more than one license tier or other features such as packs FreeFlyer will automatically use the highest tier available. If you want to select specific features you will need to use the license server feature selection switch (-lsfs) followed by the names of the features you would like to select
FF.exe -rls 127.0.0.1 27000 -lsfs "ENGINEER,NASA_PACK" |
4.Use the report license information switch (-rli) to verify that the license was registered properly.
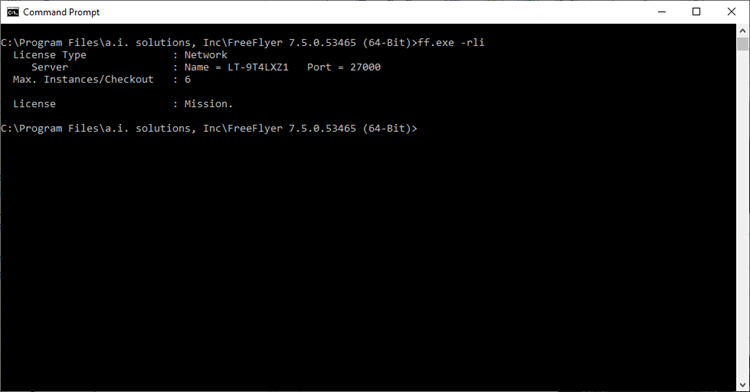
5.If you have any problems, please contact us at fflicense@ai-solutions.com or 301-306-1756 x2.
Note: On Windows systems you can configure the length of the timeout for a connection attempt by setting an environment variable called FLEXLM_TIMEOUT equal to the desired timeout length. Values are in microseconds, and the valid range is 200,000 to 20,000,000. The default value is 3,000,000 microseconds (or 3 seconds).
How To Connect to a Network License in Linux
1.Verify that the License Server is running:
•Contact your System Administrator to verify that the Network License Server software is installed on the server and is running. •See Setting up a Network License Server above. |
2.Open a terminal window.
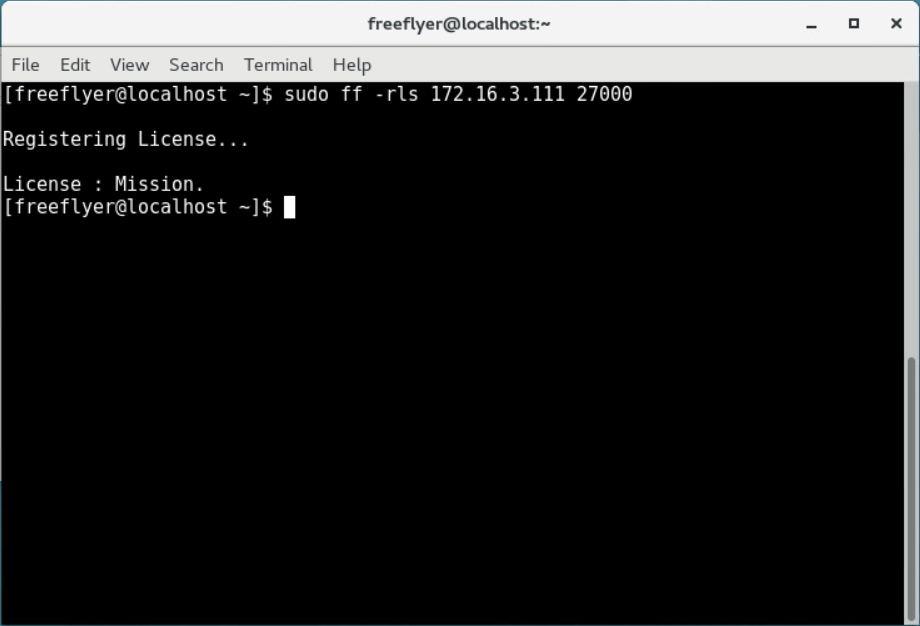
3.Using the server name and port specified by your System Administrator, use the register license server switch (-rls) to register the license server.
Note: When connecting to a three-server redundant license server, use the register license server switch (-rls) in conjunction with the server name and port for each license server. For example, for a three-server redundant setup with servers "Server1," "Server2," and "Server3" on port 27000 the bash syntax would be as follows:
ff -rls Server1 27000 -rls Server2 27000 -rls Server3 27000 |
4.Use the report license information switch (-rli) to verify that the license was registered properly.
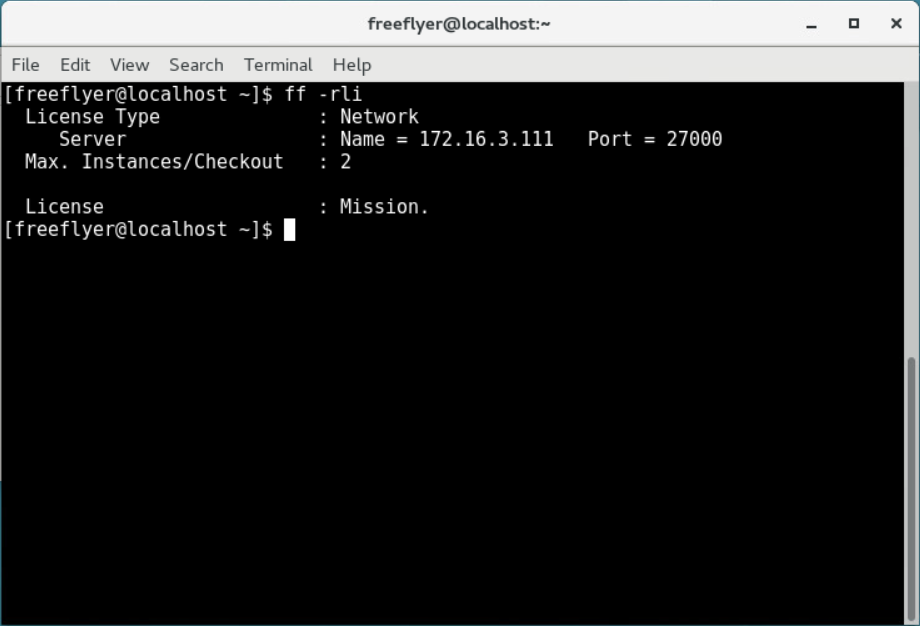
5.If you have any problems, please contact us at fflicense@ai-solutions.com or 301-306-1756 x2.
Note: See the System Requirements page for a full list of Linux package dependencies.
Borrowing a License
Borrowing in Windows with FreeFlyer.exe
The 'Check Out License From License Server' option allows you to check out or borrow a license from the server. When you check out a license without the 'Borrow' option on, you will be able to continue using FreeFlyer temporarily if the connection to the server is brought down. If FreeFlyer is closed down, the checked out license will be returned and the connection to the license server will need to be re-established the next time FreeFlyer is started up.
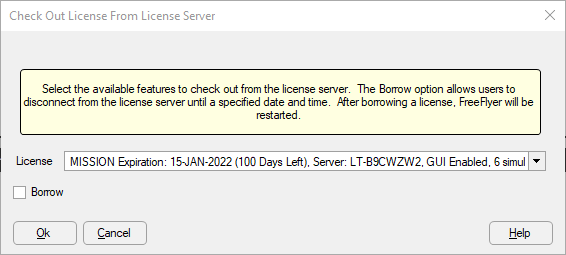
Borrowing the license (i.e. checking the Borrow option 'on') will allow you to borrow a FreeFlyer license from the server until a specified date and time. Standard licenses can only be borrowed for up to two weeks. This license will allow you to use FreeFlyer without an active connection to the license server until it is returned or the borrow end date is reached.
Note: Borrowed licenses cannot be used by other users on the network. Once the license is returned to the server, other users will once again be able to use the license.
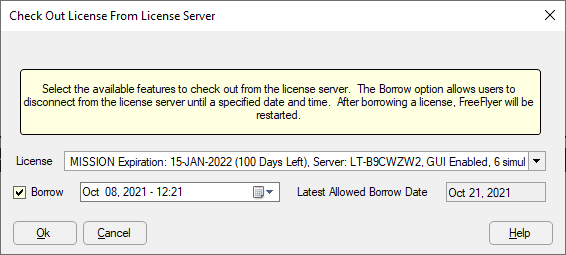
Once you have selected the license you would like to check out and an end date, select the 'Ok' button. Windows users will see a shield symbol on this button and may be prompted to enter credentials for an administrator account on the machine. FreeFlyer will then restart.
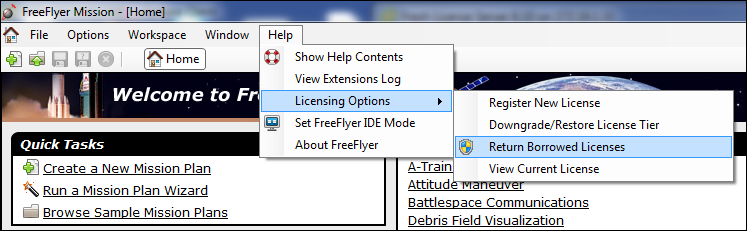
To return a borrowed license, simply go to Help à Licensing Options à Return Borrowed Licenses. Again, Windows users will see a shield symbol on this button and may be prompted to enter credentials for an administrator account on the machine. FreeFlyer will restart after the license is returned.
Note: You must be connected to the license server in order to return a borrowed license.
If you have any problems, please contact us at fflicense@ai-solutions.com or 301-306-1756 x2.
Borrowing in Windows with FF.exe
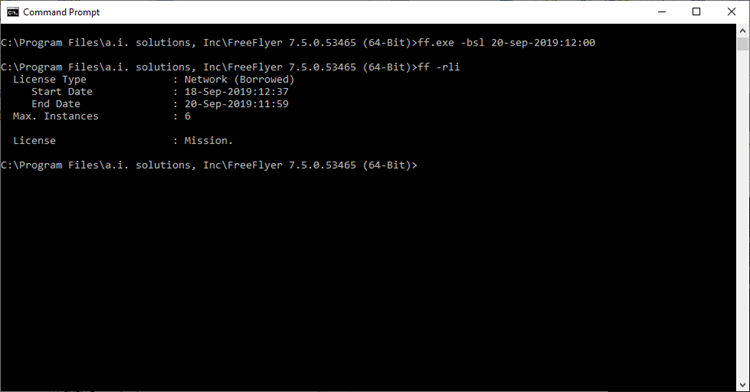
To borrow a server license in Windows using FF.exe, open a Command Prompt window, navigate to the FreeFlyer install directory, and use the borrow server license switch (-bsl). Once you've borrowed the license, you can use the report license information switch (-rli) to view the start and end times for the borrowing period.
To return a borrowed license at any point during the borrowing period, simply use the return server license switch (-rsl).
If you have any problems, please contact us at fflicense@ai-solutions.com or 301-306-1756 x2.
Borrowing in Linux
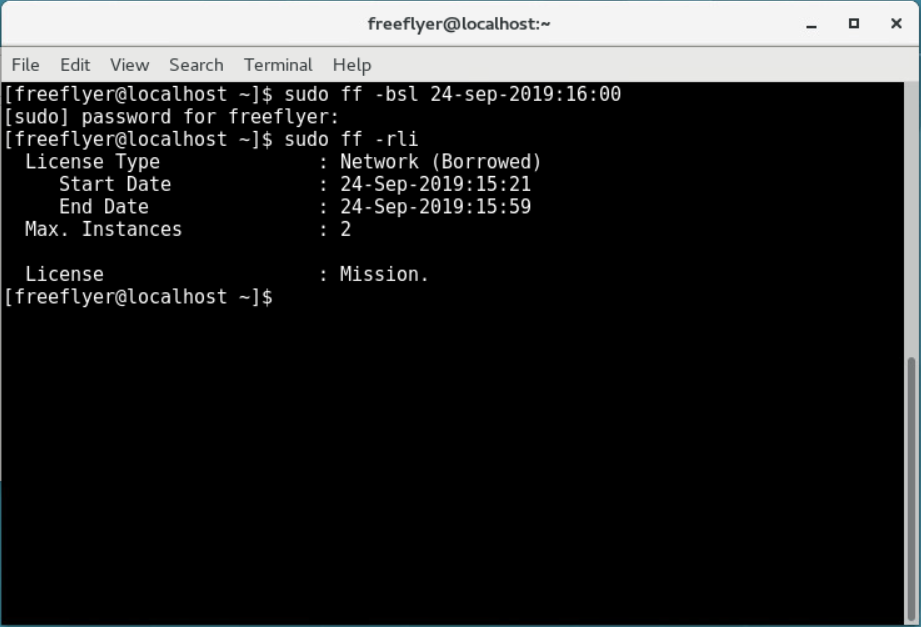
To borrow server license in Linux, open a terminal window and use the borrow server license switch (-bsl). Once you've borrowed the license, you can use the report license information switch (-rli) to view the start and end times for the borrowing period.
To return a borrowed license at any point during the borrowing period, simply use the return server license switch (-rsl).
Technical Support Contact Information
If you have any issues, please contact the FreeFlyer licensing team at fflicense@ai-solutions.com or by phone at 301-306-1756 x2.