The FreeFlyer DataBase object enables connectivity to Database Management Systems (DBMS), providing the ability to access the storage and processing power associated with relational databases. The Open Database Connectivity (ODBC) application program interface (API) is used as the connection mechanism. User-supplied Structured Query Language (SQL) statements specify the DBMS actions to be performed. Exact syntax supported for SQL statements is determined by the DBMS in use.
Note: Variations on exact syntax occur between database drivers.
•Variables, Arrays, or any FreeFlyer object property can be passed between FreeFlyer and a DataBase. •The Call command allows FreeFlyer to pass data between FreeFlyer and Database Management Systems (DBMS). •The Call command must be used on a previously defined DataBase object, which has been initialized via the Open command. •Multiple DataBase objects can be used, each forming a connection to a different DBMS or a different user account within the same DBMS. |
Connection String
One of the advantages of the ODBC interface is that there is a consistent interface to all databases from FreeFlyer, meaning you don't have to set up the connection to a database differently based on the type of database you're working with. That detail is abstracted to the ODBC configuration layer.
For example, if you install the MySQL ODBC driver, there will be a configuration GUI in the ODBC administration applet which allows the user to set up the connection. Then, in FreeFlyer, you only have to configure the data source name, and optionally username and password.
Getting Started
In Windows
To get started with a database in Windows, you must first set up its "Data Source Name" (DSN) under ODBC and associate a driver and database location with that name. Specific drivers may require additional parameters. Your specific database driver documentation should be referenced for the database’s setup.
Note: Because FreeFlyer is a 64-bit application, you need to use the 64-bit version of the ODBC manager located at "C:\Windows\System32\odbcad32.exe".
Database Configuration Procedures
1.From the Control Panel, double click on "Administrative Tools" and then double click "Data Sources" (ODBC) - see note above if you are using a 64-bit machine. 2.Under "User Data Sources" do one of the following two things:
3.A window should pop up with configuration options. |
Within the configuration window, enter the following inputs (may vary depending on the ODBC driver):
1.Data Source Name: the name of your data source (e.g. "MySQLdata" or "Accessdata"). 2.Description: a description of your database (e.g. "Database for my Spacecraft"). 3.Database: the name of the database you will be using (e.g. "my_data"). 4.TCP/IP Server: enter the TCP/IP server where the database is located. 5.User: the user of the database. This will be specific to each database. 6.Password: the password associated with the user. |
You are now ready to access your database through FreeFlyer. You may set up a DataBase object through the Object Browser, as seen in this image, or through FreeFlyer script, as in the syntax examples below.

DataBase Object Editor
In Linux
As in Windows, in Linux the ODBC API is used to interface between FreeFlyer and external databases. The general process for configuring a FreeFlyer-compatible database on a Linux platform is:
1.Install the general UNIX ODBC packages.
2.Locate the data source configuration files.
3.Configure the database type-specific connectors (e.g. for MySQL, MS SQL Server, Oracle, etc). |
To confirm that your database setup will be compatible with your FreeFlyer Mission Plans, first use the UNIX ODBC installer (odbcinst) to report the configured data sources on your machine.
odbcinst -s -q |
Next, pick a data source from the list and use a SQL command prompt to confirm that the database is configured properly.
isql -v <DATA SOURCE> <USER NAME> <PASSWORD> |
If that works, then FreeFlyer will be able to interface with your database. You can now run Mission Plans where a DataBase object points by name to any of the data sources listed in the output from odbcinst -s -q above.
Note: Since there is no GUI interface for FreeFlyer in Linux, and thus the properties of objects in the Mission Plan cannot easily be modified, it is important to ensure that when doing Mission Plan development in Windows that the data source name, user name, and password for the DataBase object are configured to match the setup on the Linux machine.
Optional Clauses
•All: Processes all the rows in the specified database. This clause is used when the bound output columns are Arrays. •Next: Processes only the next row in the specified database. This clause is used when the bound output columns are Variables. •BindParam: Binds a parameter to the user-specified property. Unlimited properties may be specified. This clause sends data from a FreeFlyer object to the DataBase. The All and Next clauses are not used with this clause. •BindCol: Maps the elements of the last row of the result set to individual variables or to the elements of an array. If the number of rows is greater than the array length, the array is incrementally resized. This clause retrieves data from the DataBase and binds it to a FreeFlyer Variable or Array. You must specify All or Next when using this clause. •ReturnCount: Returns the row number that was fetched, starting at 1. "0" is returned when an empty results set is generated. •ResultsPending: Returns "0" if all rows have been processed and "1" if more rows are available. •RowCount: Returns the number of rows affected by SQL statements such as UPDATE, INSERT, or DELETE. If the information is unavailable, "-1" is returned. |
See how these clauses are used in the detailed examples below.
FreeFlyer passes database-specific commands through the supplied ODBC driver. FreeFlyer variables, arrays, array elements, and object properties may be bound to the SQL execution input and output through the “BindParam” and “BindCol” commands. The BindCol list maps the last row of the result set to each individual variable per column. If Arrays are used, elements are filled beginning at myArrayName[0] and progressing upward. If more rows are returned than the array size, the array is incrementally resized.
Note: Database column definitions must match the types of FreeFlyer objects they are bound to.
If the results set contains multiple rows, use the "All" or "Next" options within the Call statement. If the "All" keyword is specified, Array objects must be bound to the output columns , and the Call command handles the entire result set within a single execution of the Call statement. If the "Next" keyword is specified, Variable objects must be bound to the output columns, and processing is performed on one row of the results set at a time.
If the result set for the Call statement and associated SQL statement is closed, then the SQL statement is executed, potentially generating a result set. If a result set is generated, then the set is opened and transferred to the object(s) listed in BindCol.
If the result set for the Call statement and associated SQL statement is open, then the SQL statement is not executed, and maps the next row in the results set to the object(s) listed in BindCol.
To aid in processing, FreeFlyer variables can optionally be mapped to "ReturnCount" and/or to "ResultsPending". If used, the variables will contain the return status of the Call statement execution. The variable bound to ReturnCount contains the row number of the result set that was fetched, starting at 1. A ReturnCount of "0" is returned when an empty results set is generated. The variable bound to ResultsPending will contain a "0" if all rows were processed or a "1" if more rows are available.
If a change in the input variables in the BindParam list is detected during a Call command execution, an open result set is first closed, discarding any unprocessed results, and a new execution of the SQL statement begins. If the value of the variable bound to ResultsPending is set to "0" before executing the Call statement, an open result set is first closed. The result set is automatically closed when the execution of the Call statement completes if no command is specified.
For SQL statements performing UPDATE, INSERT, or DELETE, a variable bound to “RowCount” will return the number of rows affected if the database is available. If the information is unavailable then a "-1" is returned. For other SQL statements, the database’s ODBC driver may define this value. For example, some data sources may be able to return the number of rows returned by a SELECT before fetching the rows. However, not all databases are required to supply the number of rows.
|
Manual Commit Mode
The FreeFlyer DataBase object has the option to enter a manual commit mode, also commonly known as transactional mode. This mode will build up a transaction, or queue, of SQL commands when calls are made to the DataBase. This transaction will be executed as a stack only when the Commit method is called, and will rollback the entirety of the transaction if any of the SQL commands in the transaction fail to execute.
Note: When manual commit mode is selected, the DataBase object will automatically roll back any changes made to the database if the Mission Plan unexpectedly stops either due to a runtime error, or some other error.
Properties and Methods used in Manual Commit Mode
The CommitMode property is used to set the commit mode of the DataBase. By default, the DataBase object is set to run in automatic commit mode. This must be done while the database is closed. The Timeout property can be used to set the database timeout, it is only relevant if a transaction is trying to handle locked data in the DataBase, otherwise it will perform its command normally.
DataBase myDB;
myDB.DataSourceName = "my_data"; myDB.CommitMode = 1; // Set commit mode to manual. myDB.Timeout = 6; // Set database timeout.
|
Use the Commit method to commit all database changes. If any of the changes fail, the database will roll back to its initial state.
Spacecraft SC1;
Open myDB;
Call myDB "INSERT INTO sc_table1 (A, B) VALUES (?, ?)" BindParam (SC1.A, SC1.TA); Call myDB "INSERT INTO sc_table2 (A, B) VALUES (?, ?)" BindParam (SC1.A, SC1.TA);
myDB.Commit(); // Commit changes to the database. |
The GetLastActionMessage method returns the specific details of the last execution that was completed by the data source, regardless of whether the execution was successful or not. The contents of the message are specific to the database driver that is being used. This will return the string “No Additional Information” if there is no additional information. If a transaction fails, the GetLastActionCode method returns a five-character SQLSTATE value specific to that error message. This will return an empty string if there is no return code associated with the last return (only happens when it returns SUCCESS without info).
Try; Call myDB "DROP TABLE nonexistanttable"; // This transaction fails. End; Report myDB.GetLastActionCode(), myDB.GetLastActionMessage();
Call myDB "INSERT INTO sc_table0 (sma, ta) VALUES (?, ?)" BindParam (SC1.A, SC1.TA); // This transaction succeeds.
Report myDB.GetLastActionCode(), myDB.GetLastActionMessage(); // No error code is generated. |
Output:
myDB.GetLastActionCode |
myDB.GetLastActionMessage |
42S02 |
[MySQL][ODBC 5.1 Driver][mysqld-5.1.65-community]Unknown table 'nonexistanttable' |
No Additional Info |
The Rollback method can be used to roll back changes made to the current transaction to the point when the last Commit method was called. If the Commit method was not called throughout the Mission Plan, the database will revert back to when the DataBase object was first initialized.
While (SC1.ElapsedTime.ToDays() < 5);
Call myDB "INSERT INTO sc_table0 (sma,ta) VALUES (?,?)" BindParam (SC1.A, SC1.TA);
If (Test == 0); myDB.Commit(); // Only commit changes to the database if the conditional statement is met. Else; myDB.Rollback(); // Roll back any changes to the database if conditional statement fails. End;
Step SC1;
End; |
Example 1: Insert and Extract Data
The following script creates and configures the necessary objects for the first example:
Array lat[100]; myDB.UserName = "my_name"; myDB.Password = "my_password"; |
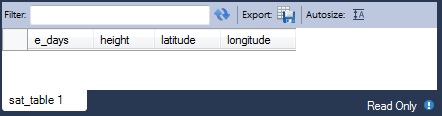
The following script demonstrates how to create a table within a database. The blank table that is created is shown below.
Call myDB "CREATE TABLE sat_table (e_days FLOAT, height FLOAT, latitude FLOAT, longitude FLOAT)"; |
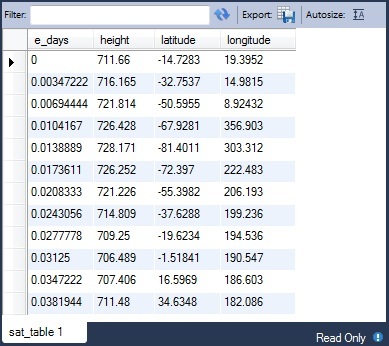
The following script demonstrates how to insert data into a table in a database for every Step of a Spacecraft. The populated table is shown below.
While (Spacecraft1.ElapsedTime < TIMESPAN(1 hours));
Call myDB "INSERT INTO sat_table (e_days, height, latitude, longitude) VALUES (?, ?, ?, ?)" BindParam (Spacecraft1.ElapsedTime.ToDays(), Spacecraft1.Height, Spacecraft1.Latitude, Spacecraft1.Longitude) RowCount rrows;
If (rrows == 0 ); // insertion failed End;
Step Spacecraft1;
End; |
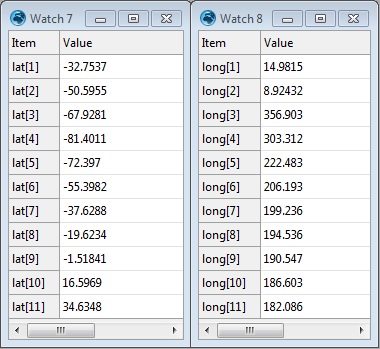
The following script demonstrates how to extract data from a table one row at a time. The values returned to lat[0], long[0], rreturn, and rpending are shown below.
Call myDB Next "SELECT latitude, longitude FROM sat_table" BindCol (lat[0], long[0]) ReturnCount rreturn ResultsPending rpending;
If (rreturn == 0); // nothing selected, nothing returned // note that in this case rpending = 0 End; If (rpending == 0); // all results returned, results set closed End; If (rpending == 1); // results pending, next execution needed to process next row End; |

The following script demonstrates how to extract data from a table all rows at once. The values returned to lat and long are shown below.
Call myDB All "SELECT latitude, longitude FROM sat_table" BindCol (lat, long) ReturnCount rreturn;
If (rreturn == 0); // nothing selected, nothing returned End |
The following script closes the DataBase object:
Close myDB; |
Where:
•myDB is a DataBase object •sat_table is a table within the DataBase •e_days, height, latitude, longitude define the column headings of the table •INTEGER defines the format of the values recorded in the individual columns of the table •lat[0] and long[0] are elements of Array objects •rreturn, rpending, and rrows are Variable objects |
Example 2: Create an Ephemeris in a DataBase
The following script opens a database, creates a table, and populates it with states from a spacecraft, thereby creating an ephemeris in the DataBase object.
String sqlStatement; DataBase myDB; Spacecraft Spacecraft1;
myDB.DataSourceName = "my_data"; myDB.DataBaseLogFile = "myDB.log";
Open myDB;
Call myDB "DROP TABLE SC_EPHEM"; // remove table if it exists already
sqlStatement = "CREATE TABLE SC_EPHEM (epoch FLOAT, x FLOAT, y FLOAT, z FLOAT, vx FLOAT, vy FLOAT, vz FLOAT)"; Call myDB sqlStatement;
sqlStatement = "INSERT INTO SC_EPHEM VALUES (?, ?, ?, ?, ?, ?, ?)";
While ( Spacecraft1.ElapsedTime < TIMESPAN(1 days)); Step Spacecraft1; Call myDB sqlStatement BindParam (Spacecraft1.Epoch.ToDays(), Spacecraft1.X, Spacecraft1.Y, Spacecraft1.Z, Spacecraft1.VX, Spacecraft1.VY, Spacecraft1.VZ); End;
Close myDB; |
The following script then extracts this ephemeris data and writes it into the state of a spacecraft.
Variable resultsPending = 1; Variable returnCount; Variable epoch;
Open myDB;
While (resultsPending == 1); Call myDB Next "SELECT * from SC_EPHEM" BindCol (epoch, Spacecraft1.X, Spacecraft1.Y, Spacecraft1.Z, Spacecraft1.VX, Spacecraft1.VY, Spacecraft1.VZ) ReturnCount returnCount ResultsPending resultsPending; Spacecraft1.Epoch = TimeSpan.FromDays(epoch); Map Spacecraft1; End;
Close myDB; |
Example 3: Using Manual Commit Mode
The following script initializes a Database Object in manual commit mode, then writes data to the Database after the first day.
Spacecraft SC1; String MySQL = " ";
DataBase myDB;
myDB.DataSourceName = "my_data"; myDB.DataBaseLogFile = "fflog.log"; myDB.UserName = "root"; myDB.Password = "password"; myDB.CommitMode = 1; // Set database to commit mode.
Open myDB;
MySQL = "DROP TABLE sc_table";
Try; Call myDB MySQL; // Attempt to remove table if it exists. End;
Report myDB.GetLastActionCode(), myDB.GetLastActionMessage(); // Read error if drop fails.
MySQL = "CREATE TABLE sc_table (epoch TEXT, height FLOAT, lon FLOAT, lat FLOAT)";
Call myDB MySQL; // Create table in the database. myDB.Commit(); // Commit changes to database - adding sc_table.
MySQL = "INSERT INTO sc_table VALUES (?, ?, ?, ?)";
While (SC1.ElapsedTime < TIMESPAN(3 days));
Call myDB MySQL BindParam (SC1.EpochText, SC1.Height, SC1.Longitude, SC1.Latitude);
If (SC1.ElapsedTime > TIMESPAN(1 days)); myDB.Commit(); // Commit changes to database after the first day. Else; myDB.Rollback(); // Rollback changes before the first day. End;
Step SC1;
End;
Close myDB; |
See Also
•DataBase Properties and Methods
•Open Command
•Call Command
•Close Command