In this section, we will start our very first mission! For this scenario, we have the Keplerian Elements of two different spacecraft. We want to compare the speeds of those spacecraft during a 2 day period.
The topics discussed in this tutorial are the following:
3. Writing the Mission Plan - Drag and Drop
4. Writing the Mission Plan - FreeForm
Let's make the Mission Plan!
•To start, on the Home Screen click "Create a New Mission Plan"
Adding Spacecraft
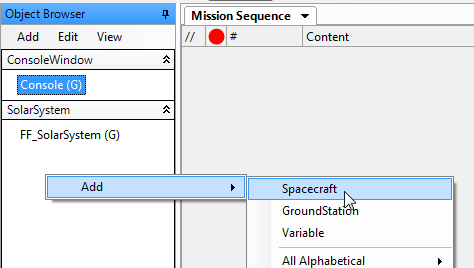
•Right Click in the Object Browser and Press
oAdd → Spacecraft
Object Browser in the Output Screen
•Double Click “Spacecraft1”
•Change the Element Type from “Cartesian” to “Keplerian”
•Enter the orbital parameters for Spacecraft 1:
oA: 7100 km
oE: 0.05
oI: 0 deg
oRAAN: 0 deg
oW: 0 deg
oTA: 0 deg
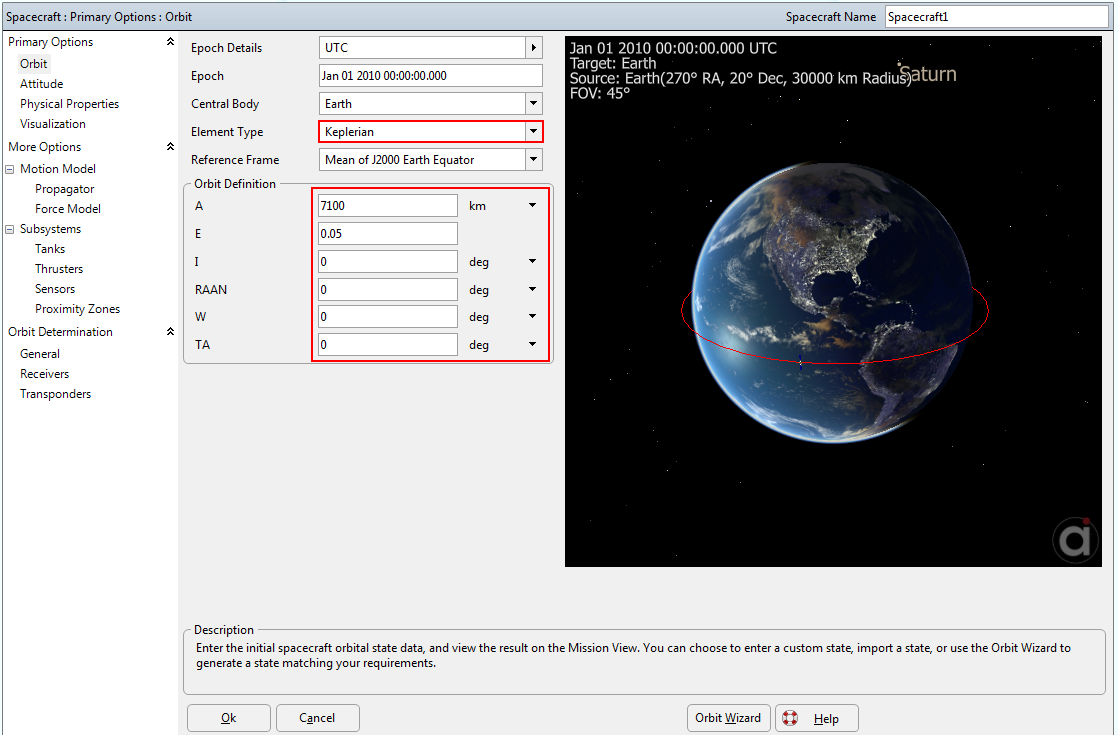
Spacecraft Orbit Editor
•Click on “Propagator” in the Left Hand side of the Spacecraft Window under “Motion Model”
•Change the Step Size from 300s to 100s
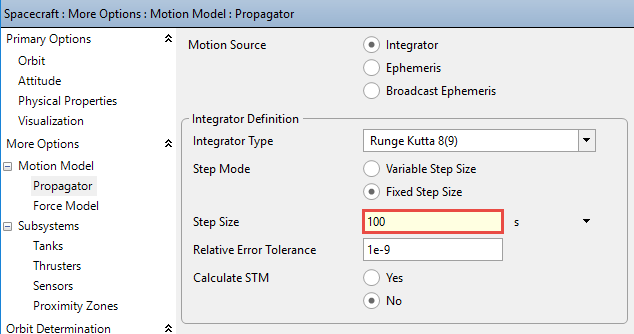
Spacecraft Propagator Editor
•Also under “Motion Model”, click on “Force Model”
FreeFlyer has the ability to modify the Force Model used on the Spacecraft. Here you can change the gravitational model and atmospheric model used in the simulation. You can also change the bodies used in force calculations, as well as simulate the effects of Solar Radiation Pressure. However, our simulation does not require us to change any of these options.
•Under “Primary Options,” click on “Physical Properties”
In this section, you can change the Spacecraft’s Aerodynamic properties as well as its Mass and Moment of Inertia. These properties are especially critical when using Low Earth Orbiters over longer periods of time, or when your Spacecraft uses thrusters.
•Under “Dry Inertial Properties”, change the Mass to 200 kg.

Spacecraft Physical Properties Editor
•Click “Ok” to save your changes and close the Spacecraft Editor
We need to add the Second Spacecraft in as well. This time, we will make sure it has a different tail color.
•Right Click the Object Browser and Press
oAdd → Spacecraft
•Double Click “Spacecraft2”
This time, we can use the Orbit Wizard to create a Spacecraft with a pre-defined orbit.
•Click on “Orbit Wizard” at the bottom right of the Spacecraft editor
•Choose “Molniya” from the “Orbit Type” dropdown
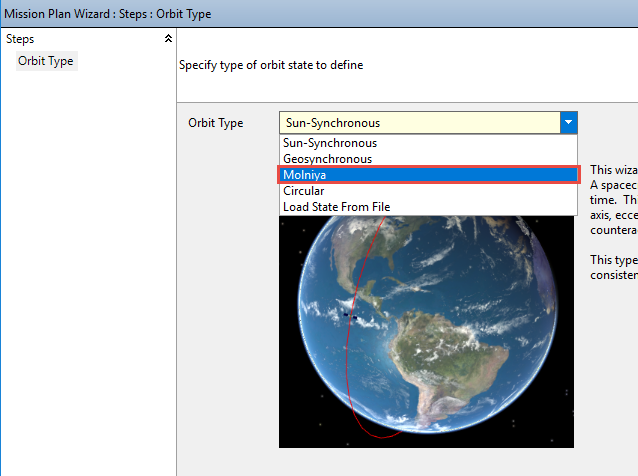
Spacecraft Orbit Wizard
•Click “Next”
•Leave all the default values
•Click “Finish”
•Click on “Propagator” in the Left Hand side of the Spacecraft editor
•Change the Step Size from 300s to 100s
•Click on Visualization on the left-hand side
•Change the tail color to green
•Go to the 3D Model dropdown and select “TDRS” (This will change the appearance of the Spacecraft)
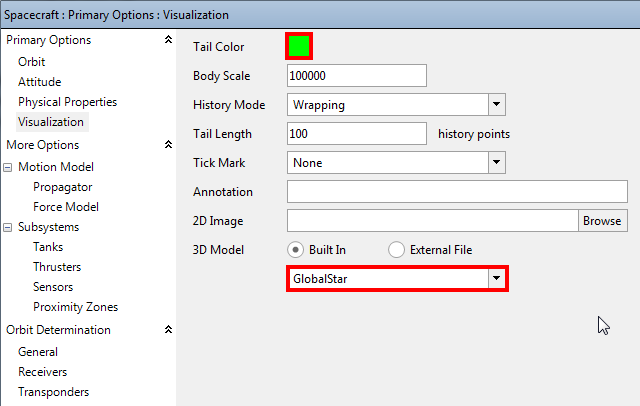
Spacecraft Visualization Editor
•Click “Ok”
Great! We have created our Spacecraft. Now we need to add in a few more objects through the Object Browser
Adding Other Objects
First, we will add in one of the more important Objects: a ViewWindow. This will allow us to view our Spacecraft orbiting a 3D globe. If we so desired, we could plot its ground track on a 2D map as well. Let’s add in the ViewWindow:
•Right Click the Object Browser
oAdd → Output → ViewWindow
•Double Click “ViewWindow1”
•Check both boxes for Spacecraft 1 and 2 in the “Available Objects” so that they are visible in the ViewWindow.
•We want the names of the Spacecraft visible as well
oClick on "Spacecraft" to select both Spacecraft objects
Note: Selecting "Spacecraft" will select all the Spacecraft objects, but you can also select individual Spacecraft by simply clicking on their name, or multiple Spacecraft with CTRL + click
oCheck the "Show Name" box on the right hand side so that both Spacecraft will have their names visible
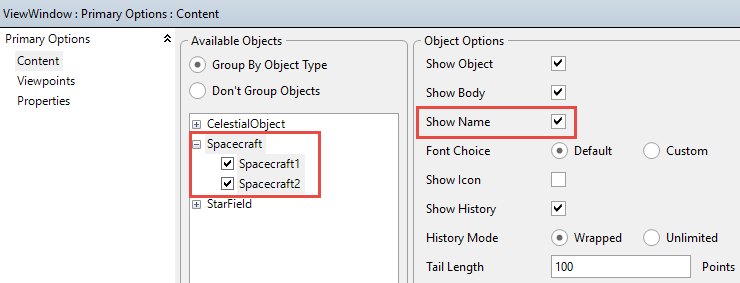
ViewWindow Editor
Now, we want to modify one of the viewpoints of the ViewWindow so we have a good view of both Spacecraft. Also, we’d like to have a chase viewpoint of Spacecraft2
•In the left-hand side of the ViewWindow editor, Click on “Viewpoints”
•For Reference Frame, click “Inertial”
•To add the second viewpoint, Click “Create”
•Change the name to “ChaseSC2”
•Change the title to “Chase SC2”
•Change source to “Spacecraft2” and click "Copy to Target" to set the Target as Spacecraft2 as well
•Change the Radius to 3000 km
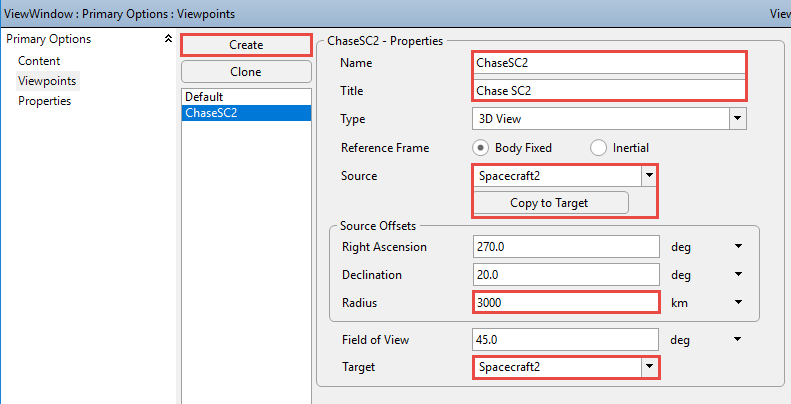
ViewWindow Viewpoint Editor
•Click “Ok” to save your changes and close the ViewWindow Editor
Now that we have our ViewWindow all set up, we still need one more thing – a PlotWindow. This will allow us to graph the velocities of the Spacecraft.
•Right Click the Object Browser
oAdd → Output → PlotWindow
•Double click "PlotWindow1"
•Click on the Y-Axis dropdown menu
•Under “Choose a property or method”, select “VMag”
oTo navigate more quickly, you may press the first letter of what you’re looking for to jump to the beginning of that alphabetical section
oVMag is the magnitude of the velocity vector, which is what we are looking for
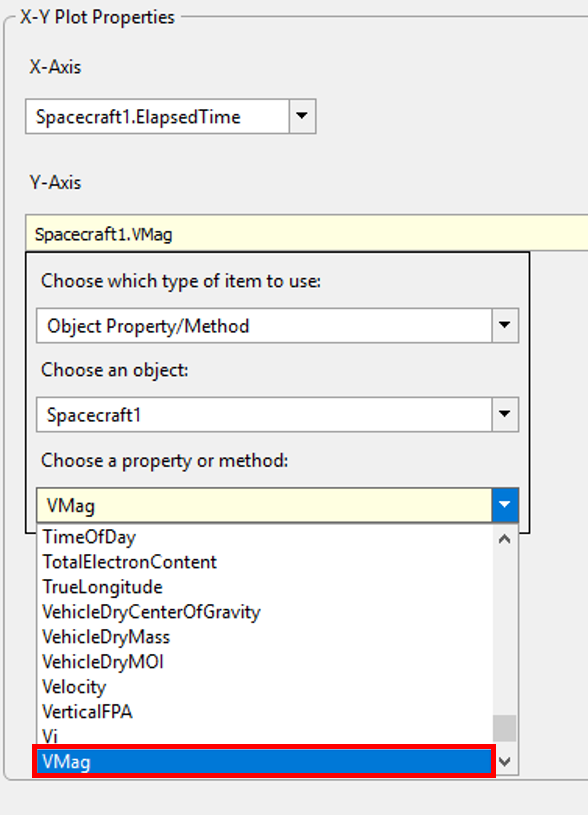
PlotWindow Editor
•Click “More” so we can add another line to the plot
•Click on the second dropdown that just appeared
•Under “Choose an object”, select “Spacecraft2”
•Under “Choose a property or method”, select “VMag”
•Click “Ok”
Now that we have all the objects we need for our Mission Plan, let’s move on to the actual Mission Sequence.
Writing the Mission Plan - Drag and Drop
The easiest way you can create your Mission Sequence is to drag and drop Script Elements onto the Mission Sequence. To start, we will need to put in a while loop that will last us 2 days. You will likely use while loops in most missions you create.
•Drag and drop “While…End” from the Script Elements on the right-hand side into the Mission Sequence portion of your window
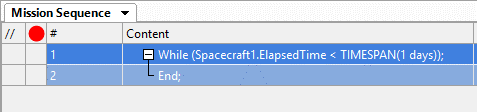
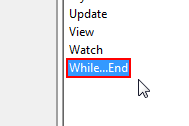
Scripting Elements and While Loop inside Mission Sequence
•Double Click the first line which should read “While (Spacecraft1.ElapsedTime < TIMESPAN(1 days));”
The Mission Sequence will loop through until the condition inside the parenthesis is met. For our mission, we want it to run for 2 days.
•Click on the dropdown that currently reads “TIMESPAN(1 days)”
•Under "Enter a time span value", delete "1" and enter "2"
We can continue dragging and dropping elements into the Mission Sequence, but for practice we are going to write the rest of the mission in FreeForm, FreeFlyer’s scripting editor.
Writing the Mission Plan - FreeForm
•Drag and drop a “FreeForm” from the "Script Elements" section on the right-hand side into the While loop
•Double-click "FreeForm: FreeForm"
•So we know what this script does, let's change the FreeForm label to “Step and Update”
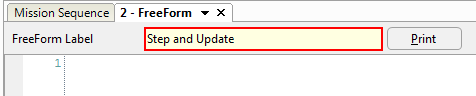
FreeForm Label
FreeFlyer script allows us to bypass the limitations and constraints of doing things through the GUI, and also allows us to write complex math functions or logic control that are otherwise not built in to FreeFlyer. Anything that can be done through the Object Browser and Drag-and-Drop can also be done through a FreeForm script editor.
To start off, we need to step both of the Spacecraft forward one step (Remember when we set the step size to 100s?) First, we will step forward Spacecraft1. To do this, we will write:
Step Spacecraft1; |
To step Spacecraft2, we will do so with what is called an “Epoch Sync”. This ensures that both Spacecraft will be simulated to the same points in time, syncing their epochs. This is always a good practice when dealing with multiple Spacecraft. To do this, we will write:
Step Spacecraft2 to (Spacecraft2.Epoch == Spacecraft1.Epoch); |
Now, we need to update the PlotWindow so that the current Spacecraft speed is written to the plot. To do this, we will write:
Update PlotWindow1; |
Next, we need to update the ViewWindow to show our Spacecraft at its current state. To do this, we will write:
Update ViewWindow1; |
Overall, your script should look something like this:
Step Spacecraft1; Step Spacecraft2 to (Spacecraft2.Epoch == Spacecraft1.Epoch);
Update PlotWindow1; Update ViewWindow1; |
For more on FreeForm syntax and usage, go to
Help → Show Help Contents → Guides → FreeFlyer Scripting → Syntax and the FreeForm Script Editor
For help on other parts of FreeFlyer that you may have questions about, you can right-click on the element in question and click "Go To Help File." This will bring you to the FreeFlyer Help File and give you information about the element you right-clicked.
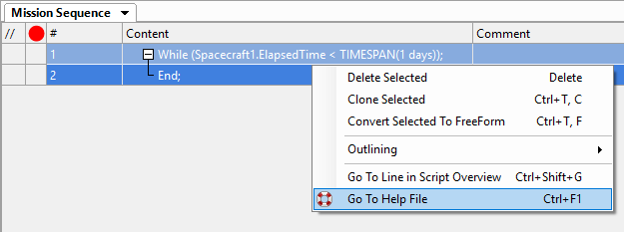
Go To Help File Example
The Report Command
Report commands can be used to print text or numerical data to a data table. For this scenario, we will print the time, spacecraft altitude, and spacecraft velocity for each spacecraft.
•Click on the “Mission Sequence” tab to go back to the Mission Sequence
•Drag and drop a FreeForm script editor underneath the “Step and Update” FreeForm we just created (still inside the While loop)
•Double-click the FreeForm
•Change the name label to “Report Time, Alt, and Velocity” so we know what this script does
To report the data, we need to write the following:
Report Spacecraft1.EpochText, Spacecraft1.Height, Spacecraft1.VMag; Report Spacecraft2.EpochText, Spacecraft2.Height, Spacecraft2.VMag; |
You’ll notice that as soon as you press the period key after an object, FreeFlyer will give you a scrollable list of properties (‘P’) and methods (‘M’) applicable to that object along with a description of that property or method. The auto complete logic allows you to scroll and either double-click or press enter to have FreeFlyer automatically type the property or method you've chosen.
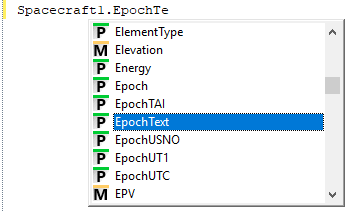
FreeFlyer IntelliSense
Your Mission Sequence should now look like this:
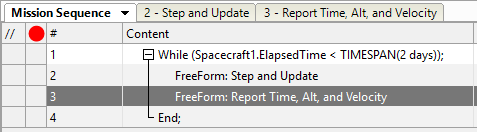
Mission Sequence
Running the Mission
•Press the play button on the navigation bar
oThis will automatically run a Syntax Check, and then start the mission
•Four windows should pop up: The ViewWindow, PlotWindow, and two Report Windows
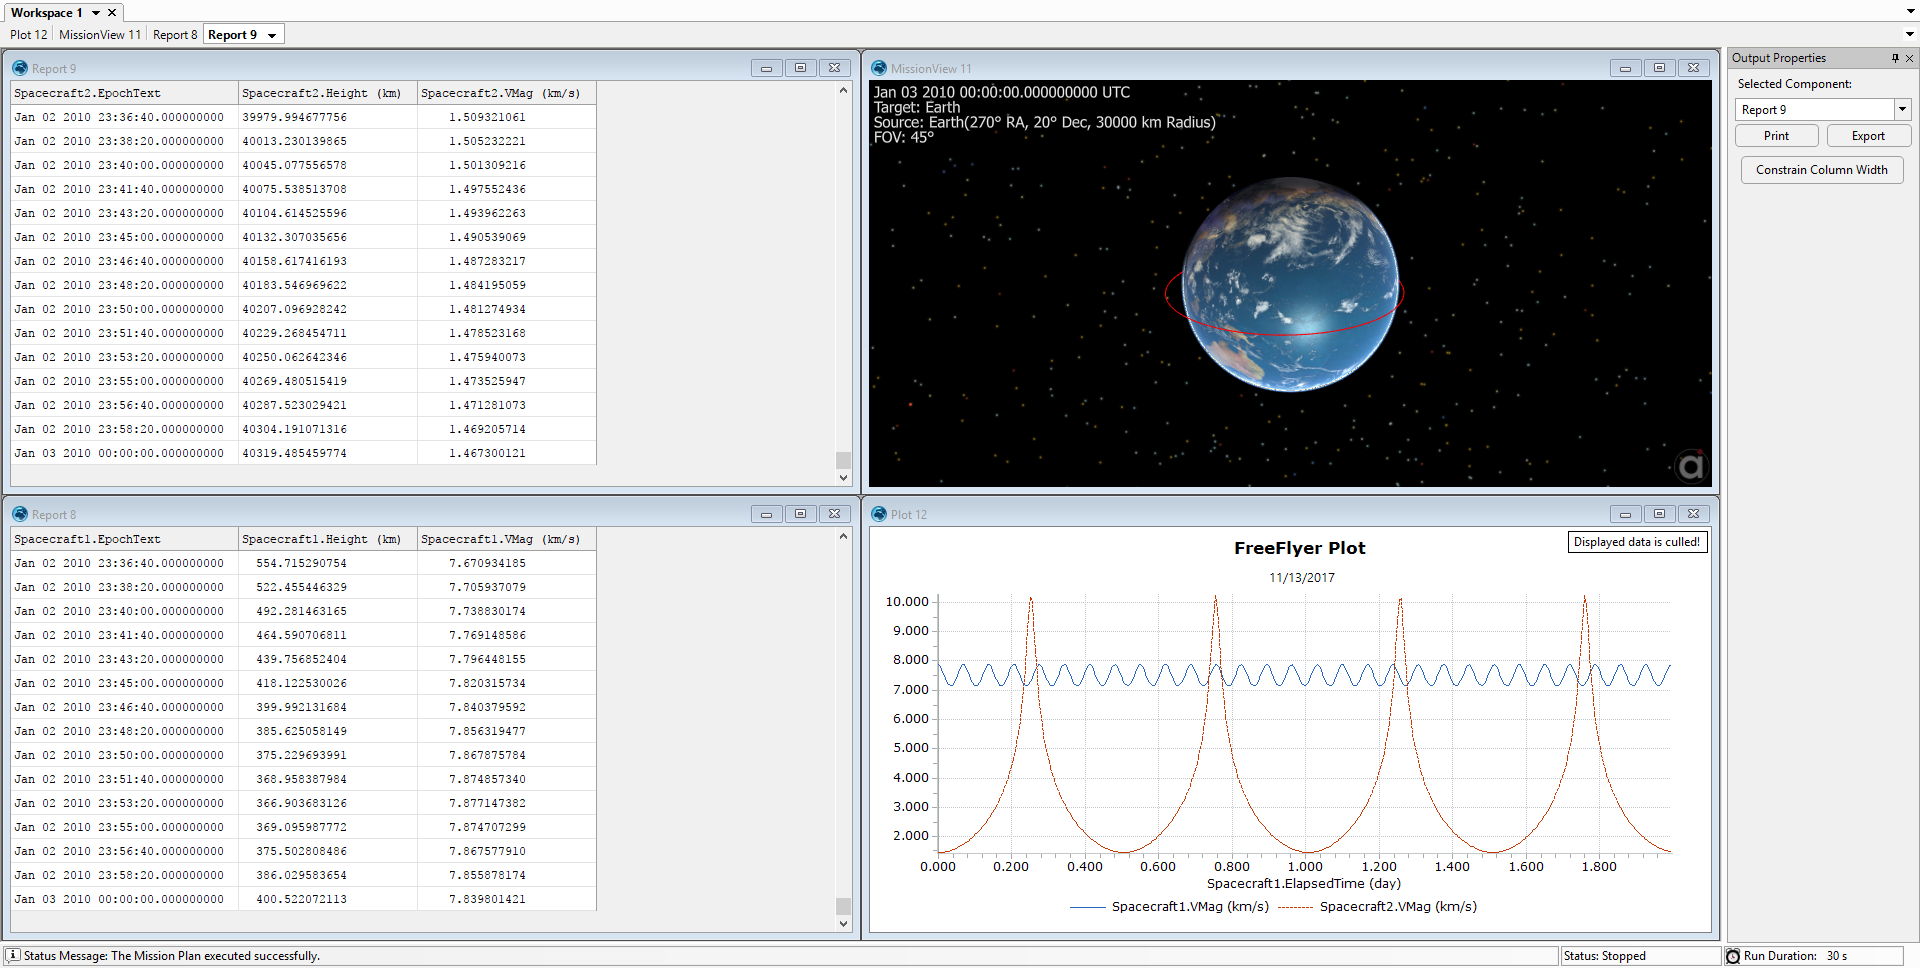
Output Window
•Double Click the top of the MissionView Window to maximize it
•Click and hold the left mouse button to rotate around the scenario
•Click and hold the right mouse button to zoom in and out
•As stated before, to modify any of the output properties, you can modify the components in the Output Properties Section on the Right Hand side.
•To change the viewpoint to the chase viewpoint we set up earlier, in “Output Properties” change the Viewpoint to “Chase SC2”
If you wish to switch to other full screen outputs, on the bar just below the Workspace tabs, you’ll see each output at the top.
•Switch to the Velocity Plot by clicking on the "Plot" tab below the workspace tabs
![]()
Plot Tab
•To zoom in on a section of the plot, click and drag to highlight the section of where you would like to zoom in.
•To zoom out, right-click the plot.
•You can modify the output properties of the plot in the “Output Properties Section” on the Right Hand Side.
•If you need to export the plot, click on the button labeled “Export”
oYou can export it as an image file, or a data file
Once the Mission Plan finishes running and comes to a stop, try to answer the following questions:
Which Spacecraft has the fastest top speed?
Which Spacecraft shows the least change in speed during its orbit?
Looking at the graph, about how long is Spacecraft2’s orbital period?
Adding Tanks and Thrusters
Let’s add something in to complicate the problem. Let’s assume that 8 hours into the scenario, Spacecraft1 speeds up 1 km/s in the direction it is traveling. How do we model this?
•Click on the “Control” button on the Navigation Bar to return to the Mission Sequence
•Double-click on Spacecraft1
•Under “Subsystems” click on “Tanks”
•Click “Create”
•Click “Edit Tank” to see the properties
We just added a tank to Spacecraft1. In the Tank editor, we can see the different properties you can edit.
•Change the Total Tank Volume to 0.25 m^3
•Change the Fuel Mass to 200 kg
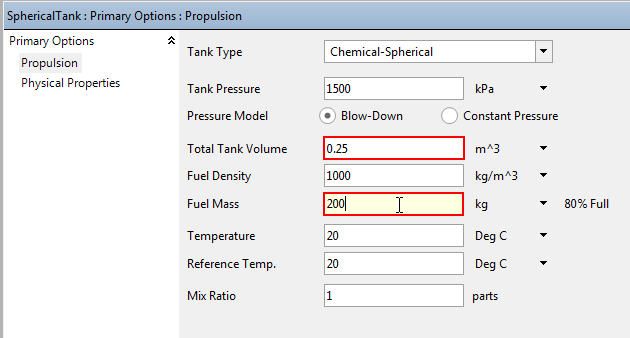
Spacecraft Tank Editor
•Click “Ok” to close the Tank editor
•Under “Subsystems” in the Spacecraft editor, click on “Thrusters”
•Click “Create”
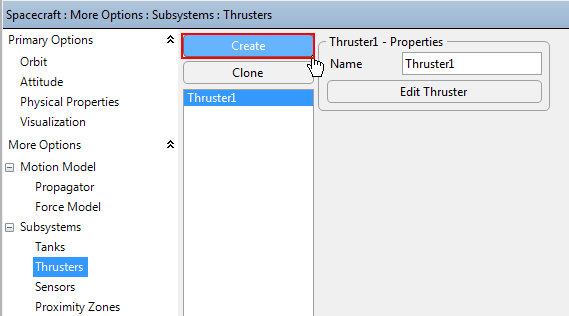
Spacecraft Thruster Editor
•Click “Edit Thruster” to see the properties
We just added a Thruster object to Spacecraft1. In the Thruster editor, we can see the various properties that can be changed. We will not make any modifications for this example.
•Click “Ok” to close the Thruster editor
•Click “Ok” to close the Spacecraft editor
Adding Impulsive Burns
In order to use an ImpulsiveBurn, you must create it as an object in the Object Browser. Once created, any Spacecraft can maneuver using that ImpulsiveBurn.
•Right-click on the Object Browser
oAdd → Spacecraft Related → Impulsive Burn
•Double-click on “ImpulsiveBurn1”
•Change the "Attitude System" to "VNB" (This is important so that the burn direction is correct)
•Leave the default burn magnitudes, which should be:
oVelocity: 1km/s
oNormal: 0km/s
oBinormal: 0km/s
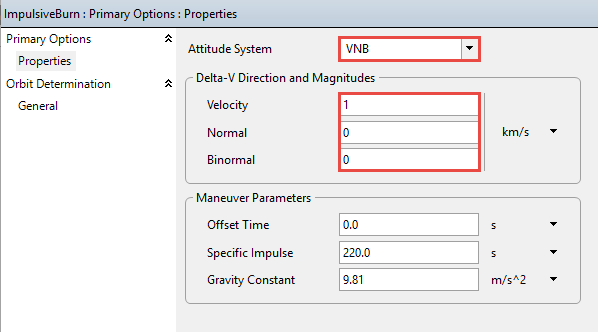
ImpulsiveBurn Editor
•Click “Ok” to close the editor
Using Impulsive Burns
We've stated that this burn occurs at about 8 hours into the mission. We need to edit our while loop to adjust for this.
•Double-click on the while loop in the Mission Sequence
•Click on the "TIMESPAN(2 days)" dropdown
•Change the "Enter a time span value" field currently set at "2" to "8"
•In the "Choose the time span units" dropdown, select hours
•Click “Ok”
This makes it so the Spacecraft will propagate normally, before the impulsive burn occurs. As soon as 8 hours has passed, the Mission Sequence will exit the loop, and we will perform the burn.
•After the while loop in the Mission Sequence, drag and drop “Maneuver” from the "Script Elements" section on the right hand side.
•Double-click on that line (Should be Line 5)
•Uncheck the box that says “Create Report?”
•Click “Ok”
Once line 5 executes, we still need the mission to continue. To do this, we need to put in a while loop for the remaining 40 hours of the mission.
•Drag and Drop “While…End” from the "Script Elements" section onto the bottom of the Mission Sequence
•Double-click on the loop
•Click on the "TIMESPAN(1 days)" dropdown
•Change the "Enter a time span value" field currently set at "1" to "40"
•In the "Choose the time span units" dropdown, select hours
•Click “Ok”
Inside the while loop, we want to do the same thing we were doing in the previous while loop. Instead of putting in a new FreeForm script editor and rewriting it, we can clone the “Step and Update” script we wrote.
•Right-click on “FreeForm: Step and Update”
•Click on “Clone Selected”
•Drag the newly cloned FreeForm script editor into the second while loop
Your Mission Sequence should now look like this:
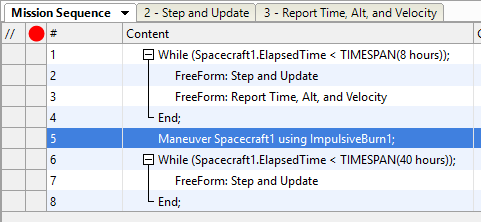
Mission Sequence
Now our mission is ready to run! This time, Spacecraft1 will change its orbit 8 hours into the mission.
•Click the Play button on the Navigation Bar
Now that we have successfully run our mission with the impulsive burn, try to answer these questions:
Look at the plot. How does Spacecraft1’s speed compare Pre-Burn to immediately Post-Burn?
What happened to Spacecraft1’s overall variance in velocity?
We hope that the rest of this guide is helpful in your understanding of orbital mechanics and spacecraft flight dynamics. Remember to utilize the help file if you have any questions about FreeFlyer! You may do this by pressing F1, or right clicking the element you have questions about and clicking "Go To Help File." If the help file couldn't quite answer your question, you may email techsupport@ai-solutions.com. Also, be sure to check out http://www.ai-solutions.com for internship and career opportunities!
See Also
•Previous Topic: Navigating FreeFlyer