In the final section of the Maneuvering tutorial, we discussed the math behind a plane change (or inclination change) maneuver. We discovered that we would need to execute a burn that was mostly normal to our velocity, but with a small component in the negative velocity direction (see the Plane Change Maneuver tutorial to review). We determined the following formulas for the Δv components:
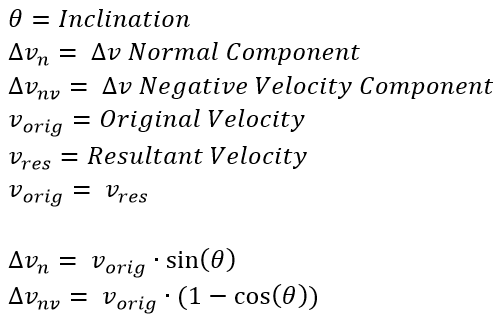
Where Δvn is the normal component and Δvnv is the negative velocity component. In the previous plane change example, we used
FreeFlyer to calculate the Δv components directly using these equations. This time, we will execute a similar mission plan, but use a Targeting loop to determine the Δv components (instead of the equations above). Then, we can compare the results that FreeFlyer achieves to our analytic calculations.
Use Targeting to Model an Inclination Change
Problem: We have a spacecraft in a circular, equatorial orbit with a SMA of 10000 km. How much Δv would we need to change the inclination to 35º without changing the shape of the orbit? |
•Create a new Mission Plan and save it as "TargetingInclinationChange.MissionPlan"
Adding a Spacecraft, ImpulsiveBurn, and Variable
•Create a new Spacecraft with the following Keplerian orbital elements:
oA: 10000 km
oE: 0
oI: 0 deg
oRAAN: 0 deg
oW: 0 deg
oTA: 0 deg
•Create a new ImpulsiveBurn object
•Open the ImpulsiveBurn editor
•Change the attitude system to "VNB"
•Click "Ok" to close the editor
•Create a new Variable object
•Open the Variable editor and rename it "initialVelocity"
•Click "Ok" to close the editor
Adding the ViewWindow
•Create a new ViewWindow object
•Open the ViewWindow editor
•Check "Spacecraft1" in the "Available Objects" section
•Check "Show Name"
•Change the history mode to "Unlimited"
•Go into "Viewpoints" on the left-hand side
•Change the reference frame to "Inertial"
•Click "Ok" to close the editor
Building the Mission Sequence
•Drag and drop a FreeForm script editor into the Mission Sequence
•Name this "Set up Console and Initial Conditions"
In this script, we will use the Console window to report the spacecraft's initial Keplerian orbital elements, and save the initial velocity. To do this, we double-click to open the FreeForm and write:
// Set up Console Console.DockMode = 3; Console.WordWrap = 1; Console.Dimension = 35; Console.BackColor = ColorTools.Black; Console.CurrentTextColor = ColorTools.Lime; Console.Show();
// Report initial spacecraft elements Report "Initial Spacecraft Elements: " to Console; Report " A: ", Spacecraft1.A to Console; Report " E: ", Spacecraft1.E to Console; Report " I: ", Spacecraft1.I to Console; Report " RAAN: ", Spacecraft1.RAAN to Console; Report " W: ", Spacecraft1.W to Console;
// Save the initial velocity (circular velocity for the current SMA) initialVelocity = Spacecraft1.VMag; |
We need to save the spacecraft in its initial state before executing the targeting loop.
•In the Mission Sequence, drag and drop a "Save" command after the FreeForm
•Double click the command to open the editor and change the "SaveName" placeholder to "initial state"
•Click "Ok" to close the editor
Now, we will create the targeting loop, which will vary the V and N components of ImpulsiveBurn1 to achieve a new spacecraft inclination of 35 degrees and the same initial velocity (meaning we will remain in a circular orbit of the same semi-major axis).
•In the Mission Sequence, drag and drop a "Target...End" script element after the "Save" command
•Double click the command to open the Targeting editor
•In the "Initial Setup" tab, select Spacecraft1 as the object to reset at the start of each iteration of the targeting loop
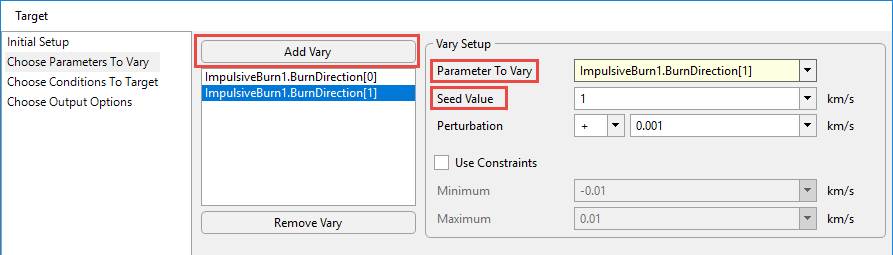
•Navigate to the "Choose Parameters to Vary" tab and click "Add Vary" to add to the list of components to vary in each iteration:
oIn the "Parameter to Vary" box, use the drop-down menu to select "Object Property/Method" (under "Choose which type of item to use"), "ImpulsiveBurn1" (under "Choose an object") and "BurnDirection" (under "Choose a property or method")
▪The index value in the last box should be 0, indicating that you are accessing the first element of the BurnDirection array; this represents the component in the V direction of the VNB frame
oSelect "Add Vary" again and perform the same process, but use enter an index value of "1" to represent the second component of the BurnDirection array, the N component in the VNB frame
▪For this one, in the "Seed Value" box, enter 1 km/s since we know that most of the Δv will be in the N direction
•Navigate to the "Choose Conditions to Target" tab and click "Add Achieve" to indicate the goals of our targeter:
oIn the "Parameter to Achieve" box, use the drop-down menu to select "Spacecraft1" (under "Choose an object") and "I" (under "Choose a property or method")
▪Set the "Goal Value" field to be 35 degrees (our desired new inclination)
▪Set the "Tolerance (+/-)" field to be 0.01 degrees
oSelect "Add Achieve" again, and in the "Parameter to Achieve" box, use the drop-down menu to select "Spacecraft1" (under "Choose an object") and "VMag" (under "Choose a property or method")
▪In the "Goal Value" field's drop-down menu, select "Object" under "Choose which type of item to use" and select "initialVelocity" under "Choose an object"
▪Set the "Tolerance (+/-)" field to be 0.001 km/s
| Note: look at the "Script" section in the Targeting editor to see how you could write the Targeting loop in FreeFlyer script |
•Click "Ok" to close the editor
•In the Mission Sequence, drag and drop a "Maneuver" command inside the Targeting loop
oDouble click the command to open the Maneuver editor
oUncheck the "Create Report?" box and click "Ok" to close the editor
We have now completed the targeting loop, but inside the loop we performed a Maneuver. We must restore the Spacecraft to its initial state before visualizing the initial orbit.
•In the Mission Sequence, drag and drop a "Restore" command after the Targeting loop
•Double click the command to open the editor and change the "SaveName" placeholder to "initial state"
•Click "Ok" to close the editor
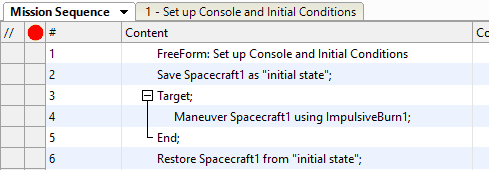
At this point, your Mission Sequence should look something like this:
Now, we want to visualize the initial orbit and the final orbit that results from our burn. To do this, we will propagate the Spacecraft for one day in its initial orbit, then maneuver using the ImpulsiveBurn determined by our targeter, then continue to propagate in the new orbit. We will also report the new Keplerian elements and the burn components to the Console window.
•In the Mission Sequence, drag and drop a "While...End" loop after the "Restore" command
•Inside the loop, drag and drop a "Step" command
•Also inside the loop, drag and drop an "Update" command
•After the "While...End" loop, drag and drop a "Maneuver" command
oDouble click the command to open the Maneuver editor
oUncheck the "Create Report?" box and click "Ok" to close the editor
•Drag and drop a FreeForm script editor into the Mission Sequence
•Name this "Report New Orbital Elements and Burn Components"
In this script, we will change the Spacecraft's color (to differentiate from the initial orbit) and report the post-burn Keplerian elements, as well as the burn components and total Δv magnitude. To do this, we write:
// Change the Spacecraft color Spacecraft1.Color = ColorTools.Yellow;
// Report the Keplerian elements after the burn Report "Post-burn Spacecraft Elements: " to Console; Report " A: ", Spacecraft1.A to Console; Report " E: ", Spacecraft1.E to Console; Report " I: ", Spacecraft1.I to Console; Report " RAAN: ", Spacecraft1.RAAN to Console; Report " W: ", Spacecraft1.W to Console;
// Report the burn attributes Report "Burn: " to Console; Report " V: ", ImpulsiveBurn1.BurnDirection[0] to Console; Report " N: ", ImpulsiveBurn1.BurnDirection[1] to Console; Report " B: ", ImpulsiveBurn1.BurnDirection[2] to Console; Report "Total delta-v: ", ImpulsiveBurn1.BurnDirection.Norm to Console; |
Now we just need to propagate the Spacecraft for a day in its new orbit:
•In the Mission Sequence, drag and drop a "While...End" loop
•Inside the loop, drag and drop a "Step" command
•Also inside the loop, drag and drop an "Update" command
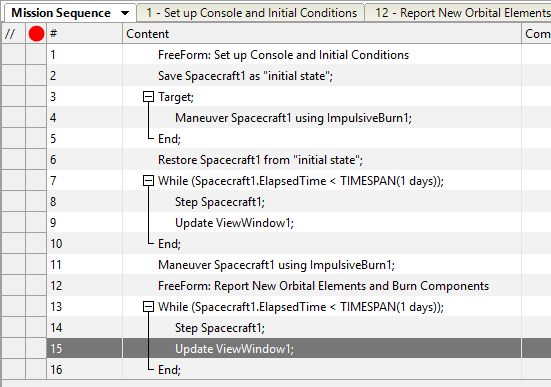
Your Mission Sequence should now look something like this:
Save and Run your Mission Plan, then try to answer these questions:
Try solving this problem by hand. How do your calculations compare to FreeFlyer's calculations?
What other "Achieves" could you have set in your Targeting loop? Try Achieving Spacecraft1.A = 10000 km (your initial SMA) and Spacecraft1.E = 0 (your initial eccentricity) instead of Achieving Spacecraft1.VMag = initialVelocity. Can you produce the same result?
If you were changing the inclination from any orbit other than an equatorial one, where in the orbit would you need to perform the burn? How would you modify your code to account for this additional constraint?
BONUS: try writing your Targeting loop in FreeFlyer script instead of using the drag-and-drop method. Recall that the Targeting editor displays a sample of what the FreeFlyer script should look like.