In the previous section covering Hohmann transfers, we stated that Hohmann transfers are typically the most efficient orbit transfers. However, this raises the question: When is it not?
The diagram below depicts a bi-elliptic transfer. In the bi-elliptic transfer, the first transfer is a highly eccentric orbit with an apoapsis higher than the target orbit radius. Once the spacecraft has reached apoapsis, it performs a burn raising its periapsis to the height of its target orbit. Finally, once it reaches periapsis, it performs an orbital insertion burn to put it into a circular orbit.
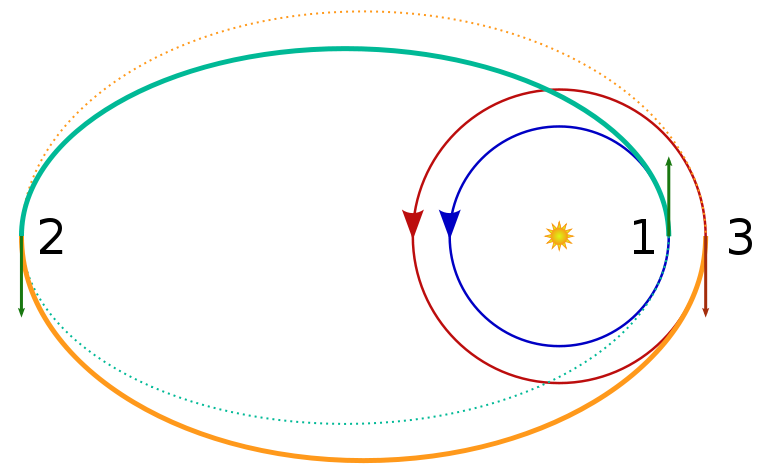
Bi-Elliptic Transfer
If you look at the graph below, you can see the relative efficiencies of a Hohmann transfer versus a bi-elliptic transfer. The graph below graphs the amount of Δv required to get to a target orbit using a bi-elliptic transfer. The x-axis shows the ratio of the target orbit to the parking orbit. The y-axis is an arbitrary value of Δv to show the relative efficiencies of the bi-elliptical transfer. The different lines indicate the Δv required if the intermediate orbit is x times bigger than the target orbit. If you'll notice, the black line is 1x, which is the same thing as a Hohmann transfer.
Another thing to note: At an orbit ratio of approximately 11.94, the Hohmann transfer represented by the black line, loses its spot as the most efficient transfer. However, not all the lines are below the black line at this point. This means that when the target orbit to parking orbit ratio is above 11.94, it may be more efficient to perform a bi-elliptic transfer. However, once it reaches a ratio of approximately 15.58, all bi-elliptic transfers are more efficient.
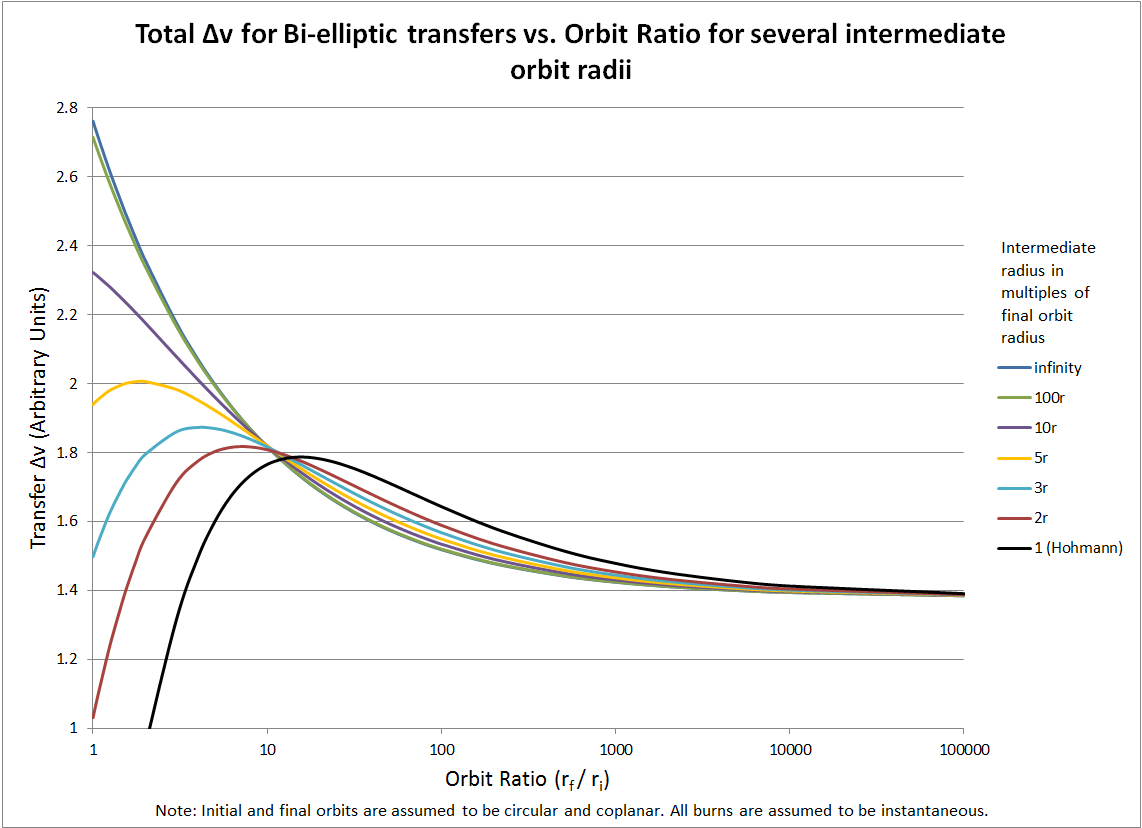
Bi-Elliptic Transfer Δv Requirements
The table below illustrates the most efficient transfer based on the orbit ratio:
Orbit Ratio |
Most Efficient |
Orbit Ratio < 11.94 |
Hohmann |
11.94 < Orbit Ratio < 15.58 |
Depends on size of Bi-Elliptic Transfer |
Orbit Ratio > 15.58 |
Bi-Elliptic |
Modeling the Bi-Elliptic Transfer
Problem: A Spacecraft object's parking orbit is at a radius of 7,000 km. The target orbit has a semi-major axis of 105,000 km. Model a bi-elliptic transfer with an intermediate transfer orbit that is 2x the semi-major axis of the target orbit. |
•Create a new Mission Plan and save it as "BiEllipticTransfer.MissionPlan"
Adding a Spacecraft
•Create a Spacecraft with the following Keplerian elements
oA: 7000 km
oE: 0
oI: 0 deg
oRAAN: 0 deg
oW: 0 deg
oTA: 0 deg
•In the Spacecraft object's force model, uncheck the "Moon" and "Sun" boxes. (This is to make sure no unwanted perturbations occur)
•Click "Ok" to close the Spacecraft editor
Adding ImpulsiveBurns
•Create an ImpulsiveBurn object through the Object Browser
•Double-click on "ImpulsiveBurn1"
•Change the attitude system to "VNB"
•Press "Ok" to close the editor
•Right-click "ImpulsiveBurn1" and clone it twice
•Rename the two clones "ImpulsiveBurn2" and "ImpulsiveBurn3"
•Create a ViewWindow through the Object Browser
•Double-click "ViewWindow1"
•Check "Spacecraft1" in the "Available Objects" list
•Check the "Show Name" box for Spacecraft1
•Change the history mode to "Unlimited" (This will allow for better visualization)
•Go to the "Viewpoints" section on the left-hand side
•On the default view, change the reference frame to "Inertial"
•Change the declination value to 90 deg
•Change the radius value to 700,000 km
•Press "Ok" to close the ViewWindow editor
Building the Mission Sequence
•Drag and drop a FreeForm script editor onto the Mission Sequence
•Double-click the FreeForm script editor
•Rename the script to "User Input"
In this section, we want the user to define the parking orbit, the target orbit, and the magnitude of the bi-elliptic transfer. Also, we need to make sure that the parking orbit the user has defined actually gets assigned to the Spacecraft. To do this, we write:
// User Input for the Bi-Elliptic Transfer Variable parkingSMA = 7000; Variable targetSMA = 105000;
// Magnitude of how much larger the Bi-Elliptic transfer should be in comparison to the target orbit Variable transferMagnitude = 2;
// Assigns the Parking SMA to the Spacecraft Spacecraft1.A = parkingSMA; |
Now, we need a FreeForm script editor to calculate all the maneuvers needed for the bi-elliptic transfer.
•In the Mission Sequence, drag and drop another FreeForm script editor after the "UserInput" FreeForm script editor
•Double-click the FreeFrom script
•Rename the FreeForm script editor to "Calculate Bi-Elliptic Transfer"
In this FreeForm, there are several calculations we need to do to solve the bi-elliptic transfer problem. Ultimately, this FreeForm script editor will calculate the Δv required for each of the maneuvers, then assign those values to each ImpulsiveBurn object. However, we will take this FreeForm step by step so it doesn't get too complicated. First, let's try and solve the Δv of the first maneuver. To do this, we will be using the Vis-Viva equation, just like we did in the Hohmann transfer section. We will need to calculate the SMA of the first transfer orbit, the speed at periapsis of that orbit, the speed of the parking orbit, and the difference between the two. To do this, we write:
// Calculations for Maneuver 1
// SMA of the first transfer orbit Variable transfSMA1 = (targetSMA * transferMagnitude + parkingSMA)/2;
// Speed at periapsis for the first transfer orbit Variable transfPeri1 = sqrt(Earth.Mu * ( (2/parkingSMA) - (1/transfSMA1) ) );
// Delta V for the first maneuver Variable dV1 = transfPeri1 - Spacecraft1.VMag; |
Next, we need to calculate the second maneuver. There are a few more things we need to calculate this time. We have the SMA of the first transfer orbit, but we still need the radius of the apoapsis of that first orbit. To calculate this, we write:
// Calculations for Maneuver 2
// Radius of Apoapsis of the first transfer orbit Apoapsis Variable radiusApog1 = transfSMA1 * 2 - parkingSMA; |
We have the radius of apoapsis of the first transfer orbit. Still, we need the SMA of the second transfer orbit. To calculate this, let's look at the diagram below:
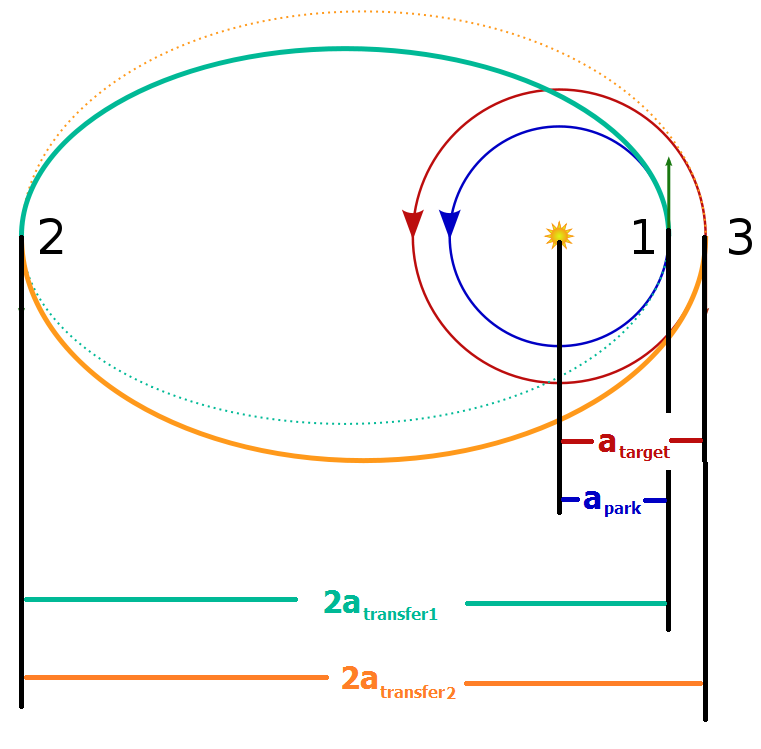
Bi-Elliptic SMA Diagram
Based on this diagram, we can derive a very simple equation to solve for second transfer orbit SMA:
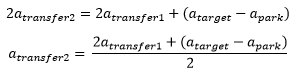
Now, we can write a statement calculating exactly this:
// SMA of the second transfer Orbit Variable transfSMA2 = (2 * transfSMA1 + (targetSMA - parkingSMA))/2; |
Next, we need to calculate the velocity of the Spacecraft at the apoapsis of the first transfer orbit, the velocity it needs to match the second transfer orbit, and the Δv. To calculate this, we write:
// Speed at apoapsis for the first transfer orbit Variable transfApog1 = sqrt(Earth.Mu * ( (2/radiusApog1) - (1/transfSMA1) ) );
// Speed at apoapsis for the second transfer orbit Variable transfApog2 = sqrt(Earth.Mu * ( (2/radiusApog1) - (1/transfSMA2) ) );
// Delta V for the second maneuver Variable dV2 = transfApog2 - transfApog1; |
Now that we have calculated the first two maneuvers, we need to calculate the third and final maneuver - the orbital insertion burn. To do this, we need to calculate the velocity of the Spacecraft at the periapsis of the second transfer orbit, the velocity it needs to be to match the target orbit, and the Δv. To calculate this, we write:
// Calculations for Maneuver 3
// Speed at periapsis for the second transfer orbit Variable transfPeri2 = sqrt(Earth.Mu * ( (2/targetSMA) - (1/transfSMA2) ) );
// Speed for the target circular orbit Variable vTargetorbit = sqrt( Earth.Mu * ( (2/targetSMA) - (1/targetSMA) ) );
// Delta V for the third Maneuver Variable dV3 = vTargetorbit - transfPeri2; |
At this point, we have calculated the values for all three maneuvers and we can assign these values to the ImpulsiveBurn objects. To do this, we write:
// Assigns Delta V values to each Maneuver ImpulsiveBurn1.BurnDirection[0] = dV1; ImpulsiveBurn2.BurnDirection[0] = dV2; ImpulsiveBurn3.BurnDirection[0] = dV3; |
Now, let's move onto the rest of the Mission Sequence.
•In the Mission Sequence, drag and drop a while loop after both FreeForm script editors
•Change the Argument inside the while loop to "(Spacecraft1.ElapsedTime < TIMESPAN(4 hours))"
•Inside the while loop, drag and drop a "Step" command
•Inside the while loop, drag and drop an "Update" command after the "Step" command
•Outside after the while loop, drag and drop three FreeForm script editors after the while loop
•Rename them "Perform Maneuver 1", "Perform Maneuver 2", and "Perform Maneuver 3"
Now, we will go into each of these scripts and have the Spacecraft perform the maneuvers.
To start, let's go into the "Perform Maneuver 1" Script. In this script, we will change the Spacecraft tail color, Maneuver the Spacecraft, then step the Spacecraft to its orbit apoapsis. To do this, we write:
// Changes the tail color for the first transfer orbit Spacecraft1.Color = ColorTools.Yellow;
Maneuver Spacecraft1 using ImpulsiveBurn1;
// Steps the spacecraft until its orbit apoapsis WhileStepping Spacecraft1 to (Spacecraft1.OrbitApoapsis); Update ViewWindow1; End; |
Now let's go into the second maneuver. Open the "Perform Maneuver 2" Script. In this script, we will do the same as before, but we will perform "ImpulsiveBurn2" instead and step the Spacecraft to its periapsis. To do this, we write:
// Changes the tail color for the second transfer orbit Spacecraft1.Color = ColorTools.Lime;
Maneuver Spacecraft1 using ImpulsiveBurn2;
// Steps the spacecraft to its periapsis WhileStepping Spacecraft1 to (Spacecraft1.OrbitPeriapsis); Update ViewWindow1; End; |
Lastly, let's go into the "Perform Maneuver 3" FreeForm script editor. In this script, we will change the tail color, perform the maneuver, and then report the values of each maneuver, as well as the total required Δv. To do this, we write:
// Changes the tail color for the target orbit Spacecraft1.Color = ColorTools.Cyan;
Maneuver Spacecraft1 using ImpulsiveBurn3;
// Calculates the total Delta V used for the Bi-Elliptical transfer Variable totalDV = dV1 + dV2 + abs(dV3);
// Reports each Maneuver value and the total amount of Delta V used Report dV1, dV2, dV3, totalDV; |
Note that when we calculated "totalDV", we had to use the absolute value of "dV3". This is because for our third maneuver, we need to turn the Spacecraft around and burn in the opposite direction of our velocity vector. Because of this, the value is negative and needs to be positive when calculating the total Δv.
Let's head back to the Mission Sequence to finish the Mission Plan.
•Below the "Perform Maneuver 3" FreeForm script editor, add a while loop
•For the while loop argument, change it so it says "(Spacecraft1.ElapsedTime < TIMESPAN(5 days))"
•Inside the while loop, add a "Step" command
•Inside the while loop, add an "Update" command after the "Step" command
Your Mission Sequence should look something like this:
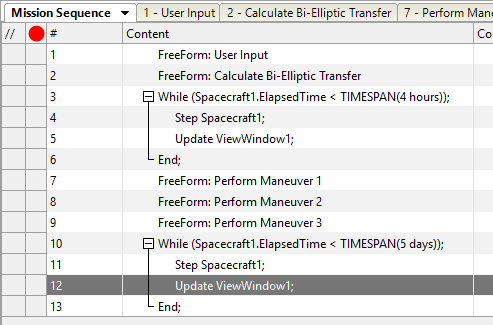
Mission Sequence Example
Save and Run your Mission Plan to see your results. After running this Mission Plan, answer the following questions:
How did FreeFlyer's calculations compare to your own calculations by hand?
How much Δv did each maneuver cost? How much total Δv was used?
Open the Hohmann transfer Mission Plan you just built. Run the mission with the same parking and target SMAs as this problem. How does the total Δv compare to the bi-elliptic's total Δv?
Go back to the Bi-Elliptic Transfer Mission Plan. In the user input, change the "transferMagnitude" to 5. Did the total amount of Δv increase or decrease?