FreeFlyer Extensions allow you to create custom FreeFlyer objects to be used alongside FreeFlyer's built-in objects to implement features that otherwise wouldn't be possible. Once the extension has been written, the extension must then be built and registered for use with FreeFlyer. Then, once the extension DLL has been successfully registered the extension object can then be used within FreeFlyer script.
Build and Register an Extension
Once you've finished writing your extension, making sure to include at minimum each of the key components identified in the Anatomy of a FreeFlyer Extension guide, the next step is to build the extension using Visual Studio. The build process creates a .NET assembly (.DLL) that FreeFlyer uses to implement the extension object within a Mission Plan. To build the extension, open your extension project in Visual Studio. Then, navigate to the Build menu in the file bar and select Build Solution. Visual Studio will provide information about the success of the build process, and once the build is successful the next step is to register the extension for use with FreeFlyer.
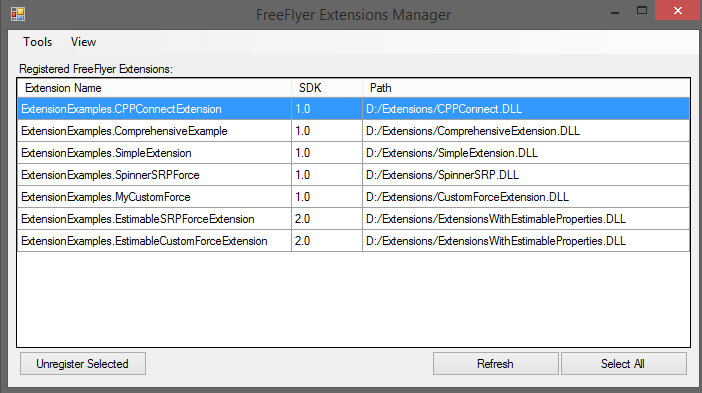
To register the extension, open the Extensions Manager. The Extensions Manager can be found in the Utilities folder located in the SDK installation directory or from the Start Menu. Once you've opened the Extensions Manager, navigate to the Tools menu in the file bar and select Register Extension. Navigate to the location of the extension DLL, select it, and press Open. If the extension is registered successfully it will appear in the list of registered FreeFlyer Extensions.
Note: If you move the extension DLL to a different location on your computer you must re-register the extension in that new location in order for FreeFlyer to recognize that it is registered properly.
Once the extension has been registered, FreeFlyer will automatically detect and load the extension when it is launched. You can identify what extensions have been loaded by FreeFlyer by examining the Extensions Log. This log file details FreeFlyer's success or failure in loading each registered extension, and if an extension fails to load properly the reason for that failure is captured in the log. The log is located in the FreeFlyer folder in a user's My Documents, and it can also be accessed through FreeFlyer itself via the Help menu in the file bar. Navigate to this menu and select "View Extensions Log" to view the contents of the log file.
Note: In the Build Events tab of the project properties, you can type the following line into the box labeled Post-build event command line to cause it to automatically register with the Extensions SDK on a successful build: "%Windir%\Microsoft.NET\Framework64\vX.X.XXXX\regasm" /codebase "$(TargetPath)"
Get/Set Methods
Every FreeFlyer Extension has four generic methods that are available when using the Extension in FreeFlyer script as follows.
•GetNumericProperty(String propertyName, Variable propertyValue) •SetNumericProperty(String propertyName, Variable propertyValue) •GetStringProperty(String propertyName, String propertyValue) •SetStringProperty(String propertyName, String propertyValue) |
Each method returns 1 for success and 0 for failure. These methods are provided for convenience. Their purpose is to provide a simple mechanism for setting and getting data to and from your Extension without the need to create custom interface methods. By default, these four methods do nothing when called. In order to make them do something, you need to override them in your Extension. See the following example for an idea of how these can be implemented.
|
Extension Script-Level Documentation
The C# language provides a feature called an attribute which allows you to associate a piece of information with a particular element of code. We have seen this when setting the GUID of an Extension, and you can see how the snippet of code below associates a GUID with the class SimpleExtension using the Guid attribute.
[Guid("85cefb4a-cf67-4b50-b66b-7f4d385bc0a6")] public class SimpleExtension : ExtensionBase, IFFObjectExtension, ISimpleExtension |
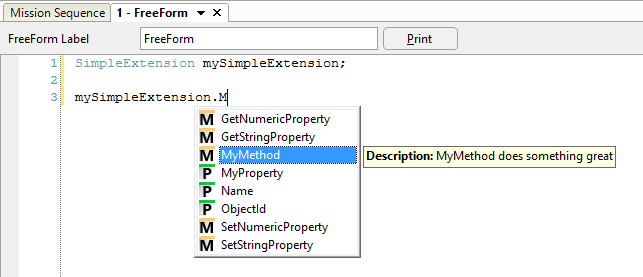
FreeFlyer utilizes the Description attribute to allow the author of an Extension to provide auto-complete descriptions when an extension object is used within FreeFlyer script. Using this attribute, it is possible to provide descriptions for your properties, methods, and method arguments. The Description attribute is part of the System.ComponentModel library. See the following example for further detail.
//Need to add the following using statement using System.ComponentModel; public interface ISimpleExtension { [Description("MyProperty does this and that")] double MyProperty { get; set; }
[Description("MyMethod does something great")] void MyMethod([Description("This is the input")] double[] input, [Description("This is the output")] double[] output); } |
Once the auto-complete descriptions have been provided through the Description attribute, they will appear in a FreeForm script editor as below.

Visible Extension Method Documentation via Attributes
Interfacing with External DLLs
C# provides a simple mechanism to call functions defined in an external DLL. You declare the method inside your C# class using the DllImport attribute as follows.
[DllImport("MyDllName.dll")] private static extern void MyMethodName(double [] a, double [] b); |
The DllImport attribute lets you specify the name of the DLL which exports the function you want to use. The method signature following the attribute should match the exported function in both method name and number and type of arguments.
Cleaning Up Resources
C# is a "garbage collected" language. This means that when you write code in C# you are free from the burden of having to explicitly release objects and memory. Instead, the .NET runtime periodically looks at which objects/memory are no longer being used and then releases the associated memory. One disadvantage to this approach is that the extension author has no knowledge as to when the objects created in the extension will be released. To deal with this and ensure that the objects created in an extension are cleaned up regularly, each Extension has a virtual CleanUp method (provided as part of ExtensionBase) which is always called when a Mission Plan stops running. If your particular extension requires you to explicitly perform cleanup activities when you're done using it, you should override this method as in the following example:
public class SimpleExtension : ExtensionBase, IFFObjectExtension, ISimpleExtension { public override void CleanUp() { // Do something here... } |
Using Extension Objects
After FreeFlyer has successfully loaded the extension you can then use the object created by the extension within FreeFlyer script as you would any other built-in object. This is best illustrated through an example. The script example below makes use of the SimpleExtension extension examined in the Anatomy of a FreeFlyer Extension guide:
Variable aVar; Array input[3]; Array output[2];
SimpleExtension mySimpleExtension;
aVar = mySimpleExtension.MyProperty;
input[0] = 1; input[1] = 2; input[2] = 3; mySimpleExtension.MyMethod(input,output);
Report aVar, output; |
As can be seen in this example, you create the object using the same syntax as you would to create a built-in object: you specify the object type (this is the overridden extended type name) followed by the name of the object. Then once the object is created you can use it in script just like any other built-in object, using the custom properties and methods that you've written. After running the script example above, the Variable "aVar" will have a value of 7.2 and each element of the Array "output" will have a value of 6.
Key Utilities
There are two important utility applications provided as part of the FreeFlyer Extensions SDK, the Extensions SDK itself used to register Extensions and the GUID Generator intended to generate unique GUID identifiers for each Extension.
Extensions SDK
The Extensions Manager can be found in the Utilities folder located in the SDK installation directory or in the Start Menu. Administrator privileges are required to use the Extensions Manager. This utility is provided to allow you to:
•View the FreeFlyer Extensions currently registered on your machine •Register new Extensions •Un-register currently registered Extensions |
To register a FreeFlyer Extension using the Extensions Manager, choose Register Extension from the Tools menu. Navigate to the location of the extension DLL, select the DLL, and press Open. If the extension is registered successfully it will appear in the list of registered Extensions. The Extensions Manager tracks all registration activities in an activity log. To show or hide this log choose Activity Log from the View menu in the file bar. Selecting this option will display the activity log as part of the Extensions Manager GUI.

The Extensions SDK Interface
Note: If you move the extension DLL to a different location on your computer you must re-register the extension in that new location in order for FreeFlyer to recognize that it is registered properly.
GUID Generator
The Globally Unique Identifier (GUID) Generator can be found in the Utilities folder located in the SDK installation directory or in the Start Menu. This utility allows you to generate a unique GUID to be used for your custom FreeFlyer Extensions.

The GUID Generator Interface
Deploying an Extension
Moving a FreeFlyer Extension you've built to a machine other than the one it was built on is a simple process:
1.Install the FreeFlyer Extensions SDK Redistributable on the secondary machine. The Redistributable SDK is available for download from the a.i. solutions FTP server or the a.i. solutions website. 2.After placing the DLL for your Extensions on the secondary machine in a location of your choice, register the extension using the FreeFlyer Extensions Manager. |
Note: Due to the Windows security architecture, the FreeFlyer Extension must reside on a local drive. You cannot register an Extension residing on a drive mapped to a remote machine.