The Integrator object is a type of Propagator which can be associated with a Spacecraft object. The Propagator Summary Table is a good reference for selecting an Integrator.
Configuring a Spacecraft to use an Integrator
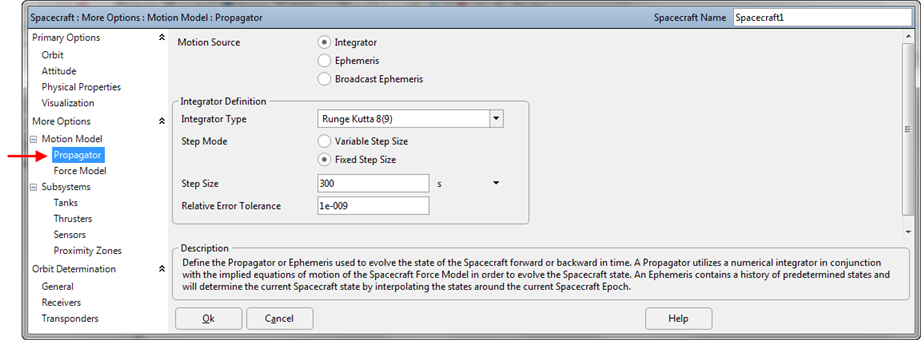
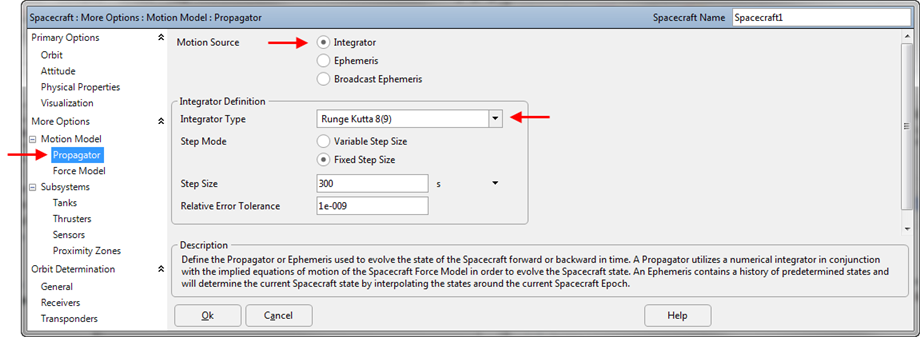
To configure a Spacecraft to use an Integrator, double-click the Spacecraft in the Object Browser, and then select the Propagator page from the menu on the left, as shown in the image below. Once the Propagator page has been selected, ensure that the Spacecraft is propagated using an Integrator using the "Motion Source" radio buttons. In the Mission tier of FreeFlyer, a default Spacecraft will be propagated using a Runge-Kutta 8(9) integrator with a 300 second fixed step size, and an error tolerance of 1E-9.
The Integrator and Force Model objects are accessible directly from the Object Browser by clicking the "+" next to the Spacecraft object. Double-clicking on these objects allows direct access to the Propagator and Force Model pages of the Spacecraft Object Editor, instead of going to the first page of the Editor.

You can also create an Integrator object via FreeFlyer script, or access the properties of an Integrator created in the Spacecraft object editor within a FreeForm script editor. To create an Integrator object via FreeFlyer script, use the syntax shown in the script below, which shows how to create a Spacecraft using a Runge-Kutta 8(9) propagator and a default Force Model:
RK89 Integrator1; Spacecraft Spacecraft1(Integrator1); |
Where:
•Integrator1 is a new object of type "RK89" which uses a default Force Model •Integrator1 can now also be accessed through Spacecraft1.Propagator or (Spacecraft1.Propagator AsType RK89) |
You can also load an existing ForceModel into a new Integrator object using the following syntax:
ForceModel ForceModel1; RK89 Integrator1(ForceModel1); Spacecraft Spacecraft1(Integrator1); |
Where:
•ForceModel1 is a new object of type "ForceModel" •Integrator1 is a new object of type "RK89" which uses ForceModel1 as its Force Model •ForceModel1 can now also be accessed through Integrator1.ForceModel or (Spacecraft1.Propagator AsType RK89).ForceModel •Integrator1 can now also be accessed through Spacecraft1.Propagator or (Spacecraft1.Propagator AsType RK89) |
When a Spacecraft is created without specifying a Propagator or Force Model, the default Propagator and Force Model are used. The default Propagator is the highest fidelity Propagator available with your license level. For example, with the Mission license, the default is the RK89 Propagator. To access the properties of a Spacecraft's integrator, you can use syntax such as:
Spacecraft Spacecraft1; (Spacecraft1.Propagator AsType RK89)./*RK89 Property*/; |
See the Type Casting page for more information on the TypeOf and AsType keywords.
Setting Integrator Properties
Once "Integrator" has been selected via the "Motion Source" radio buttons menu or set via script, you can specify the integrator type using the drop-down menu shown in the image below. For more information on which integrator to choose for your mission, go to the Spacecraft Propagators page.
To set the Integrator Type via FreeFlyer script, FreeFlyer allows you to override a Spacecraft's current propagator with a new one. The script below shows how to override the existing Propagator with a new object of type RK45 in script and then access one of its properties.
Spacecraft Spacecraft1; Spacecraft1.SetPropagatorType(TypeOf(RK45)); |
Step Mode
The Integrator step mode can be a key in determining FreeFlyer's performance. For long duration Mission Plans, "Variable Step Size" should be selected to allow FreeFlyer to take larger propagation steps based on the error tolerance, potentially improving the speed at which FreeFlyer operates. However, in this mode, data can not be reported at a constant interval; data will be generated whenever a step is taken. A fixed step size will ensure a fixed data output interval, with the possible side effect of slower operation speeds. To set the Integrator Step Mode, use the radio buttons shown in the image above, or set the mode via FreeFlyer script using this syntax:
(Spacecraft1.Propagator AsType RK89).FixedStep = 1; // Use Fixed Step Mode (Spacecraft1.Propagator AsType RK89).FixedStep = 0; // Use Variable Step Mode |
Fixed and Variable Step Modes are available for both forward and backward propagation.
Step Size
When the step mode discussed above is set to fixed, a step size must be set. A positive step size will propagate the Spacecraft forward through time, while a negative step size will propagate the Spacecraft into the past. To set the step size, use the numeric text entry field shown in the image above, or set the step size via FreeFlyer script using the syntax:
Spacecraft1.Propagator.StepSize = TIMESPAN(30 seconds); |
When you step the Spacecraft using the Step command, FreeFlyer will take one "propagation step" of the specified size, using the specified integrator, such as the Runge-Kutta 8(9). You will also specify a maximum relative error tolerance, which FreeFlyer will use to determine the maximum “integration step size” that can be taken internally in order for FreeFlyer to maintain the specified error tolerance. For simple propagators such as the Two Body, the error tolerance is not used, and therefore the “integrator step size” is equal to the “propagation step size”.
Note: As of FreeFlyer 7.3, the default timing precision mode is nanosecond precision mode. For older Mission Plans that have not yet been converted from millisecond precision mode, the syntax for working with times such as step sizes is different. A sample is shown below; see the timing precision mode page for more information.
Spacecraft1.Propagator.StepSize = 30; |
Relative Error Tolerance
For the Runge-Kutta integrators, the propagator performs two orders of integration (8th and 9th order for the RK89, for instance). It first estimates the error in the integration by finding the difference between the two orders, which is known as the absolute error. To get the relative error, which is limited by the relative error tolerance property of the propagator, FreeFlyer divides the absolute error by the change in all parameters (Spacecraft ICRF position and velocity vectors) being used for propagation. The propagator's ToleranceMode property dictates whether this error is calculated as a complete vector or as individual components. Other integrator types outside of the RK, such as the Cowell, do not utilize error tolerance in the same manner.
To set the Integrator relative error tolerance, use the numeric text entry field shown in the image above, or set the tolerance via FreeFlyer script using this syntax:
(Spacecraft1.Propagator AsType RK89).Tolerance = 1e-009; |
See Also
•Integrator Properties and Methods
•Solar System settings that affect Spacecraft Propagation